Table of Contents
Check and edit irrigation
Analyze water application
Description
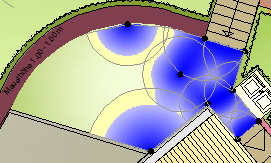
With this function you can check the distribution of the planned sprinklers and thereby determine under- or oversupply. For this purpose, all sprinklers in the current irrigation project are analyzed.
Application
- Activate the Irrigation Manager the irrigation project or a group.
- Switch to the tab Analyses.
- Choose the button [Add].
- You can use the default settings or make adjustments.
- Confirm the dialog Analysis of water application with
 (Take).
 - Push the dialog Irrigation Manager if necessary, to the side so that you can view the analysis in the drawing.
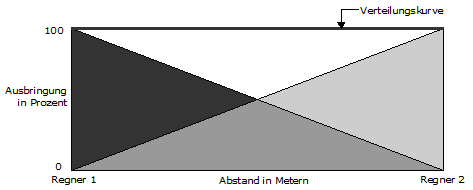
Water application is optional if the paint is 100% evenly distributed over the surface.
You can add more to optimize the distribution of the sprinklers Set sprinkler (please refer Create irrigation) and edit the sprinklers (see following chapter) that are already in the drawing. Then update the analysis.
You can also use the graphic analysis of the water output for your presentation to the customer.
If you only use the analysis for checking purposes, then switch the analysis to invisible if you agree to the distribution. To do this, click on the symbol  before analysis.
Functionality
The water output analysis (tensiogram) is based on the assumption that a single sprinkler on the sprinkler itself has a water output of 100%, which then continuously decreases with increasing distance.
With an arrangement from sprinkler to sprinkler, the addition of the sprinkler curves results in the highest uniformity in watering.
The memory requirement increases the more analyzes are created in the drawing and the finer an analysis is. For more information, see Tabs > Analysis.
Edit sprinkler
Description
In order to optimize the distribution of the sprinklers, you can set additional sprinklers and change sprinklers in the drawing.
Application
- Close the dialog Irrigation Manager.
- Click on a sprinkler to be edited.
- Click on a blue one Handleto change the angle, throw, direction and position of the sprinkler.
- Move the mouse pointer until the desired setting is visible and click again.
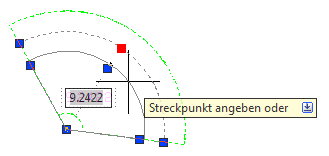
If the radius is edited, two green arcs appear at the mouse pointer. These show the minimum and maximum radius. You can also enter a value for the radius here.
- The changes are made in Irrigation Manager updated.
If a water application analysis is already available, you can do this using the button [To update] recalculate.
Recalculate the sprinkler
The function can be activated via the menu Extras> Recalculate the sprinkler be called.
Specifying new values for Pressure sprinkler and Pressure nozzle the automatically determined sprinklers are recalculated and, if necessary, other sprinklers are used.
Two things are also checked:
- Are there any changes in the material specifications of the presets?
⇒ If so, the sprinklers are updated and the new material specifications are used.
- Are the sprinklers one Valve circuit suitable for the combination?
⇒ If not, the sprinkler will be replaced by a suitable sprinkler if possible.
Enter heights
The function can be activated via the menu Tools> Enter heights be called.
Since the height difference between the sprinkler and the water source influences the operating pressure, the height difference can be entered here. Once you have the value with [OK] confirm, the entered value will be passed on to all subordinate sprinklers.
This has the advantage that the value for the height difference to the water source only needs to be entered once, for example if several sprinklers are recorded under one valve circuit and they all have the same height difference to the water source.
The height difference to the water source is only taken into account for sprinklers.
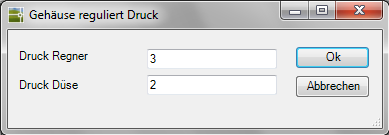
Housing regulates pressure
The function can be activated via the menu Extras> Housing regulates pressure be called.
This option is specific to the Sprinkler available (see Create irrigation > Detect sprinklers automatically). This function ensures that the pressure of the sprinklers is not greater than the entered value, regardless of the operating and flow pressure.
As soon as the dialogue with [OK] is confirmed, the entered values are passed on to all subordinate sprinklers. This has the advantage that the values for the pressure only have to be entered once, for example if several sprinklers are recorded under one valve circuit and all are to be assigned the same pressure.
Inheriting properties
The function can be activated via the menu Tools> Inherit Properties be called.
Properties such as labeling and graphics are automatically inherited by all subordinate objects when they are created. This does not apply to objects to which their own properties have been assigned.
With this function you restore the original status and thus the automatic inheritance.
The manual settings of the individual objects are overwritten.
Cruising hoses
The function can be activated via the menu Tools> Crossing Hoses be called.
During the planning it can happen that hoses cross.
To make it clear which hose leads over the other, the intersections are marked with a hose overlay symbol.
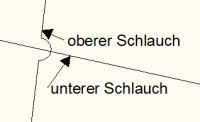
The width of this symbol can be changed in the properties (see Tabs) can be adapted by the irrigation object.
If no symbol is to be displayed, set the value to 0.
You can also use the Edit hose sequence (see following chapter).
Edit hose sequence
The function can be activated via the menu Tools> Edit hose sequence be called.
With this option you can subsequently set which of the intersecting hoses leads over the other hose.
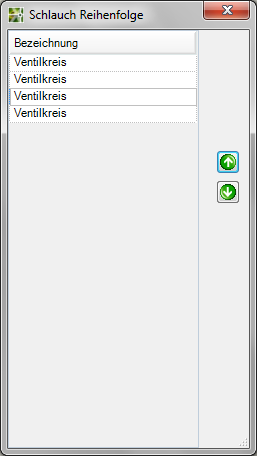
All hoses used are displayed in the list.
You can change the order of the hoses by highlighting a hose and moving it up or down with the arrow keys.
The hose overlay symbols are adjusted automatically.