Table of Contents
Create irrigation
Detect sprinklers automatically
Description
Place automatically detected sprinklers in the area. Using water pressure (see Tabs > Technical data), radius and throw, the program can determine the right model with the right nozzle from the material catalog. After calling up the function, you will be asked to select the position of the sprinklers in the drawing.
Application
The function can be activated via the menu Irrigation> round sprinkler> determine round sprinkler automatically or the symbol  be called.
- In the drawing, enter the position (Focus) for the sprinkler.
- Drag the Radius and select the starting point of the sector.
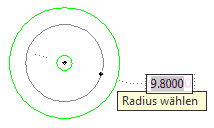
Two green circles appear on the mouse pointer. These show the minimum and maximum radius.
If you enter a value for the radius, the result is Starting point of the sector Automatically from the position of the mouse pointer. - Drag the Shop and click the end point of the sector.
For one Full circle enter the value 360 .
- Repeat the first steps for additional sprinklers.
- Complete the entry with Enter-Button.
- The sprinklers created are automatically saved in the Irrigation Manager without assignment
 listed.
Put specific sprinkler
Description
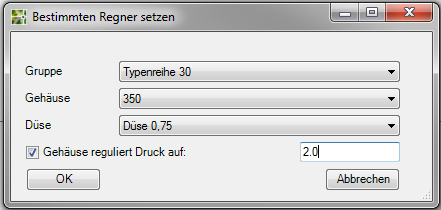
With this function, a specific sprinkler can be selected from the imported material catalogs and placed in the area. After calling up the function, you will be asked to select the sprinkler in the following dialog.
Application
The function can be activated via the menu Irrigation> round sprinkler> set certain sprinklers or the symbol  be called.
- In the dialog above, select the one you want Group, Housing and jet .
- In the drawing, enter the position (Focus) for the sprinkler.
- Rotate the object and click if you want Orientation is reached.
- Repeat steps 2 and 3 for additional sprinklers.
- Complete the entry with Enter-Button.
- The sprinklers created are automatically saved in the Irrigation Manager without assignment listed.
Set certain rectangular sprinklers
Description
With this function, a rectangular sprinkler can be selected from the imported material catalogs (e.g. Gardena or Hunter) and placed in the area. After calling up the function, you will be asked to select the sprinkler in the following dialog.
Application
The function can be activated via the menu Irrigation> set rectangular sprinkler or the symbol  be called.
- In the dialog above, select the one you want Group, Housing and jet .
- In the drawing, enter the Position for the sprinkler.
- Rotate the object and click if you want Orientation is reached.
- Repeat steps 2 and 3 for additional sprinklers.
- Complete the entry with Enter-Button.
- The sprinklers created are automatically saved in the Irrigation Manager without assignment listed.
Draw the drip pipe
Description
You use the drip pipe function to plan the irrigation of small or irregular areas or of hedges and planters in order to achieve even and slow moisture penetration in the root zone. You create a line that is then inserted in the Irrigation Manager Materials are assigned.
Application
The function can be activated via the menu Irrigation> Drip Pipes> Draw Drip Pipe or the symbol  be called.
- In the drawing, indicate the starting point for the line.
- Click further points to show the course of the line in the drawing.
- Click the end point of the line.
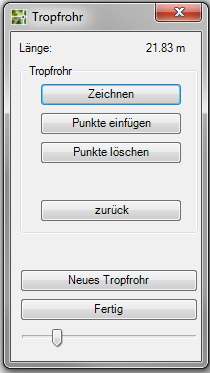
- Choose the button [Finished]to finish creating the drip tube.
- The drip tube is automatically in the Irrigation Manager without assignment listed.
- Assign the object Drip pipe another material too. Read more about this under Tabs > Technical data. Enter the values for distance and Flow
| feature | Description |
|---|---|
| To draw | Draws a line by specifying points and thus shows the course of the line. |
| Insert points | Inserts points between existing points. To do this, first select the predecessor (point in front of the point to be inserted, in the direction of the drawing) and then the new points. |
| Delete points | Deletes the selected point. |
| back | Resets the last step in each case. |
| New drip tube | The drawing of the current line is ended (with save) and a new line is started. |
| Ready | Finishes drawing the current line, closes the dialog Drip pipe and shows the dialogue Irrigation Manager at. New objects are in the group without assignment . |
Drip pipes are not automatically added to the valve circuit. Choose the function [Add] when creating the valve circuit. For more information, see Create connections > Draw the valve circuit.
Draw the drip tube surface
Description
You use the drip tube area function to plan the irrigation of small or irregular areas in order to achieve even and slow moisture penetration in the root zone. You create a surface that is then used in Irrigation Manager Materials are assigned.
Application
The function can be activated via the menu Sprinkling> Draw drip tubes in area> Drip tube area or the symbol  be called.
- In the drawing, indicate the starting point for the surface.
- Click at least two more points to create a surface.
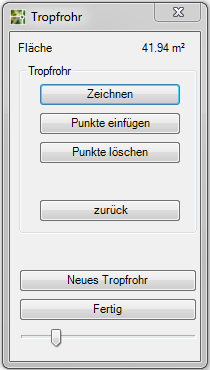
- When you want to finish creating the surface, choose the button [Finished].
- The drip tube surface is automatically in the Irrigation Manager without assignment listed.
- Assign the objects Drip tube surface another material too. Read more about this under Tabs > Technical data. Enter values for the distance, Flow andLaying density
The length of the drip pipe is calculated based on the installation density.
| feature | Description |
|---|---|
| To draw | Draws an area by specifying points and thus represents the area that is equipped with drip pipes. |
| Insert points | Inserts points between existing points. To do this, first select the predecessor (point in front of the point to be inserted, in the direction of the drawing) and then the new points. |
| Delete points | Deletes the selected point. |
| back | Resets the last step in each case. |
| New drip tube | The drawing of the current line is ended (with save) and a new line is started. |
| Ready | Finishes drawing the current line, closes the dialog Drip pipe and shows the dialogue Irrigation Manager at. New objects are in the group without assignment . |
Drip pipes are not automatically added to the valve circuit. Choose the function [Add] when creating the valve circuit. For more information, see Create connections > Draw the valve circuit.