Table of Contents
Mass tree
Description
In the upper part of the Object Manager - below the tools - the objects you have derived appear in the mass tree. Before you create data, only the group is in the tree All (yellow folder symbol). Further groups can be created by the processor. You can use any number of hierarchies here. Once created, mass trees can be saved and later imported into new drawings (see the following chapter Administer). The objects that you derive from the drawing are then sorted below the groups.
Groups are the main structure objects in the mass tree, the properties of which can be transferred to the subordinate groups and objects. Groups can be used to create mass tree structures so that the individual objects can be stored clearly.
Im Object manager you can manage and organize (create, delete, etc.) groups in different ways (menu, keyboard, mouse), e.g. by touching and moving them (with the left mouse button pressed, known as the drag & drop function from Windows Explorer ).
Features
The function New group to create a new group can be called via the toolbox or directly in the mass tree via the right mouse button.
The editing options correspond roughly to those known from other Windows applications and can be applied to groups and objects.
The Windows clipboard is not used as temporary memory, but an internal memory in the program. This means that im Object manager cut objects cannot be pasted in other programs.
If groups are edited, the functions always relate to the content. If you delete a group, for example, all objects contained in it are also deleted.
All functions of the object manager can be found here:
Administer
Im Object manager You can save created mass trees either as a pure mass tree structure or as a mass tree with objects in a directory or in a library in the Quick manager export. This allows you to import and use the exported mass trees quickly and easily in other drawings or on other computers. All properties defined in the info dialog (e.g. Schedule and Label) saved. With the help of this functionality, the work becomes very effective, since standards can be defined and there is no need to re-create mass trees. A thematic mass tree structure or a mass tree structure adapted for different output scales is useful.
Export mass tree
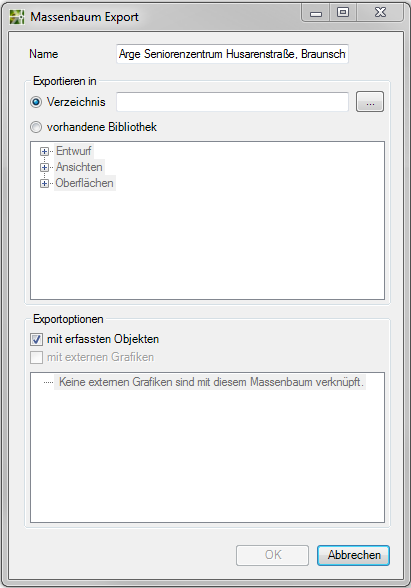
The function Export mass tree enables the export of the mass tree structure with or without captured objects.
Application
- In the Object Manager, mark the point from which the mass tree should be exported.
- Call the function with the right mouse button Data exchange> Export mass tree .
- In the dialog you can make various settings for the export. The individual setting options are explained below.
- With [OK] the mass tree is exported.
Settings for export
| Name | The name is automatically assigned based on the group in the mass tree. You can also enter a name manually. |
| Export to | Directory: Enter a directory into which the mass tree is to be exported. To do this, click the button [...]. |
| Export to | existing library: Select im Quick manager Under Design, View or Surfaces the desired storage location to which the mass tree is to be exported. Will the mass trees in the Quick manager then you can simply drag and drop them into other drawings. |
| Export options | Choose whether in the mass tree detected objects and used external graphics (e.g. own symbol lines or blocks) should be exported as well. The external graphics used in the mass tree are sorted according to their type and listed in the lower window. |
Store the export files in a central location so that all editors can use them.
Import mass tree
The function Import mass tree enables the import of the pure mass tree structure.
Application
- In the left window, mark the point where the mass tree should be inserted.
- Call the function with the right mouse button Data exchange> Import mass tree .
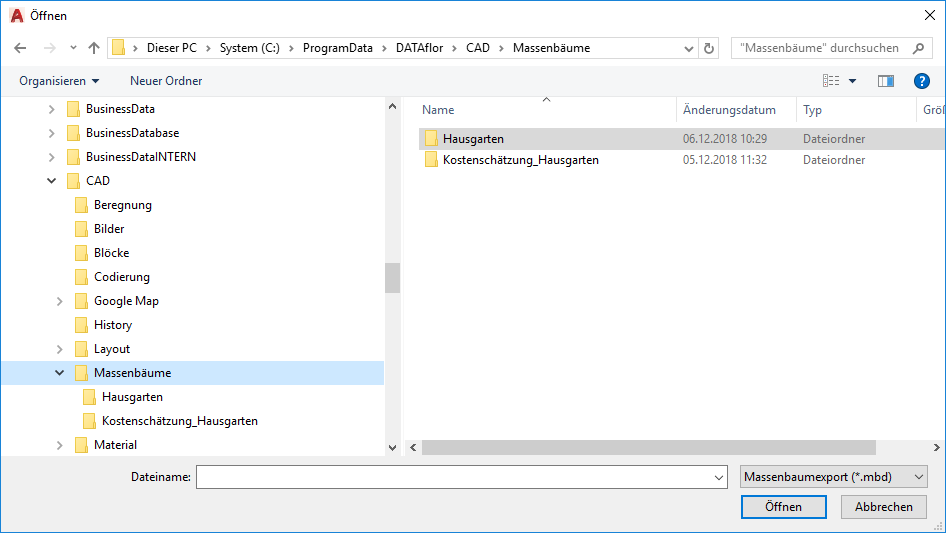
- Select the one to import mbd-File.
- The mass tree structure is inserted below the marking.
Import mass tree with objects
The function Import mass tree with objects enables the import of the complete mass tree including the exported objects.
Application
- In the left window, mark the point from which the mass tree should be inserted.
- Call the function with the right mouse button Data exchange> Import mass tree with objects .
- Select the one to import mbdFile.
- Specify the insertion point for the objects. Will this with the EnterButton, the objects are inserted as in the original.
- The mass tree is inserted with the objects below the marking.
Note that importing very large mass trees can take a long time. Therefore, check the use of the option in advance Do not sort graphics order under Options  > General tab.
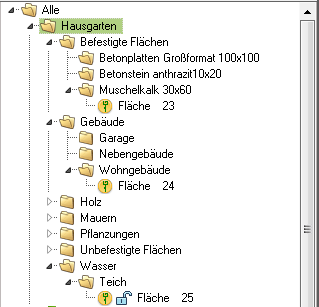
Examples of mass trees
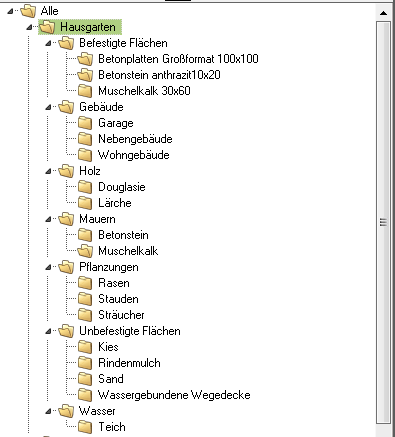
To show the universal usability of the object manager, two sample mass trees are included in the scope of delivery.
The mass trees include labels, graphics and documentation (see Object manager) assigned. By recording objects or contours in the Object Manager, the basis for planning can be created very easily. The mass tree Home garden is very suitable for the implementation of simple and smaller planning projects. For a cost calculation, choose the mass tree Cost estimate.
To use one of these mass trees, go to the top entry in the Object Manager All. Then select with the right mouse button: Data exchange> Import mass tree and select in the user directory of DATAflor CAD the desired mdbFile.
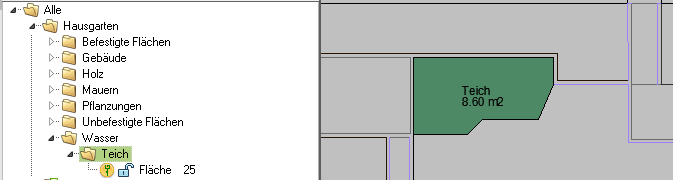
In the second step, the drawing objects are recorded and stored in the relevant groups. As soon as the objects are in the group, the object takes on the defined properties.
Excel
A summary or the details of the cost and area composition can be generated in the object manager. To do this, select with the right mouse button Data exchange> Excel.
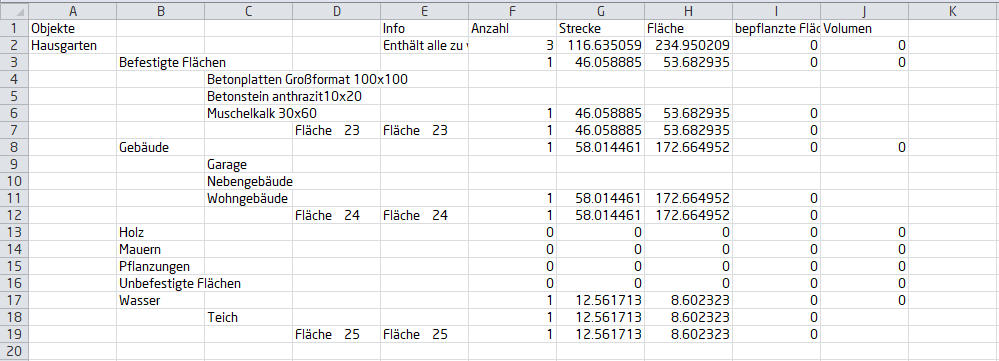
The compilation in the Excel file depends on how you opened the tree.
If you still have additional Formulas & Lists define (e.g. area x price per square meter), you will also receive a priced cost overview or you can use the Graphic cost estimation.