Table of Contents
Formulas & Lists
Applying formulas
Formulas are like that Object manager, a universal tool. The results can be, for example, cost calculations (area x variable costs per square meter = result in EUR) or evaluations (area x variable evaluation in points = result total number of points).
Formulas created are saved across the program and are therefore immediately available in all other drawings. The application, selection and administration of the formulas takes place in the dialog Formulas & Lists.
Assign formulas
- About the dialogue Formulas & Lists click in the Info dialog on the button
 Formulas.

In the folder DATAflor you will find a selection of sample formulas. If you are in the previous version of DATAflor CAD have already created their own formulas, these are automatically imported the first time they are called up. You can find these formulas below Import.
- A formula can now be selected from the individual folders, which can then be [OK] in the Mass tree is taken over.
- If variables are still stored in the formula, they will be queried when you insert them. The variable is colored for clarity.

- The same applies to references to lists in which an entry is selected and with [OK] can be confirmed.


will be one Group assigned a formula, that formula is added for each child object.
An Bearbeitung However, the formula can only at the assigned group level respectively.
Frequently used formulas can be saved as Favorites be marked.
Create your own formulas
To create a new formula, the following functions are available in the toolbox (and also via the right mouse button):
| Create new formula | |
| Create a new folder | |
| Copy selected formula | |
| Delete selected formula |
In the tree of the formula library you can create the formulas in their own folder structure. The formulas can be moved to the desired position using drag & drop. Once you have added a formula, in the right pane you can define the properties of the formula:
- Give your formula a unique one Namur.

- in The Field Formula the definition follows the formula. For example, becomes an object property Area needed is with the button [>] and selection Object Property> Area the value inserted into the formula.

Further entries can now be +, -, *, / and numbers as arithmetic parameters, e.g 2.5.
Working with is more suitable variableswho are also with [>] be inserted. The variable can be used with [Costs] be designated. This has the advantage that each time the formula is used, a cost value that is individually applicable to the object can be specified.
In addition, also on a List can be accessed, e.g [!Conversion weights m3/t!] or you refer to another Formula, which is then queried when using the formula.
- Choose one from the list unity off or use one inscription unit.
For example, the labeling unit serves as a unit in the legend and is only used if for the unity the value save is taken.
- In the area Rounding you can choose if you save rounding, a rounding of Result of the formula or a rounding of all values want in the calculation. Then select the number of digits from the list.
- The Title can be used as a column heading in the legend (e.g. costs). This can be helpful, for example, if you use several different formulas that all calculate costs, but the calculated values should only be displayed in one column in the legend.
- Under Label you can predefine a text to be used in the object label. Again, you have the button [>] the possibility of those used in the formula object property, variables or Result insert.

To use this formula as an annotation attribute, select the generated formula in the object annotation under Formulas the end. Further information can be found in the chapter: Special features of the labeling.
- In the area Info additional information about the formula can be stored.
- Save the created formula or assign it with the button OK .


change formulas
To change formulas that have already been defined, mark the corresponding entry in the tree on the left. The right side shows the details, which can be easily edited. Processing ends with Save or OK.
Changes only affect newly assigned formulas. Already in Object manager The formulas used are not overwritten by the new property.
Edit assigned formula
If you want to change a variable or the selection of a list item after adding the formula, click in the Info dialog on ![]() Edit formulas.
Edit formulas.

In the mass tree, select the individual object or group/item. About the arrow > open the entries for the variables and lists in the formula dialog. Enter the new value for the variable here or select the new entry from the list.
Once created, formulas can also be deleted and revised. The revision only refers to a new use of the formula.
Drawings in which the formula was applied in the previous state are not changed.
Lists
Lists are used in the formula library as a knowledge database and for storing frequently required values.

In the folder DATAflor you will find a selection of sample lists. If you are in the previous version of DATAflor CAD have already created their own lists, these are automatically imported the first time they are called up. You can find these formulas below Import.
Frequently used lists can be saved as Favorites be marked.
To create a new list, the following functions are available in the toolbox (and also via the right mouse button):
| Create a new list | |
| Create a new folder | |
| Copy selected list | |
| Delete selected list |
Like the formulas, the lists can also be created in their own folder structure. Use an appropriate name for the list here. The lists can be moved to the desired position using drag & drop.
Once you have added a list, in the right pane you can define the properties of the list:
- In the table, enter one for each Namur and factor for the entry.
- Confirm the entry with the Tabkey to move to the next field or line.
- Save the created list or assign it with the button OK .
In addition, you can already existing Import lists.

For this purpose, the file must be in a column-based format. After selecting the file via [...] you can in the window Separator and the columns for identifier and Value define.
With OK import the list.

Predefined formulas
In addition to the properties that are derived from the object when it is acquired - as a rule Quantity, Route, Area and Volume - you can add your own as well as predefined formulas.
About Add formulas (plus symbol bottom left) these formulas (area from distance, volume from distance, volume from area) are available:

An assignment of this automated formula directly to hierarchy objects (e.g. positions) is also possible here.
Even if these formulas are assigned at group/item level, the property is created for the object. The variable can be adjusted for all objects at the same time on the upper level or for each individual object. The value at the group/item level remains 0.
If there is more than one property with the corresponding unit of measure, you can select which of the two quantities is to be transferred for the object. If the box is unchecked, no transfer takes place.
Area from route
After the selection you will be asked for the Widthwhich can also be changed later.
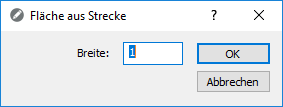
The Attribute Area from route is now listed with the derived area and taken over as a quantity for the item. A documentation with the REB formula 91 (distance x width) is carried out in the quantity verification.

To subsequently change the width, the attribute Area from route opened via the arrow. The value can then be Width to change. Other formulas can be used as long as the unit of the formula is also m².
Volume from distance
After the selection you will be asked for the Width and the Layer thicknesswhich can also be changed later.
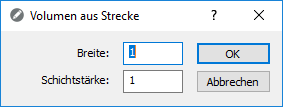
The Attribute Volume from distance is now listed with the derived volume and taken over as the quantity for the item. A documentation with the REB Formula 04 (cuboid) is carried out in the proof of quantities.

The attribute is used to subsequently change the width and layer thickness Volume from distance opened via the arrow. The values can then be Width and Size to change. Furthermore, other formulas can also be used, provided that the unit of the formula is also m³.
Volume from area
After the selection you will be asked for the Layer thicknesswhich can also be changed later.
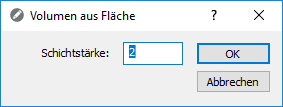
The Attribute Volume from area is now listed with the derived volume and taken over as the quantity for the item. A documentation with the REB formula 04 (cuboid) or with formula 01 (prism) takes place in the proof of quantity.

The attribute is used to subsequently change the layer thickness Volume from area opened via the arrow. The value can then be Size to change. Furthermore, other formulas can also be used, provided that the unit of the formula is also m³.
Other position units
With the help of formulas, the quantity for each item can be determined, regardless of which unit is present. For these cases, a formula must be created that has the item unit as its unit. To do this, select the entry using the plus symbol at the bottom left Formula.

Creating and managing formulas is explained in the chapter above: Assign formula
For some position units are from DATAflor already predefined formulas (e.g. weight from areas in tons / unit: t).

DATAflor CAD uses a conversion table (file UNITS.TBL). This simplifies the handling of units enormously, as different spellings and conversions are preset. Is as a position unit, for example M3 or cm3 entered, used DATAflor CAD automatically the m³ Quantity. If a unit is not recognized, the conversion table with a Editor can be added or changed.
Example of volume
