Table of Contents
Tips and Tricks
The DATAflor Hotline are often asked questions about how to solve certain tasks in the Google SketchUp area. The answers to these frequently asked questions are documented in this chapter.
SketchUp with blank screen
Question: Why does SketchUp keep my screen blank? The exported objects DATAflor CAD are not displayed in SketchUp and it cannot be drawn.
Answer: The reason for this is the display setting of the monitor. So change the color depth as follows: Windows Start> Control Panel> Personalization> Display> Change Color Depth to "Medium (16Bit)"> Apply.
3D-Objekte produce
With the push / pull function, you can push and pull surface elements to add or remove volume from 3D models. This function can be applied to any type of surface, including circular, rectangular, and abstract surfaces. The push / pull function is activated in the modification toolbar or in the “Tools” menu.
Creating volumes
The “push / pull” function increases or decreases the volume of geometric shapes in your models. To push or drag surfaces:
- Choose the function Push pull
 .
.
The cursor turns into a 3-D rectangle with an up arrow.
- Click the area that you want to enlarge or reduce.
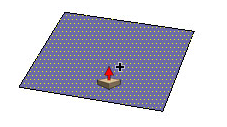
- Move the cursor to add (or decrease) volume.

Note: Press the Esc key at any time to start the process again.
- Click the mouse when the volume is the size you want.
You can also hold down the mouse button and drag and release the mouse button to create a volume.
If you create a single face on the ground plane (the red / green plane) as shown in a previous step, SketchUp assumes that that face will be used as the bottom of a structure. The front of the surface (gray) faces down and the back (purple) faces up. When you use the push / pull function on that single face (in the blue direction), you are actually pulling up from the back of the face. The positive blue direction temporarily behaves as 'below the ground' or negative blue direction. If you double-click after performing the initial push / pull operation, a positive setting will be applied. The element reverts to the single face you started with.
The content of this page comes from SketchUp User Guide. Further information on this topic can be found there in the area Push / Pull function: Volume.
Assign materials
The fill function allows you to assign materials and colors to the elements in your model. You can use it to fill individual elements or a series of interconnected surfaces, or to replace one material with another in the entire model. The filling function is shown in the basic toolbar (Microsoft Windows), in the function palette (Mac OS X) or activated in the "Tools" menu by selecting "Paint Bucket".
Application of materials and color
Be sure to use the Shaded or Shaded With Textures display style so that you can see materials as they are applied to your model. To Apply Materials (Microsoft Windows):
- Choose the Filling function out. The cursor turns into a paint bucket and the Materials Browser is activated. The Materials Browser contains libraries of materials that you can apply to surfaces in your model.
- Select a material library using the drop-down list in the Material Browser. SketchUp includes several standard material libraries, including landscape and roofing materials, and transparent materials.
- Select a material from the material library.
- Click on the areas to be painted. The material is then assigned to the surface.
The content of this page comes from SketchUp User Guide. Further information on this topic can be found there in the area Filling function.
Use sketch style
A style is a predefined collection of display settings that can be applied to a model and the drawing area. Styles give a particular look to a model and the drawing area. For example, a style could consist of the blue sky color, the brown floor color, the standard gray color for the front, and the standard purple color for the back.
One of the building blocks of a style is the edge style (or the appearance of edges) that is applied to your model. One particular type of edge style is the sketchy edge. This is an edge that looks hand drawn.
Applying styles
You can choose one of the many predefined styles from the style browser and apply it to your model. Each predefined style is a collection of specific settings that can be applied to your model and drawing area. To select and apply a predefined style:
- Select Window> Styles out. The style browser is displayed.
- Click the Select tab.
- Click the Style Book drop-down list.
- Select a collection under Style or styles under "In the model". All of the predefined styles in the collection are displayed as thumbnails.
- Click on one of the predefined styles. The style is then applied to your model and drawing area.
The content of this page comes from SketchUp User Guide. Further information on this topic can be found there in the area Style browser.
Create shadows
SketchUp's shadow function was developed to give you a general idea of how the sun and shadow affect your model during the course of the day and over the course of a year. The calculations are based on the location (latitude and longitude), the direction the model is facing, and the appropriate time zone. The time is not adjusted for daylight saving time. To enable shadows:
Enable shadows with manual data entry
In the Location area of the Model Information dialog box, manually enter location information. To enable shadows with manual data entry:
- Select Window> Model Information out. The Model Information dialog box appears.
- On the left side of the Model Information dialog box, select Geolocation out. The dialog for the location is displayed.
- Click on the option "Set location manually ...".
- Enter a country in the Country dialog box.
- In the City dialog box, enter a location (city).
- In the Latitude dialog box, enter the latitude.
- Enter the longitude in the Longitude dialog box.
- Click the button [OK] and close the "Model Information" dialog box.
- Select Window> shadow out. The Shadow Settings dialog box appears.
- click on Show / hide shadows in the upper left of the dialog box to show shadows for your model.
- Use the controls to edit the shadow in the Shadow Settings dialog box.
The content of this page comes from SketchUp User Guide. Further information on this topic can be found there in the area Enable shadows.