Table of Contents
Program operation
User interface and operating logic
Plus logic and default
Table layout
The layout specification in the table header includes the following points:
- The font in the tables is Microsoft San Serif at 8,25;
- The table lines are dotted black;
- Column widths can be adjusted automatically, by double-clicking or manually;
- The table width is variable and can change;
- Multi-selection of several columns is not possible;
- The text content is either left or right justified;
- The line width can be increased or decreased manually. This selection affects all rows of the table;
- Multiple selection of several lines is possible.
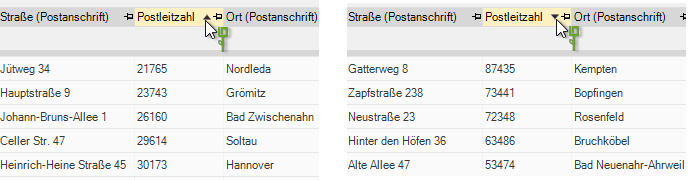
Sort by columns
By clicking on the column header you will get an ascending or descending sort based on the selected column. The sorting always refers to the last column selected.
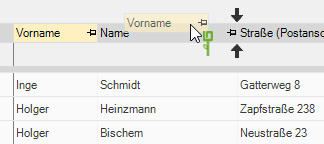
Move columns
Columns can be moved horizontally by clicking and holding.
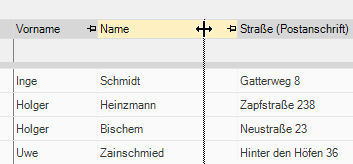
Enlarge columns
To enlarge columns, you can simply drag the column headers wider. To do this, left-click on the edge of the column header, hold down the button and drag the column to the desired width. To adapt the column width to the content, you only have to double-click on the right-hand edge of the column header with the left mouse button.
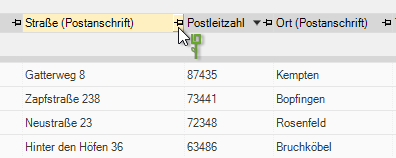
Freeze columns
The column can be fixed using the pin on the right-hand side in the column header. As soon as you click on the pin, the column on the left is inserted and is also visible when the horizontal slider is moved to the right. The gap Symbol is fixed automatically.
Grouping by columns
You have the option of sorting the data shown in the table according to the columns. To do this, click with the left mouse button on a column header, hold the key down and drag it into the area above the tables. As soon as you release the key there, the table will be sorted. You can sort the table according to several columns.

The setting of the column layout is individual for each table and is saved on a user-specific basis and remains in effect until the table display is edited again.
Column selection
You can call up the column selection by clicking on the plus in the upper left corner of the table. Here you can add or deselect columns. The columns are grouped according to their purpose. You can add / deselect entire groups or individual columns. The settings are adopted when the dialog is closed.

Layout templates
By clicking on the plus in the upper left corner of the table you can go to the tab Layout templates save and load the adapted representation of the table (e.g. for an overview, for data export or list printing).
For this purpose, the Derive the layout template from the current table, save, duplicate, delete, export, import and the Apply layout template to current table.

Each table remembers the last active state of the layout.
Column filter
filter by entries
The display within the table can be restricted in all columns by defining filter criteria. All are available as filter criteria entries used in the column to select.
To filter the entries displayed in the table according to the criteria of a column, click in the row below the column header ![]() .
.
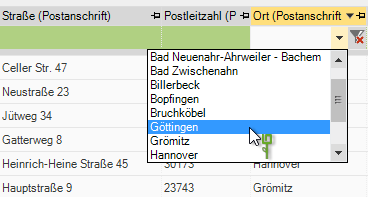
All entries already used in the column are available as filter criteria in the selection menu. If you select the desired entry, all other entries are hidden.
filter by entering text
In the table, you can filter the data in all columns by entering a text.
To filter the displayed entries in the table for a term in a column, click in the text line below the column header and enter the filter term.

Im Example only those documents are then displayed with their designation Winter contains.
Switch off the filter
You have two options for resetting the set filters:
- To one individual column filter to delete, move the mouse pointer to the line below the column header. Then click the symbol on the right
 .
. - Um all filters To remove, click on the left in the column filter row.

Further information on the tables can be found in the section General Operation > Table.
calculator
A pocket calculator is available as an input aid in numerous numerical fields, e.g. for calculating the values for the Short calculation of positions or of Quantity approaches.
In the numeric field, open the context menu with the right mouse button and select the entry calculator or alternatively use the key combination Alt + T.

The dialogue Calculation approach will be opened. Enter the values and arithmetic symbols and confirm with [Takeover].

The following arithmetic operations and constants can be used:
| Operator / function | Significance | Example |
|---|---|---|
| + (Plus sign) | Addition | 3+3=6 |
| - (minus sign) | subtraction | 3-1 2 = |
| * (Asterisk) | multiplication | 3 * 3 = 9 |
| / (Slash) | Division | 3 / 3 = 1 |
| () | clip | (2 + 3) * 4 = 20 |
| Pi | Pi = 2.0 * asin (1.0) | pi * 1 = 3,14 |
| Sqrt | Wurzel | sqrt (16) = 4 |
| ² | square | 2² = 4 |
| Shipping Costs | Sine | sin (90) = 1 |
| Cart | cosine | cos (90) = 0 |
| Tan | tangent | Tan (45) = 1 |
Text variables
You can use text variables in your texts. These are filled by the program with the current values from the database.
The following text variables are available:
| [FEED] | Causes a page break within a header or footer text, in the letter text and in the position text of a LV on the printout. Please note that the text variable must always stand alone in a line and in the first position of the line. | all printouts |
| [TAX NR] | Prints the customer's tax number in the subject, header and footer of credit notes and invoices. The tax number is stored at the address of the client. | Invoice / credit |
| [UST ID] | Prints the customer's VAT ID in the subject, header and footer of credit notes and invoices. The sales tax ID is stored at the address of the client. | Invoice / credit |
| [GROSS] | Prints the gross amount of the specifications in the subject, header and footer of all LV printouts. | all LV printouts |
| [NET] | Prints the net amount of the specification in the subject, header and footer of all LV printouts. | all LV printouts |
| [VAT] | Prints the VAT amount of the specification in the subject, header and footer of all LV printouts. | all LV printouts |
| [DELIVERY] | Prints the submission date in the header and footer text of offers that is stored in the project management for the specification of services. | Services |
| [USER] | Prints the name of the logged-in user in the header and footer text of offers, which is in the address manager in the user data in the field Contact Person was deposited. | Services |
| [CLIENT] | Prints the customer's display name in the header and footer of offers. | Services |
| [LV-NR] | Prints the number of the service specifications in the header and footer of offers as well as in the header, footer and letter text of LV letters. | Offer, LV letter |
| [Course description] | Prints the description of the service specifications in the header and footer of offers as well as in the header, footer and letter text of LV letters. | Offer, LV letter |
| [PAYMENT TARGET] | Gives in the payment terms of an offer the defined payment term. | Services |
| [DISCOUNT DAYS] | Gives in the payment terms of an offer from the set discount days. | Offer and invoice / credit note |
| [DISCOUNT AMOUNT] | Gives in the payment terms the exact amount of the discount granted on an invoice. | Invoice / credit |
| [DISCOUNT PERCENT] | Gives in the payment terms an invoice / credit memo, the set percentage of the discount rate. | Offer and invoice / credit note |
| [TOTAL OP] | Prints on advance, partial and final invoices in the text of the program parameter Note text (total surgery, gross service) as well as the total amount of the client's open items in the subject, header and footer of credit notes and invoices. | Invoice / credit |
| [Gross performance] | Prints on advance, partial and final invoices in the text of the program parameter Note text (total surgery, gross service) as well as the gross amount of the entire construction work in the subject, header and footer of credit notes and invoices. | Invoice / credit |
| [DATE] | Calculated in the payment terms of an invoice / credit note, the date by which payment must be made (= date of invoice printing + number of days defined in Zko. | Invoice / credit |
| [CURRENCY] | Prints in the payment terms an invoice / credit note the symbol of the currency of the country you are in the Configuration from BUSINESS have established. | Invoice / credit |
| [AMOUNT] | Places in the payment terms an invoice / credit note automatically enters the payment amount of the invoice. | Invoice / credit |
| [WORK PERFORMANCE_BRUTTO] | Prints the gross amount of the in the footer of invoices and credit memos labour costs. | Invoice / credit |
| [WORK PERFORMANCE_NETTO] | Prints the net amount of the in the footer of invoices and credit notes labour costs. | Invoice / credit |
| [DEADLINE] | Prints the date in the reminder text of reminders, which is in the print menu in the field Setting a deadline was chosen. You can enter reminder texts in the Dunning text management . Example: If your payment is not received by the [DEADLINE], we are forced to take legal action. | warning |
| [BOOKED] | Prints the date in the reminder text of reminders, which is in the print menu in the field booked until was chosen. You can enter reminder texts in the Dunning text management . Example: Payments up to [BOOKED] have been taken into account. | warning |
| [OR set-up] | Positions the OP list in the reminder text of reminders. You can enter reminder texts in the Dunning text management . | warning |
| [Address] | In the reminder text of reminders, in the letter text as well as in the header and footer text of letters and offers, the salutation that was stored for the addressee in the address manager You can enter reminder texts in the Dunning text management . | Reminder, account statement, letter, offer |
| [RETURN] | Prints in the subject, header and footer of Extended LV price inquiries the return date that you set in the print menu. | Extended price request |
| [SUBJECT] | Prints the subject of the LV | Delivery note for stock removal |
| [DATE] | Prints the date or the period of the selected deliveries | Delivery note for stock removal |
| [EXECUTION LOCATION] | Prints the subject, header and footer text as well as the letter text of LV letters Place of execution of the LV | all LV printouts, LV letter, delivery note for removal from stock |
| [DATE] | Gives Billing according to the delivered quantities the document date of the NK booking in the automatically generated comment line. | Comment line in the quantity statement |
| [DISPLAY NAME] | Gives Billing according to the delivered quantities the display name of the supplier in the automatically generated comment line. | Comment line in the quantity statement |
| [DELIVERY RECEIPT NUMBER] | Gives Billing according to the delivered quantities the delivery note number entered in the NK booking in the automatically generated comment line. | Comment line in the quantity statement |
keyboard shortcuts
Especially when entering data, it is inconvenient to take your hands off the keyboard again and again in order to call up certain functions with the help of the mouse. Keyboard shortcuts can help here. By pressing certain shortcuts As an alternative to clicking on the symbols in the menus, you can call up the respective function.
The following keyboard shortcuts are available:
| Ctrl + S | Saving a data record after a new creation or change |
| Ctrl + N | Creation of a new data record and provision of a data mask that has not been filled out |
| Ctrl + X | Cut out a previously marked text passage or section |
| Ctrl + C | Copy a previously marked text passage or a text section |
| Ctrl + V | Insertion of a previously copied text in place of the cursor |
| Ctrl + P | Calling up the print function |
| Ctrl + Z | Cancel |
| Ctrl + T | Apply |
| Ctrl + F | Call up the search window (mouse pointer must be in the associated field) |
| Ctrl + Q | Quick search |
| Ctrl + R | Back |
| Ctrl + I | Increases the distance to the left margin in the text editor |
| Ctrl + F2 | Attach position, title,… .. |
| Ctrl + F3 | Insert position, title,… .. |
| Ctrl + Home | Jumps to the beginning of the editing screen (e.g. in the "Item number" field) |
| Ctrl + End | Jumps to the end of the editing screen (e.g. in the "Offer price" field) |
| Ctrl + Del | Deletes everything from the current cursor position to the end of the line |
| Tab | Jumps to the next data field |
| Shift + Tab | Jumps back to the last data field |
| Shift + Ctrl + K | Enter a comment |
| Shift + ↑ or ↓ | Marking of text passages or sections |
| + (in the numeric keypad) | Open the next directory level in the tree |
| - (in the numeric keypad) | Close the subordinate directory level in the tree |
| * (in the numeric keypad) | Open all sub-directories in the tree |
| Alt+T | Calculator in numeric fields |
| Alt + Page ↑ | Scroll to the previous position of the course without changing the editing field |
| Alt + Page ↓ | Scroll to the next position in the course without changing the editing field |
| Alt + Home | |
| Alt + end | Jump to the last entry in the position tree |
| F5 | Update of the screen mask |