Table of Contents
LANDXPERT Installation manual version 2018
General information
Here you will find all the information you need to install DATAflor LANDXPERT Version 2018.
AutoCAD 2018 works with the new file format AutoCAD 2018 drawing.dwg. If you are with older AutoCAD versions or with DATAflor GREENXPERT work, it is important to save your files in the AutoCAD 2013 / LT2013 drawing, etc. save. You can change the standard file format to Options to adjust.
To open the options, go to the AutoCAD icon and then click the button below [Options].

In the options, select on the tab Open and save select the file format and accept the selection with [Apply].

The following describes the installation using the downloaded installation file. To access the file:
- Chrome - Click the icon at the bottom left of the screen.
- Internet Explorer - At the bottom of the screen in the middle in the yellow-framed field, click Run.
- Firefox - Click the download arrow in the top right corner.
If you have the latest version of DATAflor LANDXPERT on a data carrier, please proceed as follows:
- Insert the disc into your DVD drive. The installation menu starts automatically. If not, start the CD_Start.EXE file on your DVD drive manually.
- Click on the DVD's start menu [Installation]> Install {program name}


Administrator rights are required for the installation. To work with DATAflor LANDXPERT user rights are sufficient.
Plants: To access the BRUNS nursery plant catalog, you need either the installation of the plant use DATAplants - BRUNS or You install DATAflor BUSINESS (contains the complete BRUNS plant catalog).
DATAflor BUSINESS - AVA
The complete system for the planning office
In addition to the classic tasks of tendering, awarding and billing DATAflor BUSINESS - AVA a multitude of functions that make a modern office more efficient and more responsive. Address management for all clients, contractors and project addresses is also part of it, as is a connection to DATAflor LANDXPERT.
By means of the unique connection between the drawing and the specification sheet, a quantity can be determined directly DATAflor LANDXPERT create.
Read more about this under
arguments for DATAflor BUSINESS -AVA.
You will certainly have further questions regarding the program functions. We are happy to offer you seminars for this purpose. Please inform yourself here about our current seminars or order our current seminar calendar (info@dataflor.de).
System Requirements
Make sure that your computer meets the system requirements. You can find all information about this here.
Installation single place
If you are for DATAflor LANDXPERT If you have purchased a network license, you will find all information on this in the chapter Installation network.
Install AutoCAD Map
Start the downloaded installation file from AutoCAD Map 3D with a double click.
- click on Install.

- Confirm the license agreement with [Continue].
- Select the products or components to be installed.
Specify where to save the installed files. If you do not want to use the default installation path, enter a new path. (The path name cannot be longer than 260 characters.)
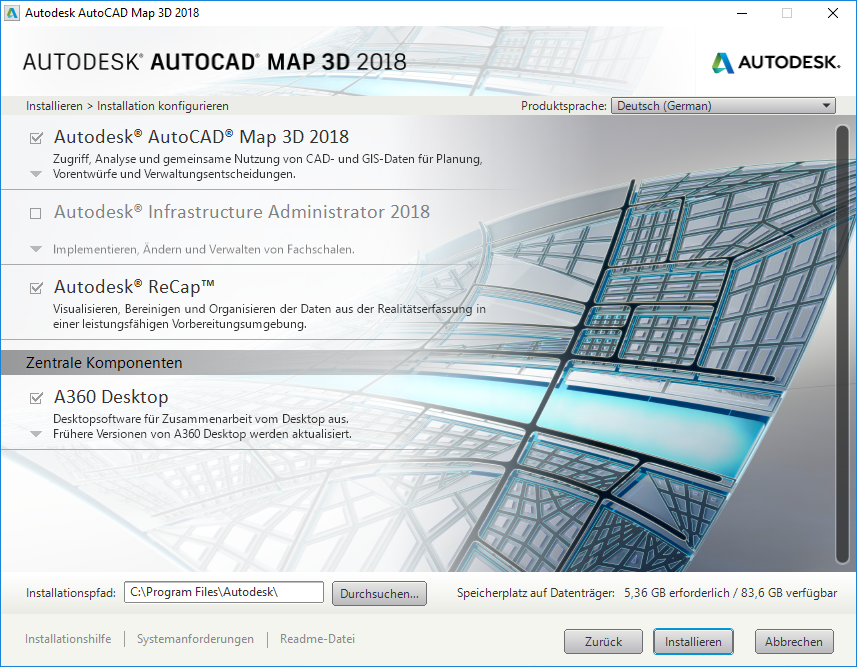
Click the button [To install].This process can take several minutes.
- When the installation is complete, a list of the installed software components is displayed. click on [Complete]to close the installer.
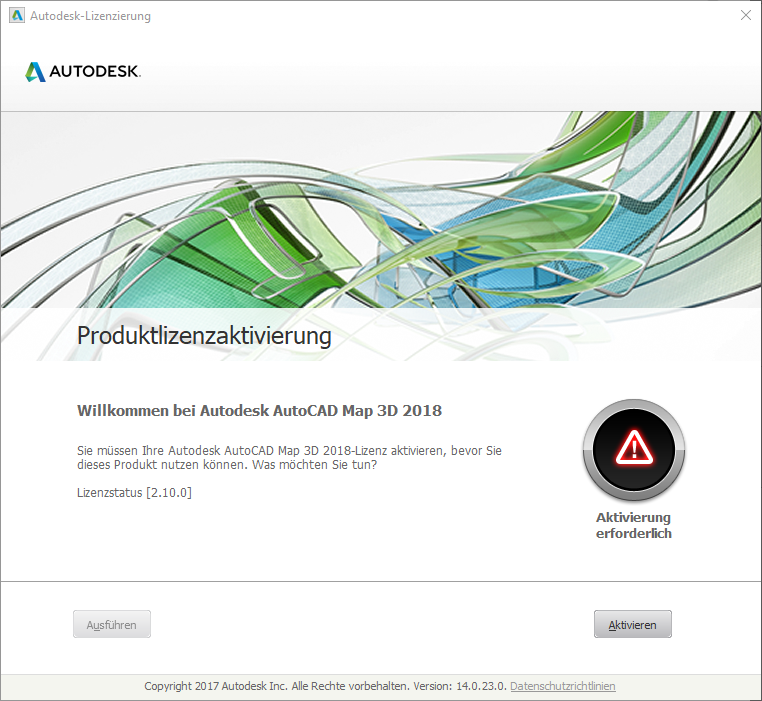
Activate the product license
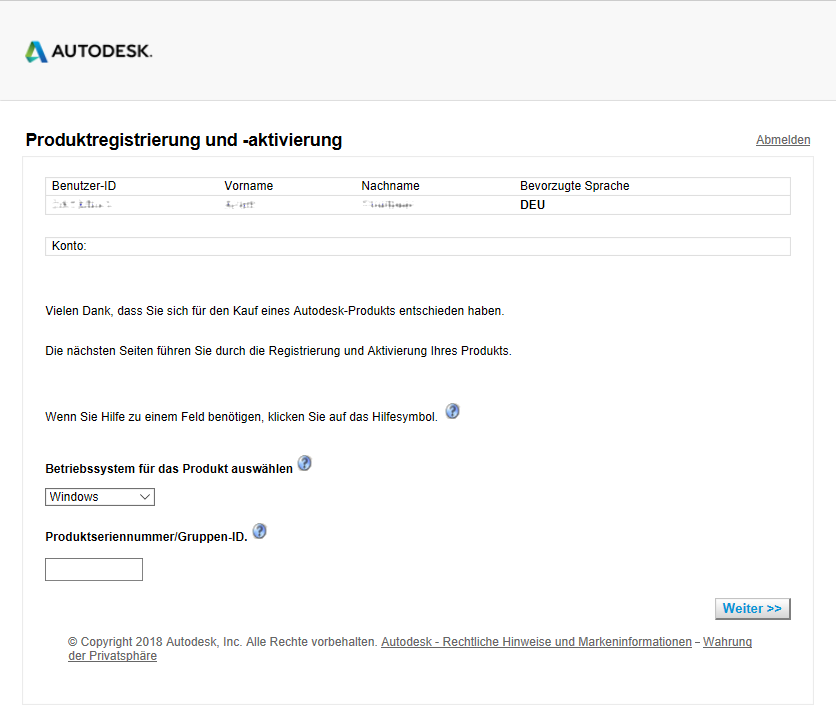
- For the Activation of AutoCAD Map log in with your Autodesk Accounts-Registration information to: register.autodesk.com. If you don't have an Autodesk Account, follow the on-screen instructions to create one.
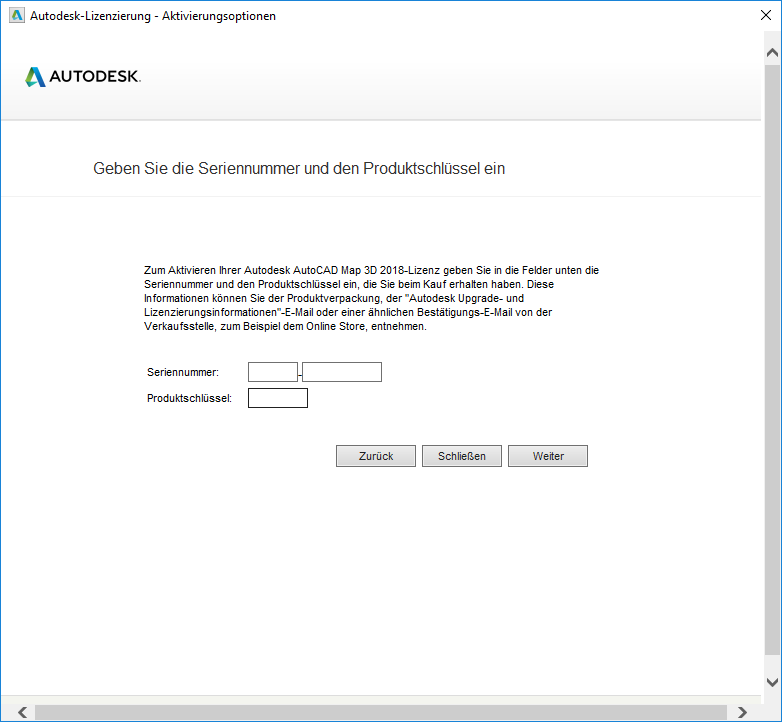
- Enter under Product serial number / group ID. the serial number you received from DATAflor and confirm your entries with [Continue].
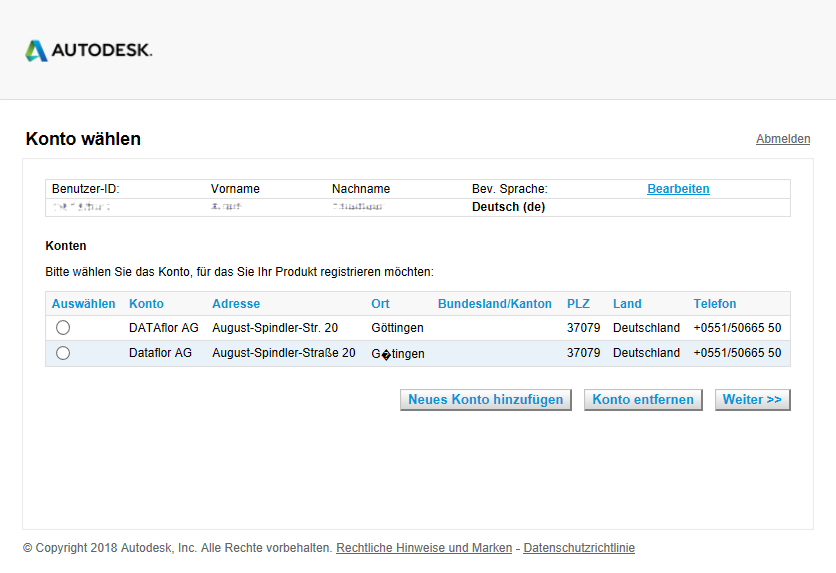
- Select your account and confirm it with [Continue].
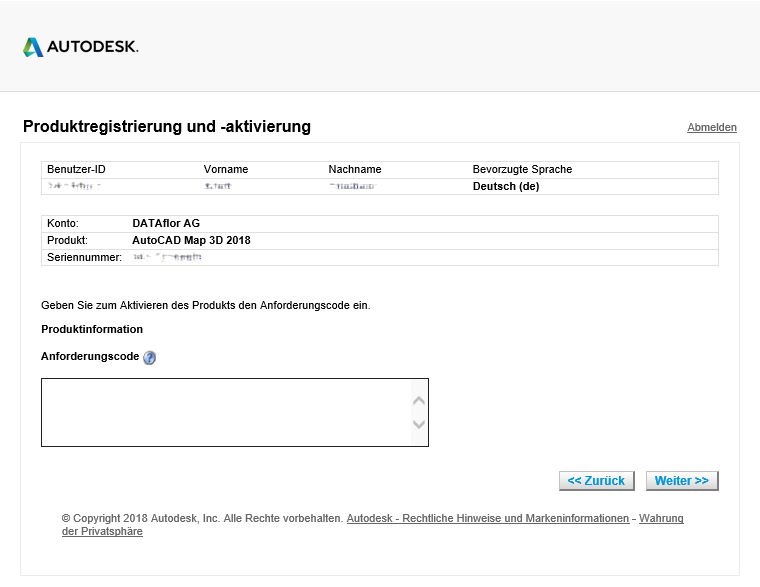
- The request code must be entered in the following window.
Leave the website Autodesk - Register Once open to do the following in AutoCAD Map 3D.
- To get the request code, start AutoCAD Map 3D and select Sign in.

- After logging in, choose enter Serialnumber.
- In the window Product license activation click on [Activate].
- Enter the Serial number and product key one that you from DATAflor have received. Confirm your entries with [Continue].
- Copy in the window Product license activation options the request code.
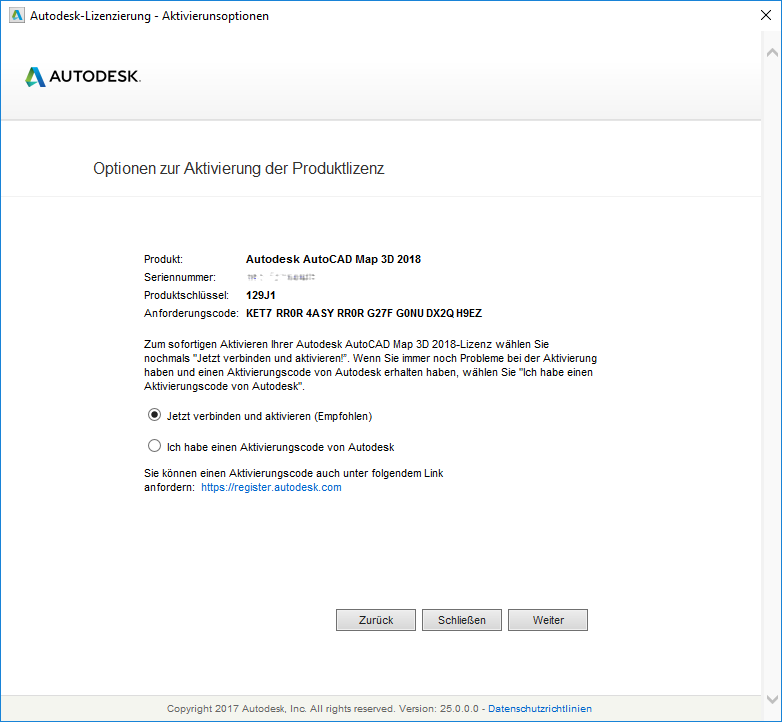
Leave this AutoCAD window open to do the following on the website Autodesk - Register Once to execute.
- On the website Autodesk product registration and activation paste the request code in the appropriate field.
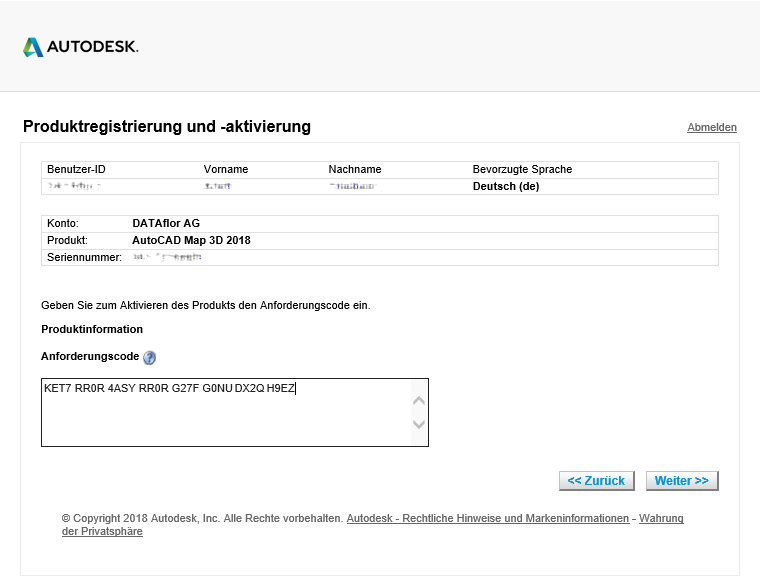
- With Continue online registration is complete. The following window is displayed:
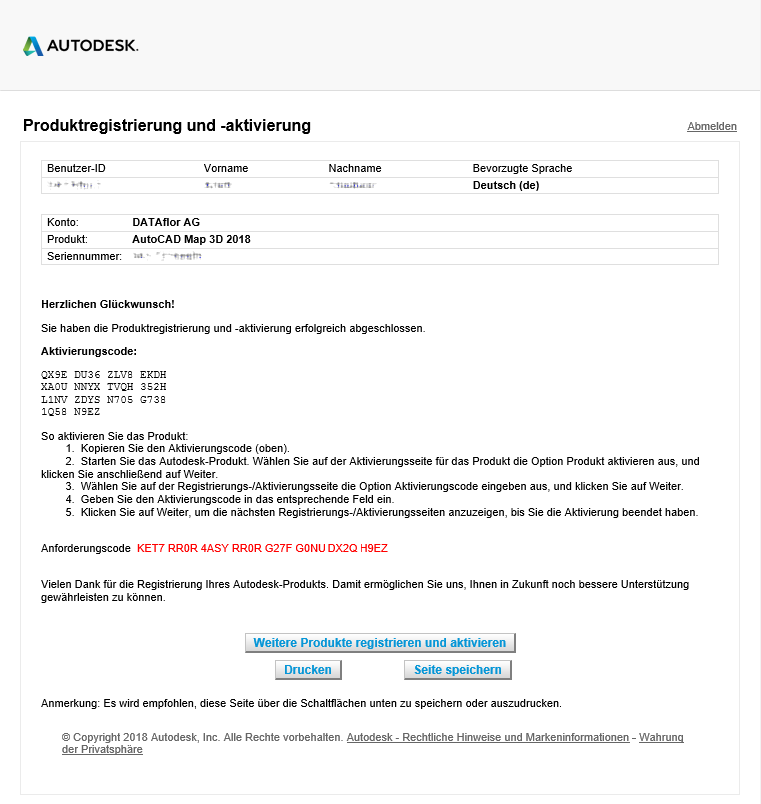
- Once you are in your AutoCAD Map 3D with the option Connect and activate now on [Continue] Click, the activation of your product license is complete.
After activation, the software works offline for up to 30 days. After these 30 days, an internet connection is required to continue using the software.
Install DATAflor LANDXPERT
Close AutoCAD Map 3D before continuing with the installation.
Start the installation by double-clicking on the downloaded installation file.
Depending on the computer system and the access rights, this can take 2 to 90 seconds.
First, the installation files are unpacked into a temporary directory.

Then the System Requirements checked. If a red traffic light is displayed, the installation cannot be continued. Make the system requirements and start the installation again.
If all requirements are met, ie all traffic lights are green, continue the installation with [Continue] continued.

In the following dialog you have the option of specifying a target folder for the program installation. Normally this dialog is started with [To install] approved.

Nachdem DATAflor LANDXPERT has been successfully installed, end the installation with [Finished].
Customize user interface and template file:
Due to the installation routine adapted for version 2018, the DATAflor predefined files for the menu and the template files not installed automatically.
To the LANDXPERT-Menu and template files (with the predefined drawing units, layers and layouts) can be customized for each user.
To do this, install the downloaded Menu customization file.
program start
When the installation is complete, the DATAflor LANDXPERT Symbol displayed. Start the program by double-clicking the icon.

DATAflor LANDXPERT is ready to go - you don't have to make any further settings.
After starting you will find a dialog in which you can call up the new features of the program version.

licensing
DATAflor LANDXPERT is automatically installed as a fully functional 30-day demo version. During this period, the full range of functions is available to you without restriction.
After purchasing DATAflor LANDXPERT the licensing takes place at the DATAflor AG. You can find all the information you need about licensing here.
DATAflor Network Access
Working with DATAflor LANDXPERT is only really effective if all users can access the same fundamentals and data. With the tool Database and network access the local workstation can be adapted to the network environment. DATAflor LANDXPERT then uses the assigned configuration.
For more information on this topic, please refer to the chapter Database and network access.
Install DATAflor BUSINESS - AVA (optional)
Refer to the product installation instructions and follow the instructions on the screen. With the installation of DATAflor BUSINESS - AVA will automatically install a demo license with a term of 30 days.
Reading in the license for the BUSINESS Supplement
If you also have a license for the BUSINESS If you receive the supplement, read the file via the license manager. You will find all the information you need about licensing here.
License transfer
Transfer AutoCAD Map license
The license is transferred using the License Transfer Utility.
An internet connection to your Autodesk account is required to transfer your AutoCAD Map license.
You can find all information about the procedure here:
Export the license
Import the license
LANDXPERT- Transfer license
The transfer of the LANDXPERT-License is done with the license manager. Further information can be found in the chapter:Transfer license.
Installation network
Setting up an AutoCAD network license
To use AutoCAD Map on the workstations with a network license, several steps are required to set up the network license file:
- Install the Network License Manager
Notes on Install the Network License Manager:
- Upgrade: If necessary, install the latest version of the Network License Manager, otherwise this step is not necessary.
- Download: Before installing the Autodesk Network License Manager, check which Server type (32-bit or 64-bit) it is about. Then select the appropriate entry for the installation kit.
- Drive: Installing the Network License Manager on a remote drive shall not supported. When installing the Network License Manager file, enter a path to a local drive, including the drive letter. The Specification of UNC addresses shall not unterstützt.
- port sharing: On the server is the Firewall to configure. To do this, the TCP ports 2080 and 27000 - 27009 can be activated (preferably as an incoming and outgoing rule).
- Register the serial number
Sign in to the Autodesk website to register your server information and serial number for the network version of Autodesk software.
- To do this, visit register.autodesk.com , choose [Register Now] and sign in with your Autodesk account. If you don't already have an Autodesk Account, you can create one right away.
- Choose yours Operating system and give the Serial number from the cover letter from DATAflor a. click on [Continue].
You must enter the serial number for a network version of the Autodesk product. If you enter the serial number for a single user version, not all necessary steps are displayed.
- Select the Account to which the software is to be registered. click on [Continue].
- Select the network server type Single sever out and enter Hostname and Host id (physical address) of your server. click on [Continue].
How to determine the host name and physical address of your server using the Network License Manager.
- To do this, open the utility LMTOOLS on your server: Start> All Programs> Autodesk> Network License Manager> LMTOOLS Utility.
- Click the tab System Settings.
- In the area Hostid settings find your host name in the field Computer / host name and the physical address in the field Ethernet address.
- Generate the AutoCAD server license
- Network licenses with one Workplace
- Save The generated license file on your computer.
- Go to step 4.
- Network licenses with more Jobs
The serial numbers have a workstation as standard. In order to be able to use several workstations, the license must be created by Autodesk.
- Open the utility LMTOOLS on your server: Start> All Programs> Autodesk> Network License Manager> LMTOOLS Utility.
- Click the tab System Settings.
- Save the HostID settingsby clicking the button [Save HOSTID info to a file] . click
- Enter a file name (e.g. Company.TXT) and click [To save].
- Close the Autodesk license server. To do this, click on the menu File> Exit.
- Email the saved file to license @dataflor.de. You will receive your license file within a few working days.
- Copy the license file to the server
After you have received your license file, you need to save it on your license server.It is recommended that you save the license file in the folder in which you installed the Network License Manager.
Install the DATAflor License server
In principle, any computer in the network can be used as a license server, as long as it has at least Windows 10 as its operating system (including the latest update) and can be accessed by the other computers via TCP/IP protocol.
A server that is constantly in operation and that has a functioning data backup is best suited.
If you already have a DATAflor If you are using the license server, please install the current version. You can use the current license server here .
- Start the downloaded file by double-clicking the exe file.
- After selecting the language for the license server, the installation starts.
There is no selection for the installation directory. The license server is imported into the “common files” of the computer. - After installing the license server, restart this computer so that the license server starts automatically.
The DATAflor The license server is registered as a service on the computer. It is therefore sufficient that the computer is switched on in order to use the license server.
Request the LANDXPERT Server license
After the installation has been completed, the release must be requested for the server. How to make the request:
- Start the request on the server by double-clicking the downloaded License request file ServerRequestLXP.cmd. (In the DVD menu, select Network licenses> Request server license.)
- After the selection, a dialog opens in which the relevant data for the request must be entered. The request can be sent to DATAflor be sent by fax, email or post.
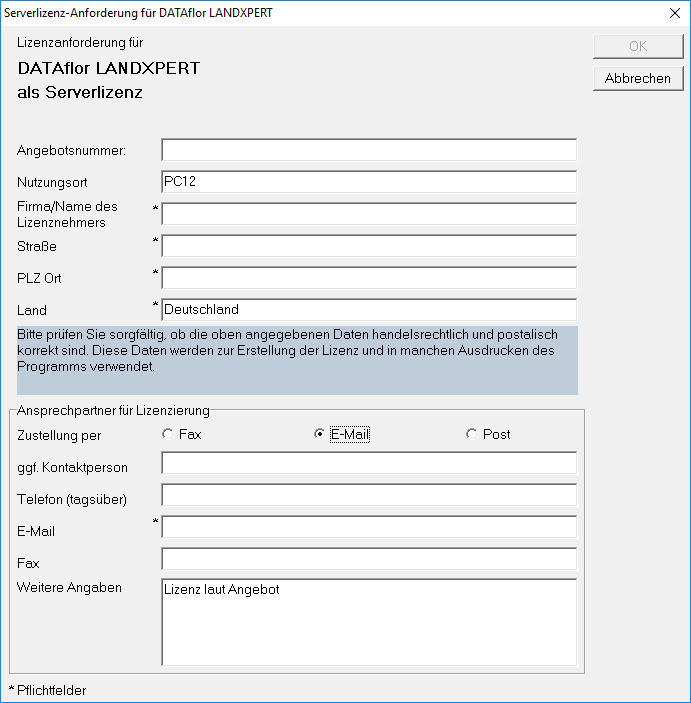
Licensing usually takes place on the day of the request.
Reading in the LANDXPERT Server license
After you have received the license, it only needs to be saved in License server can be read.
If you have not already done so, switch to the server or the workstation that acts as the server and log on to the server as an administrator. Please note: You must also switch to the server if you are working in a peer-to-peer network.
This is how you carry out the import:
- Start the DATAflor License manager: Windows Start> All Programs> DATAflor > DATAflor Tools> DATAflor License manager.
- Select in the menu License> New> Read in license

- In the following dialog, select the corresponding license file (*.LIC) and confirm your selection with [To open].
- After the successful import, you will receive a confirmation. The network license is now available for the workstations.
- Repeat reading if you also have a license file for the BUSINESS-Extension received.
A transfer of the server license to other computers (as with the individual workstations) is not is possible.
Install AutoCAD Map at work
Start the downloaded installation file from AutoCAD Map 3D with a double click.
- click on Install.
- Confirm the license agreement with [Continue].
- Select the products or components to be installed.
Specify where to save the installed files. If you do not want to use the default installation path, enter a new path. (The path name cannot be longer than 260 characters.)
Click the button [To install].This process can take several minutes.
- When the installation is complete, a list of the installed software components is displayed. click on [Complete]to close the installer.
Setting up the AutoCAD server license at the workplace
Configure AutoCAD Map 3D on the workstation to use the licenses provided with the Autodesk license server.
- Start AutoCAD Map 3D on the workstation and select Use network license.
- Select the License server model Single license server and enter the Server name (2080 @ servername) a.
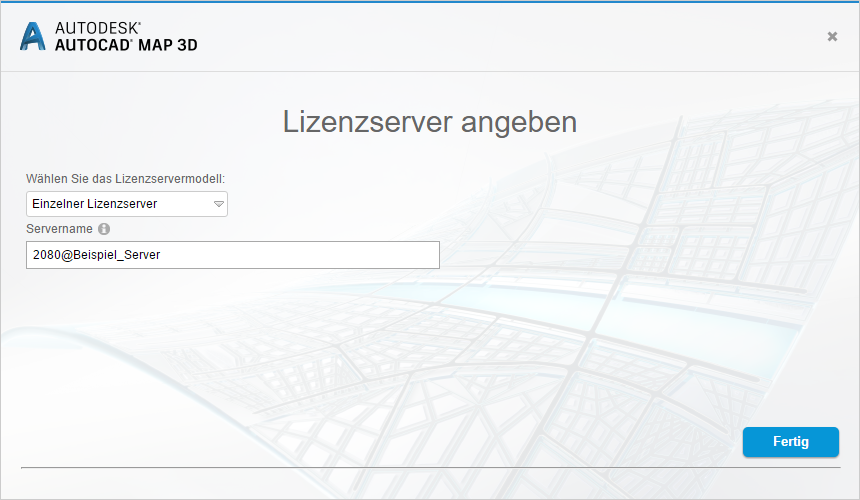
Make sure that the server name entered here corresponds to that of your license server.
- Confirm the entries with [Finished].
The AutoCAD server license is now available at this workstation.
Install DATAflor LANDXPERT at work
Close AutoCAD Map 3D before continuing with the installation.
Start the installation by double-clicking on the downloaded installation file.
Depending on the computer system and the access rights, this can take 2 to 90 seconds.
First, the installation files are unpacked into a temporary directory.
Then the System Requirements checked. If a red traffic light is displayed, the installation cannot be continued. Make the system requirements and start the installation again.
If all requirements are met, ie all traffic lights are green, continue the installation with [Continue] continued.
In the following dialog you have the option of specifying a target folder for the program installation. Normally this dialog is started with [To install] approved.
Nachdem DATAflor LANDXPERT has been successfully installed, end the installation with [Finished].
Customize user interface and template file:
Due to the installation routine adapted for version 2018, the DATAflor predefined files for the menu and the template files not installed automatically.
To the LANDXPERT-Menu and template files (with the predefined drawing units, layers and layouts) can be customized for each user.
To do this, install the downloaded Menu customization file.
program start
When the installation is complete, the DATAflor LANDXPERT Symbol displayed. Start the program by double-clicking the icon.
DATAflor LANDXPERT is ready to go - you don't have to make any further settings.
After starting you will find a dialog in which you can call up the new features of the program version.
Register workstation on the license server
To enable access to a license server for a workstation, perform the following steps:
- Start the on the workstation DATAflor License manager: Windows Start> All Programs> DATAflor > DATAflor Tools> DATAflor License manager.
- Now select in the menu Select License> New> License Server.
- In dialogue Select license server Now wear the in the top left IP address of the server a. This can be found on the server in the MS-DOS prompt with the command IPCONFIG Interrogate. The preset port is 49300. This can normally be left as it is. If communication with the server does not work, please contact the DATAflor Support on.
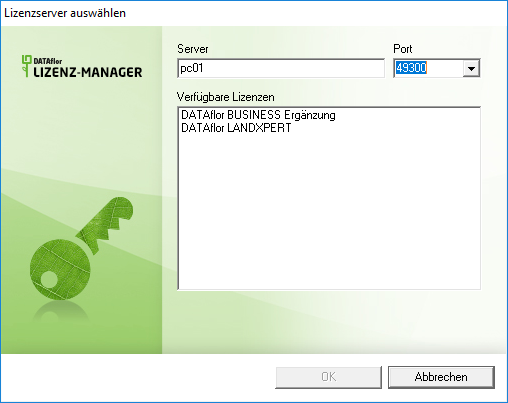
- After entering the IP address, the TabButton to press. As soon as the server has been found, the licenses available in the network are displayed in the dialog.
- Now select one of the existing server licenses by marking the server license and the dialog with [OK] is terminated.
- The license is now in the top left under Server licenses displayed.
- As soon as a license is marked, the program parts it contains appear below.
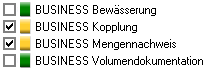
- For the BUSINESS You can extend the program parts, for example BUSINESS Link and BUSINESS Mass list choose file
 which should then be used on the local computer. These are now automatically released when the program is started.
Like you one Log off the workstation from the license server and further information on working with network licenses can be found in the topic CAD network license.
DATAflor Network Access
Working with DATAflor LANDXPERT is only really effective if all users can access the same fundamentals and data. With the tool Database and network access the local workstation can be adapted to the network environment. DATAflor LANDXPERT then uses the assigned configuration.
For more information on this topic, please refer to the chapter Database and network access.
Install DATAflor BUSINESS - AVA (optional)
Refer to the product installation instructions and follow the instructions on the screen. With the installation of DATAflor BUSINESS - AVA will automatically install a demo license with a term of 30 days.
Reading in the server license for the BUSINESS Supplement
If you also have a server license for the BUSINESS If you receive the supplement, read the file via the license manager. You will find all the information you need about licensing here.
License borrowing
Borrow license from Autodesk license server
If you are using a network license and your network administrator allows the license borrowing feature, you can borrow a license from the Autodesk license server to use DATAflor LANDXPERT to use for a period of time when your computer is not connected to the network.
Your license will automatically be returned to the license server when the confirmation date that you specified when you borrowed it has expired. You can also transfer a license back before the licensing period expires.
- Starten Sie DATAflor LANDXPERT on the workstation on which the license is to be borrowed.
- In the user account, select> Manage license.

- Select a valid date for the license borrowing.
- Click the button [Borrow license]to perform the license borrowing.
More information on the subject License borrowing get in the help.
To do this, enter the term in the search field of the info center.

Borrow license with the DATAflor License server
With the DATAflor License server you can borrow network licenses on the local computer in order to work with the program when the computer is not connected to the network. You can return borrowed licenses to the DATAflor Return license server.
You can find all information about the procedure here:
Borrow licenses from the license server
Return the license to the license server
If the license is not returned to the license server, it expires after 30 days on the single workstation and is automatically available again in the network.