Table of Contents
Courses
Configuration options
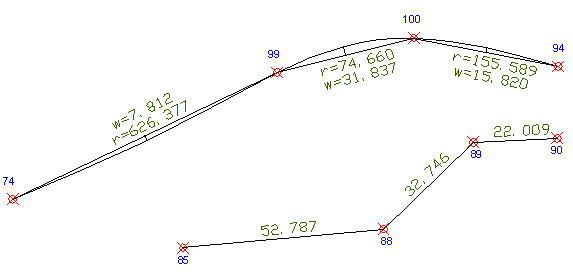
Routes can be documented with three different methods: Gauß-Elling, partial route sum and only total route (see chapter Documentation methods). Three areas can be configured for the visible documentation in the drawing: Point symbols, bending and Shapes. The specifications from the Configuration accepted. The documentation can also be simplified (see Documentation options > Simplify documentation). The difference between the simplified documentation and the exact amount of the selected drawing object is displayed in the Documentation area.

In order to improve the clarity in the drawing, the documentation of the routes is based on the preset Layer Documentations_Courses stored (for 3D routes: Documentations_Stripes_3D). This can be changed by selecting an existing layer in the drawing or by entering a new name using the keyboard. This layer is then used by DATAflor CAD created.
Point representation
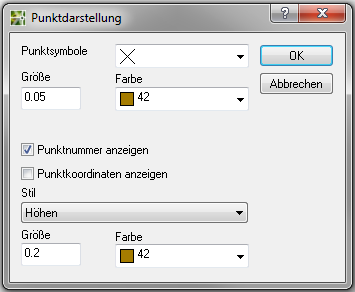
As a Point symbol you can all in DATAflor Use point styles available in CAD. The size and color can be set here. Optionally, the Point numbers The text style can still be selected here.
Will the Point coordinates activated, there is an additional specification with X and Y values, which may be required for documentation according to Gauss-Elling.
bending
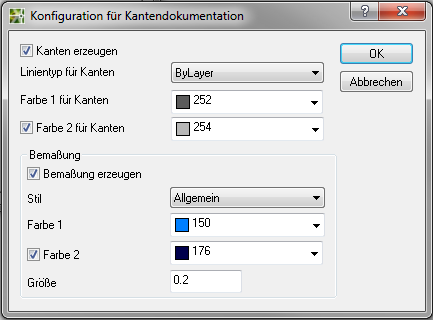
The Line type and the Color of bending can be set in the upper area. There is also the option to display the individual line segments in two different colors. For the Dimensioning In addition to the font style or font size, the color can also be set.
Shapes
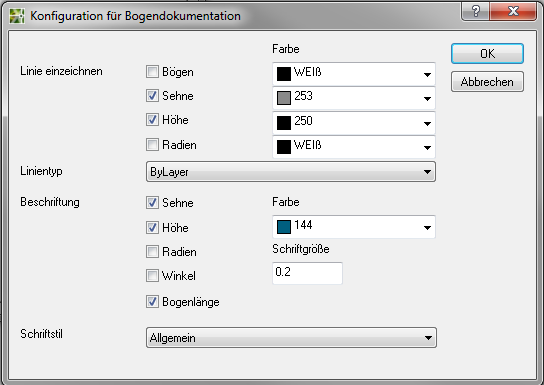
The setting options for Shapes are very extensive. In addition to precise specifications for lines (display YES / NO, color and line type), the Label format exactly (display YES / NO, color, font size and font style).
Documentation methods
A total of three different documentation options are available for routes, which only affect the calculation of the routes and the writing of the quantity statements. The graphic documentation is identical for all three methods, but can be adapted individually.
Method 1: Gauss-Elling (not for 3D routes)
Im Mass list values for the formula 21 (straight lines from coordinates) are entered (see Calculation formulas REB 23.003). Will the Reference point changed, a different origin is selected for the calculation in the documentation (see Documentation according to Gauß-Elling in the high coordinate range).
This documentation method cannot be used for 3D routes, since according to REB specifications only 2 coordinates are possible, i.e. the Z value cannot be taken into account.

REB formulas used:
- 99 - Explanation of the object
- 21 - Straight line from coordinates
Method 2: total of the distance
All sections of the route are listed individually in the quantity verification and the sum is calculated using the free calculation formula 91. Any existing bows are listed separately.
With 3D routes, arcs are broken down into straight sections, as there are no formulas for calculating arcs in 3D space.

REB formulas used:
- 99 - Explanation of the object
- 91 - List of the sections
- optional: 06 - for 2D arcs, additional circular arc calculation
Method 3: only total distance
Im Mass list the total distance is specified using the free calculation formula 91. Circular arcs are not listed separately.

REB formulas used:
- 99 - Explanation of the object
- 91 - Indication of the total distance
Automatic documentation
The documentation is created using the defined formulas.
Application
- In the mass tree, select the group or an individual object whose content is to be documented. Switch to the tab Documentation and choose the object type Route (or. 3D route) and the documentation method (e.g. Trip total).
- In the area Documentation and choose [Produce] .
- The documentation is created in the drawing
If documentation is created at a higher level, documentation is automatically created for all objects below.
The manual creation of documentation or the editing of automatically created documentation is under Documentation manual ⁄ edit explained.