Table of Contents
2D tree shade
Command: TREESHADOW
Description
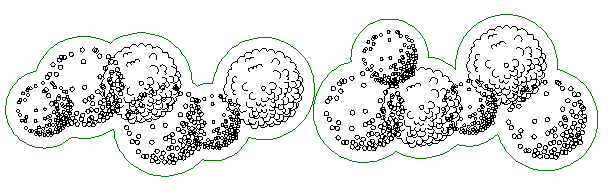
With this function inserted blocks (e.g. tree symbols from the DATAflor Library) can be provided with a tree shade.
Selected tree symbols must have the base point in the center and contain a round tree symbol.
Application
- A dialog opens after the command has been called. On the tab selection extensive selection functions are available.

With Choose object individual blocks can be selected in a targeted manner. over All starting with a name and entering e.g. one B all blocks are selected that start with B (e.g. Tree_1 and Tree_2). If no entry is made, all blocks in the drawing are shaded (not just trees). The number of selected blocks is shown at the bottom of the dialog.
Via the settings in the area Filter the selection can be further restricted.
- On the tab Border the necessary settings can be made for the boundaries of the blocks. A border is a boundary line around the block that has multiple uses. The line represents the inner boundary for the hatching of the tree shadow. Without tree shadow, it can be used as a tool for determining the area for plant planning or as a graphic tool.

The distance can be entered directly as a value. Alternatively, he can also use [Demonstrate] can be specified directly on an object.
For the Reference the options relative and absolute are available. The setting relatively takes into account the size of the selected trees. The at distance entered value is added to the radius of the tree. Thus, the distance between the border and the tree is always the same, no matter how big the tree is. At absolut the value entered under Distance is used directly as the default value for the radius around the base point of the tree. The border is therefore no longer dependent on the size of the tree.
absolute value 3 relative value 0.1 (side outside) 

The option page is important for the relative reference. Here you can control whether the border is on the outside or on the inside. External Borders are mostly used for graphic effects, internal mostly for calculations (e.g. for excavating plant pits).
Additionally you can Color and Layer to be chosen.
Example
Border only as a graphic element and as a basis for area calculations in the Object Manager.
The border can be in Object manager are recorded. This makes it possible, for example, to determine the area required for plant protection measures.
- Inside the tab Shadow the settings for the shadow calculation are specified. The shadow is divided into the outer boundary of the shadow, with which the shadow is calculated, and the filling. You can use the perimeter of the shadow show or hide.

Shop gives the direction and Offset length specifies the length of the shadow cast. Both values can be entered directly or alternatively with [Demonstrate] be tapped at an object.
For the Offset length the options relative and absolute are available. The setting relatively takes into account the size of the selected trees. The value entered for the offset length serves as a factor. The offset length is calculated from this factor and the radius of the tree. Thus the offset of the border always depends on the size of the tree. At absolut the value entered for the offset length is used directly as the default value for the offset of the border. The length of the shadow is therefore no longer dependent on the size of the tree. All plants have the same shadow length.
absolute value 3 relative value 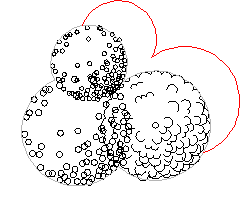

Additionally you can Color and Layer to be chosen.
- On the tab filling the hatching for the shadow is determined. You can fill the shadow show or hide.

For the hatching hatching can be selected from the list or alternatively via other hatches can be accessed. About the inputs factor and Shop the appearance of the hatching can be controlled.
Hatching type SOLID (see Glossary) 
Additionally you can Color and Layer to be chosen.
- With [Preview] the result can be viewed. After confirming with [OK] the tree shadows are created in the drawing.
Editing trees with shadows
If trees are to be moved in the drawing, this can be done without any problems. To do this, a tree only needs to be marked and then moved at the pick point.
| previously | afterwards |
|---|---|
|  |
There is another possibility: Double-clicking opens the window Features. Changes can be made here without an extra command.

This note may appear when creating new tree shadows:

This means that a tree shadow has already been created for a selected object, but its border, shadow and / or filling are on non-visible layers. (see command LAYER)