Table of Contents
Quick-Masses
Command: QMASS
Description
With the window Quick-Masses you get the opportunity to move the objects into the Object manager capture.
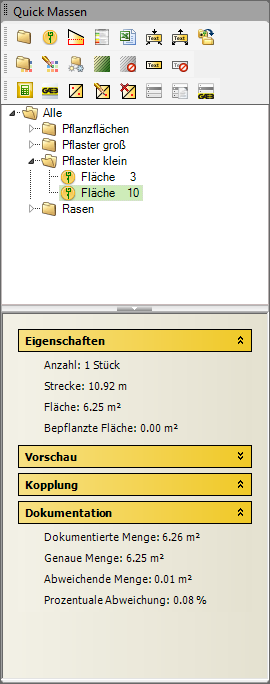
Since the mass tree with the assigned objects is displayed here, you also get an overview of the objects you have already entered Objects (CAD).
To add more objects, simply drag the objects from your drawing into the groups / positions.
A hatching can then be selected as a new object type hatching is created. In principle, the properties correspond to those of a surface.
In contrast to the area, hatching cannot be added manually Island areas be provided. If the hatching has islands, these are automatically created by the program. These cannot be edited manually in the mass tree.
Application
- Select the object in the drawing so that the Claw are visible.
- Right-click the selected object (and hold down the mouse button).
- Drag the mouse pointer to the group / position in the mass tree of the window Quick-Masses.
- Put the object down by releasing the mouse button.
Features
Functionality
Once an object is in the window Quick-Masses is recorded, for this CAD drawing element the Features are recorded (e.g. distance, area, volume) and new properties (Schedule, Label etc.) in the drawing if this is in Object manager is defined.
If the drawing is linked to a specification of services, information can be found in the Link can be viewed. (see also BUSINESS-Link, GAEB interface)
In the area Documentation details of the quantities are displayed: Documented amount and Exact amount. Once an object is documented, changes in Different amount and Percentage deviation .
During Capture of an object in the Quick masses window, you have two additional options:
Directly generate the Documentation To the object: After you have moved the mouse pointer to the group / position, press the key D. Then release the left mouse button. The documentation is created in the drawing.
For more information on this topic, see Documentation.
You use the same procedure to capture objects as XNUMXD objects. To do this, press the button 3.
You can move the groups and objects in the mass tree with the left mouse button. If you press the button Ctrl Hold down, the group / object is copied.
The window Quick-Masses can be positioned/fixed like the window Properties.
Standard toolbox
| New group: Creates a new group in the mass tree (see Mass tree > Groups). Or press the button Insert. | |
| 2D ⁄ 3D capture: You can display the objects in the projection (2D) or in the 3D development of the object or in Processing onto a 3D surface of DATAflor to capture. | |
| Derive contour: Connects the selected objects with the help of contour tracking and inserts them as one object in the mass tree (see Contours and objects). | |
| Generate legend: Generates a legend from the mass tree structure and the objects it contains and then inserts it into the drawing (see Generate legend). | |
| transferred to Excel: Transfers the mass tree structure to Microsoft Excel (if installed on the computer). It is important which group is with Export is marked (from this node the transfer takes place) and the status of the groups (closed groups are transferred as a summary, with open groups the individual objects are also listed). | |
| Summarize the labeling: Creates a megalabel from several text labels (see Text tools - Combine text label to mega label). | |
| Detach labeling: Dissolves a megalabel into individual text labels (see Text tools - dissolve megalabel). | |
| Export mass tree: Exports mass trees to a selected directory or to a library in the Quick Manager (see Mass tree). | |
| Object manager: Opens the Object manager, which contains the mass tree with the recorded objects. There are further functions there, e.g. for plant planning, and settings for labeling and dimensions can be made. |
Toolbox properties
| Theme Manager: Opens the Theme Manager, in which topics with labels and graphics can be defined. | |
| Edit properties: Call the Theme Manager with the assigned properties of the selected group (if applicable of the object). The changes will only be applied to the selected group and not to the underlying theme. | |
| Visibility Manager: Controls the visibility of the object properties (see Control of visibilities). |
Toolbox Link / documentation
| DATAflor BUSINESS Item Link: Imports a specification of services DATAflor BUSINESS (please refer BUSINESS-Link). | |
| Update LV: Updates the quantities in the specification of services or in the offer and the LV structure in the drawing. | |
| Extended GAEB import: Imports a GAEB-LV and automatically creates a position coupling DATAflor BUSINESS. (please refer GAEB interface) | |
| Generate documentation: Generates the documentation for the objects in the selected subtree. (please refer Documentation) | |
| Edit documentation: Opens the dialog for manual editing of the documentation of the selected object. | |
| Delete documentation: Deletes the documentation for the objects in the selected subtree. | |
| Write mass list: Generates the quantity statement for the objects in the selected subtree. (please refer Create quantity proof) | |
| Print mass list: Prints the in DATAflor BUSINESS active quantity verification. | |
| Export mass list as REB file: Prints a REB compliant quantity certificate in data exchange format D11. | |
| Bing Maps: Shows the position of the coupled drawing objects via Microsoft Bing. |
Graphical Estimation Toolbox
| DATAflor BUSINESS compatibility mode: activates the compatibility mode the graphical cost estimate for the objects in the selected subtree. | |
| Transfer specification structure to DATAflor BUSINESS: transfers the selected subtree from the quick masses DATAflor BUSINESS (Provided: DATAflor BUSINESS Is installed) | |
| Display graphical cost estimate dialog: after activating the BUSINESS-Compatibility mode can be in dialog Graphic cost estimation Prices, time approaches and texts can be assigned. | |
| Show Errors: The Show Errors checks the tree in the quick masses for structural errors and displays them. |
Position images toolbar
| Attach an area as a screenshot to position : Creates an image from a selected area. This image is attached to the position. (Provided: DATAflor BUSINESS Is installed) | |
| Sent a screenshot of the position to DATAflor BUSINESS: Generates images of all positions in the selected subtree and transfers them to DATAflor BUSINESS. (Provided: DATAflor BUSINESS Is installed) | |
| Show pictures of the selected hierarchy: The pictures of the selected hierarchy are displayed in a separate dialog. (Provided: DATAflor BUSINESS Is installed) |
Functions of the right mouse button
Additional functions are available via the right mouse button.
You can Zoom in on objects: shows the marked object or the objects of the marked group on the screen. The zoom factor can be adjusted via the Options can be set.
In addition, the Status select whether and how the objects should be displayed (documentation on ⁄ off, contours on / off, lock / unlock contours, marking on / off).
Insert mass tree
- Click with the left mouse button on a symbol within the palette and keep the mouse button pressed.
- Drag the mouse pointer to the drawing area and release the mouse button.
- If the mass tree contains recorded objects, you will be asked to enter the insertion point for the objects. This is done with the key Enter confirmed, the objects are inserted as in the original.
- The mass tree is in the object manager under the group Library objects inserted.
Note that the Import of very large mass trees can take a long time. Therefore, check the use of the option in advance Do not sort graphics order (please refer Options - General tab> View area).
If a group from the Theme Manager drag & drop into the Quick-Masses then all topics below the group are displayed as groups in Mass tree created. This possibility of groups from the Theme Manager is to be added analogously to the function Create a new group on this topic.