Table of Contents
Entering the SQL commands
The input of the SQL commands is done with [Append ...] or [Create…]
Select SQL
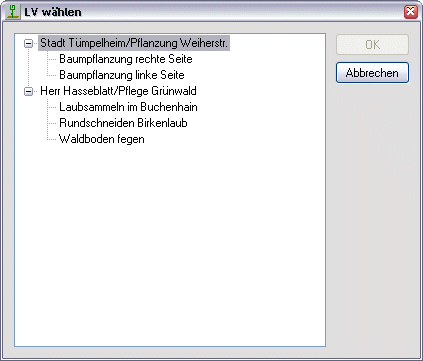
In a configuration, any number of SQL commands (hereinafter always referred to as AUSWAHLSQL1, AUSWAHLSQL2 etc.) control the selection of the subset of data records from a file. In the example, all projects and the LVs belonging to the project are to be displayed for the selection of the LV. The following steps take place for selection:
| Step 1: | SELECTIONSQL1: | SELECT projectID, description, client FROM PROJECTS |
This command creates the list of all projects and enters them in a tree structure as nodes of the first level. The first selected column is used to uniquely assign the node to the data record. The table's primary key must always be selected here.
It is very important that a column is selected here that clearly identifies the data record.
The designation of the nodes can be specified for each level in a formatting text. The following formatting text is used for the first level in the example: [Designation], [client]
SELECTIONSQL1 is called for each node found in step 2. SELECTIONSQL2 is:
| Step 2: | SELECTIONSQL2: | SELECT LVID, description FROM LVS WHERE ProjektID = [PROJEKTE: ProjektID] |
Every time an expression is in [] appears in the SQL commands, this expression is loaded from the node of the higher level. In this case the content of the field ProjectID from the table PROJEKTE, which was loaded in AUSWAHLSQL1.
The records found are entered under the respective node from step 1 as sub-nodes. Again the first selected column is used for the clear assignment of nodes → data record. Only the designation in the formatting text is used for the second level: [Designation]
This results in the following structure in the example:
With a flat structure, SELECTIONSQL2 can be omitted. If the last existing level does not provide a result, the corresponding results from the higher levels are not displayed either. In the example, the project with the ID 15344 "Water park" is therefore not displayed.
The depth of the nesting is unlimited.
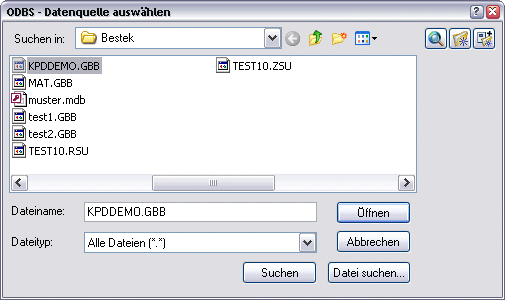
If the database structure to be connected consists of several files (e.g. one file for each LV), this can also be solved with the ODBS. In this case an entry must be made in the field Selection title take place in the main dialog and no SELECTIONSQLCommands must be defined. If the configuration is then used, a file selection dialog opens in which the corresponding database file can be selected.
The setup of the Windows ODBC driver is analogous to the procedure already described. The selection of the file is irrelevant, it is only responsible for specifying the directory.
Groups SQL
Again, any number of GROUP SQL commands generate the tree structure for the Object manager. Since there are a maximum of three position levels in our example, three entries must also be made for GROUP SQL to be created:
| Step 1: | GROUP SQL1: | SELECT PositionID, position number, short text, graphic ID FROM POSITIONS WHERE LVID = [LVS: LVID] AND ParentID IS null |
The results from GROUP SQL1 are now entered as the first level node in the mass tree structure. The first selected column is used to uniquely assign the node to the data record. The table's primary key must always be selected here.
It is very important that the first column selected is a column that uniquely identifies the data record.
The designation of the nodes can be specified for each level in a formatting text. For the example, the following formatting text is used for all levels: [Item number]: [Short text]
After that, GROUP SQL2 is executed for each of these nodes, which looks like this:
| Step 2: | GROUP SQL2: | SELECT PositionID, position number, short text, graphicID FROM POSITIONS WHERE LVID = [LVS: LVID] AND ParentID = [POSITIONS: PositionID] |
and last:
| Step 3: | GROUP SQL3: | SELECT PositionID, position number, short text, graphicID FROM POSITIONS WHERE LVID = [LVS: LVID] AND ParentID = [POSITIONS: PositionID] |
GROUP SQL3 is with GROUP SQL2 identical and only provides different results because the condition "ParentID = [POSITIONS: PositionID]" relates to the results from GROUP SQL2 (i.e. only the positions below the 2nd level are selected).
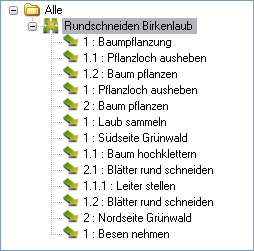
Analogous to the SELECTIONSQL commands, a tree structure is created from the three SQL commands, which is then saved in Object manager is inserted as a mass tree. In the example, the mass tree within the object management looks like this:
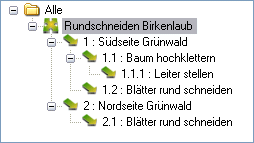
The top node is the selected LV (in this case the LV with the ID 17243: "Circular cut birch leaves"). The data record structure generated from the GROUP SQL commands is created below this. In contrast to the SELECTIONSQL commands, GRUPPENSQL shows results from the higher levels even if there are no more results in a lower level. In the example these are positions 1.2, 2. and 2.1.
The hierarchy must be specified in the database structure, otherwise only one group level can be displayed. In the example, this would be the case if the column Parentid would be missing and there would only be one GROUP SQL command. In this case all positions would be displayed in one plane.
Graphic SQL
If the connected database contains graphic information, this can be taken into account in the connection. A hatch name, the color and a factor can be read out. In this version only hatching is possible.
There is only one GRAPHICSSQLCommand for all levels.
To evaluate the graphic information, for each data set found, all GROUP SQLCommands of the GRAPHICSSQLCommand called. The result can consist of the following columns:
| Type | Only the first character of the field is evaluated. With 0, "H" or "S" hatching is created. With 1 or "B" a block is inserted. With 2, "I", "P" or "G" a graphic is inserted. With 3 or "L" a line type is specified. No distinction is made between upper and lower case. The default is 0. |
| Name | The name of the hatch, block, graphic file, or line type. The standard (default) for hatching is "SOLID", for line types "CONTINUOUS". In the case of a block or a graphic, the field must be available to specify the name of a file (for a graphic with an extension!). A hatching must be contained in the hatching file or it must be able to be found in the search path. The line type must have already been included in the drawing or in the file .LIN exist. Blocks and graphic files must be able to be found in the search path. No distinction is made between upper and lower case. |
| Color | The color index applies to the color of the graphic. The default is 7 for white. The names of the basic colors or the letters in brackets "red" ®, "green" (g), "yellow" (y), "cyan" ©, "blue" (b), "magenta" (m) and " white “(w); “White” or “black” are also recognized. No distinction is made between upper and lower case. The color “white” or “black” or 7 is in DATAflor CAD always displayed as the complementary color of the background. In the case of the letters in brackets, it is sufficient if the first character matches. “Yellow” is therefore recognized as yellow. |
| factor | A real or whole number as a factor for the graphic. The default is 1,0. Blocks are scaled evenly in X, Y and Z. With line types, the value is interpreted as width. |
| Layer | The name of the layer on which the graphic is generated. Not applicable for line types. |
Since the columns in the example table have different names, they have to be renamed in the SQL command:
| Step 1: | GRAPHICSSQL: | SELECT description AS name, color index AS color, factor FROM GRAPHIC WHERE GraphicID = [POSITIONEN: GraphicID] |
The GRAPHICSSQLCommand should return exactly one data record as a result. All other records found are ignored.
Object SQL
The OBJEKTSQL command defines the creation of graphic objects in the drawing when a database is connected. It is called once for each node created by the GROUP SQL commands. The OBJEKTSQL command is not used in this example, as no graphic objects are generated from the database. The following description therefore only clarifies the command syntax.
There is only one OBJECTQLCommand for all levels.
The result can consist of the following columns:
| Type | Only the first character of the field is evaluated. 0 or "B": Inserts a block in the drawing. 1 "C" or "P": Creates a polygon from all data records found. With "C" a closed polygon is always created. The default setting is 0 for block. |
| ID | The ID with which the object is linked to this data record. This is important later when synchronizing. With type 1 ("Poly"), the ID of the first data record found is used. With type 0, each object receives the ID of the corresponding data record. |
| Name | The name of the block is "$$ DBOBJ.DWG". This parameter does not apply to polygons. |
| Color | The color index applies to the color of the block or polygon. The default is 7 for white. The names of the basic colors or the letters in brackets "red" ®, "green" (g), "yellow" (y), "cyan" ©, "blue" (b), "magenta" (m) and " white “(w); “White” or “black” are also recognized. No distinction is made between upper and lower case. The color “white” or “black” or 7 is in DATAflor CAD always displayed as the complementary color of the background. In the case of the letters in brackets, it is sufficient if the first character matches. “Yellow” is therefore recognized as yellow. |
| factor | A whole or real number. In the case of blocks, this is the scaling factor. The default is 1,0. For polygons this is the line width. The default is 0.0 |
| Layer | The name of the layer on which the block or polygon will be inserted. |
| X, Y, Z | The coordinates for inserting the block or for the support point of the polygon. The default setting is 0.0 in each case. |
If the columns in the database have different names, they must be renamed in the SQL command:
| Step 1: | OBJECT QL: | SELECT ID, type AS type, name, color index AS color, size AS factor, right AS X, high AS Y, height AS Z FROM COORDINATES WHERE PositionID = [POSITIONS: PositionID] |
If the OBJEKTSQL command returns several results for type "Block" (0), several blocks are inserted. If it delivers several results for type "Poly" (1), the order of the data records must either be defined by a corresponding "ORDER BY" or the data records must be delivered in the appropriate order by the database driver.
A closed polygon is created when the first coordinate is the last to be repeated or the type "C" has been specified.
In order to keep the requirements on the database structure as low as possible, this SQL command can be supplemented with overrides for the defaults. This is done by appending the overrides in curly brackets to the end of the SQL command. If, for example, the type is not supplied, but should be 1 for "Poly", the appendix is: {Type = 1}
The name is not supplied, but the block should 3DTREE.DWG are inserted, the appendix reads: {Name = 3DBAUM.DWG}
The designation of the created objects can be in a formatting text like the SELECTIONSQL- And GROUP SQLCommands can be specified. If the formatting text is left blank, numbering takes place in the number range of the object manager.
With the default DBOBJ.DWG in the name field it is a DATAflor CAD supplied block. It contains a circle with diameter 1 and a cross.
Quantities of SQL
These are two SQL commands with different meanings. MENGENSQL1 reads out the unit of measure or defines the object property that is to be entered in the database. QUANTITY SQL2 writes the quantity into the database.
There are three different options available for QUANTITY SQL1:

| SQL | When choosing SQL an SQL command can be defined which reads the unit of measure from the database. This is explained in the application example. |
| Formula {} | With the selection Formula an object property or an arithmetic operation can be defined, which is written into the database table regardless of the unit of measure set in the database. |
| Attribute {} | With the selection Attribute the assigned attribute can be set in the mass tree, which is written to the database table. |
After selecting one of the options, it is entered in the dialog and must not be deleted. The QUANTITY SQL1 command with the SQL option should deliver exactly one data record as a result. All other records found are ignored.
| Step 1: | QUANTITY SQ1: | SQL: SELECT unit of measure FROM POSITIONS WHERE PositionID = [POSITIONS: PositionID] |
The unit of measure is important with that DATAflor CAD knows which object attribute should be written to the data record. For m² this is the area, for m the length etc. If the units of measure are unknown, an attempt is made to use the in the file UNITS.TBL to get a known unit of measure. If the table does not contain a unit of measure, QUANTITIESQL1 remains empty and the quantity with the most dimensions is always entered (for volume objects m³, for area objects m², etc.).
This does not apply to objects that have an attribute with the designation DB amount is added (see he grunted-Interface > How it works). In this way, for example, conversions can be made and this result can then be entered in the database. MENGENSQL1 is not evaluated for these objects.
MENGENSQL2 is necessary for entering the quantity in the table that was defined with MENGENSQL1.
| Step 2: | QUANTITY SQ2: | UPDATE POSITIONS SET Quantity = [OBJECT: ATTRIBUTE] WHERE PositionID = [POSITIONS: PositionID] | |
QUANTITY SQL2 is called every time a change takes place within the tree of the database connection, i.e. when objects are added or removed or a drawing object changes.
QUANTITIESQL2 does not necessarily have to select the data record that corresponds to the node that is displayed in the tree in order to enter the quantity.
If MENGENSQL2 delivers several data records as a result, the quantity entry is made in all data records.
Both MENGENSQL commands may only select one database column.
After completing the ODBS configuration, the configuration file is saved with [OK] and the configuration then appears in the database configuration selection for the database connection.