Table of Contents
Data selection in print management
Description
The Data selection is part of the Print management and is used for the output of forms of the form group Print out business transactions (Fast) .
- For the LV printouts such as offer, order confirmation, remuneration and invoice, the positions of the LV that are offered/confirmed/billed are selected in the data selection. This and other functions in data selection are explained in the following sections.
- In the batch print invoice, the LV for which the invoices are issued are selected in the data selection. A description of the functions for course selection can be found on the Wiki page Batch printing invoices.
Position selection
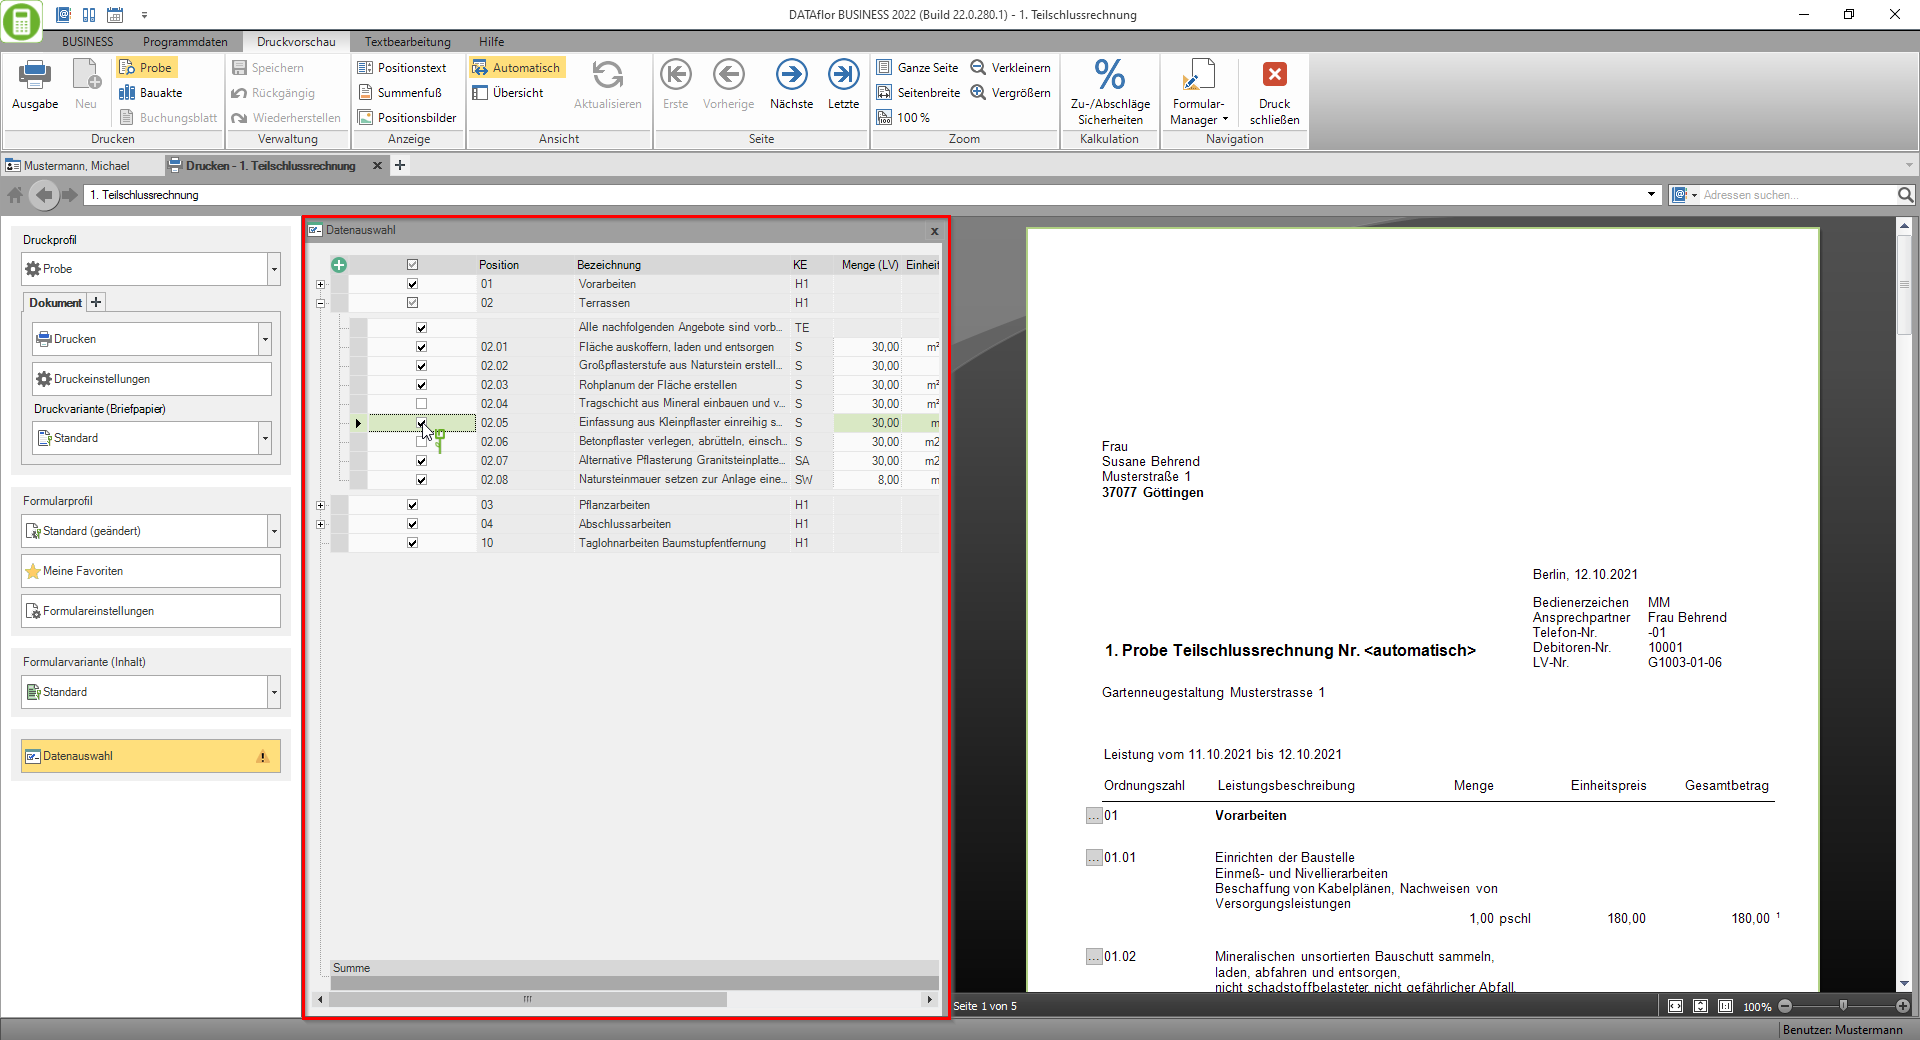
In the data selection you select the items of the LV that are offered/confirmed/billed. In LV printouts such as offers, order confirmations, remuneration and invoices, the LV positions are displayed in a table in the data selection with ordinal number, description, item identifier, quantity, unit price, etc. Via the Plus menu ![]() define the columns that will be displayed. Which columns are available depends on the form. You can also specify the order of the columns individually.
define the columns that will be displayed. Which columns are available depends on the form. You can also specify the order of the columns individually.
Start selection
When you first open the print management for a form in the LV, the data selection is loaded with a start selection of the items.
| Form | Quantities from - LV amount -% of LV amount | Quantities from - quantity approach - Proof of quantity - Summary of quantities |
|---|---|---|
| Services | all positions selected | only items with stored quantity selected |
| confirmation of the order, Compensation and on account | are not selected: - SA / MA / PA - SUN / MON - SE / ME / PE - SW / MW / PW -VR - Items without a quantity - Items without a unit price - Factor positions without a factor | only items with stored quantity selected |
With Program parameter 70.30.090 Default text positions can be controlled whether for Invoices, Compensations and Order confirmations the text positions (TE) should always be selected in the data selection.
Selection of individual positions
For the LV printouts such as offer, order confirmation, remuneration and invoice, you can select the LV positions that are offered/confirmed/billed in the data selection in the first column of the item overview.
- Selected positions
 are considered, deselected
  Positions not.
 - In the column header you can select or deselect all positions of the LV. You can also select or deselect all subordinate positions at the hierarchy level.
comfort functions
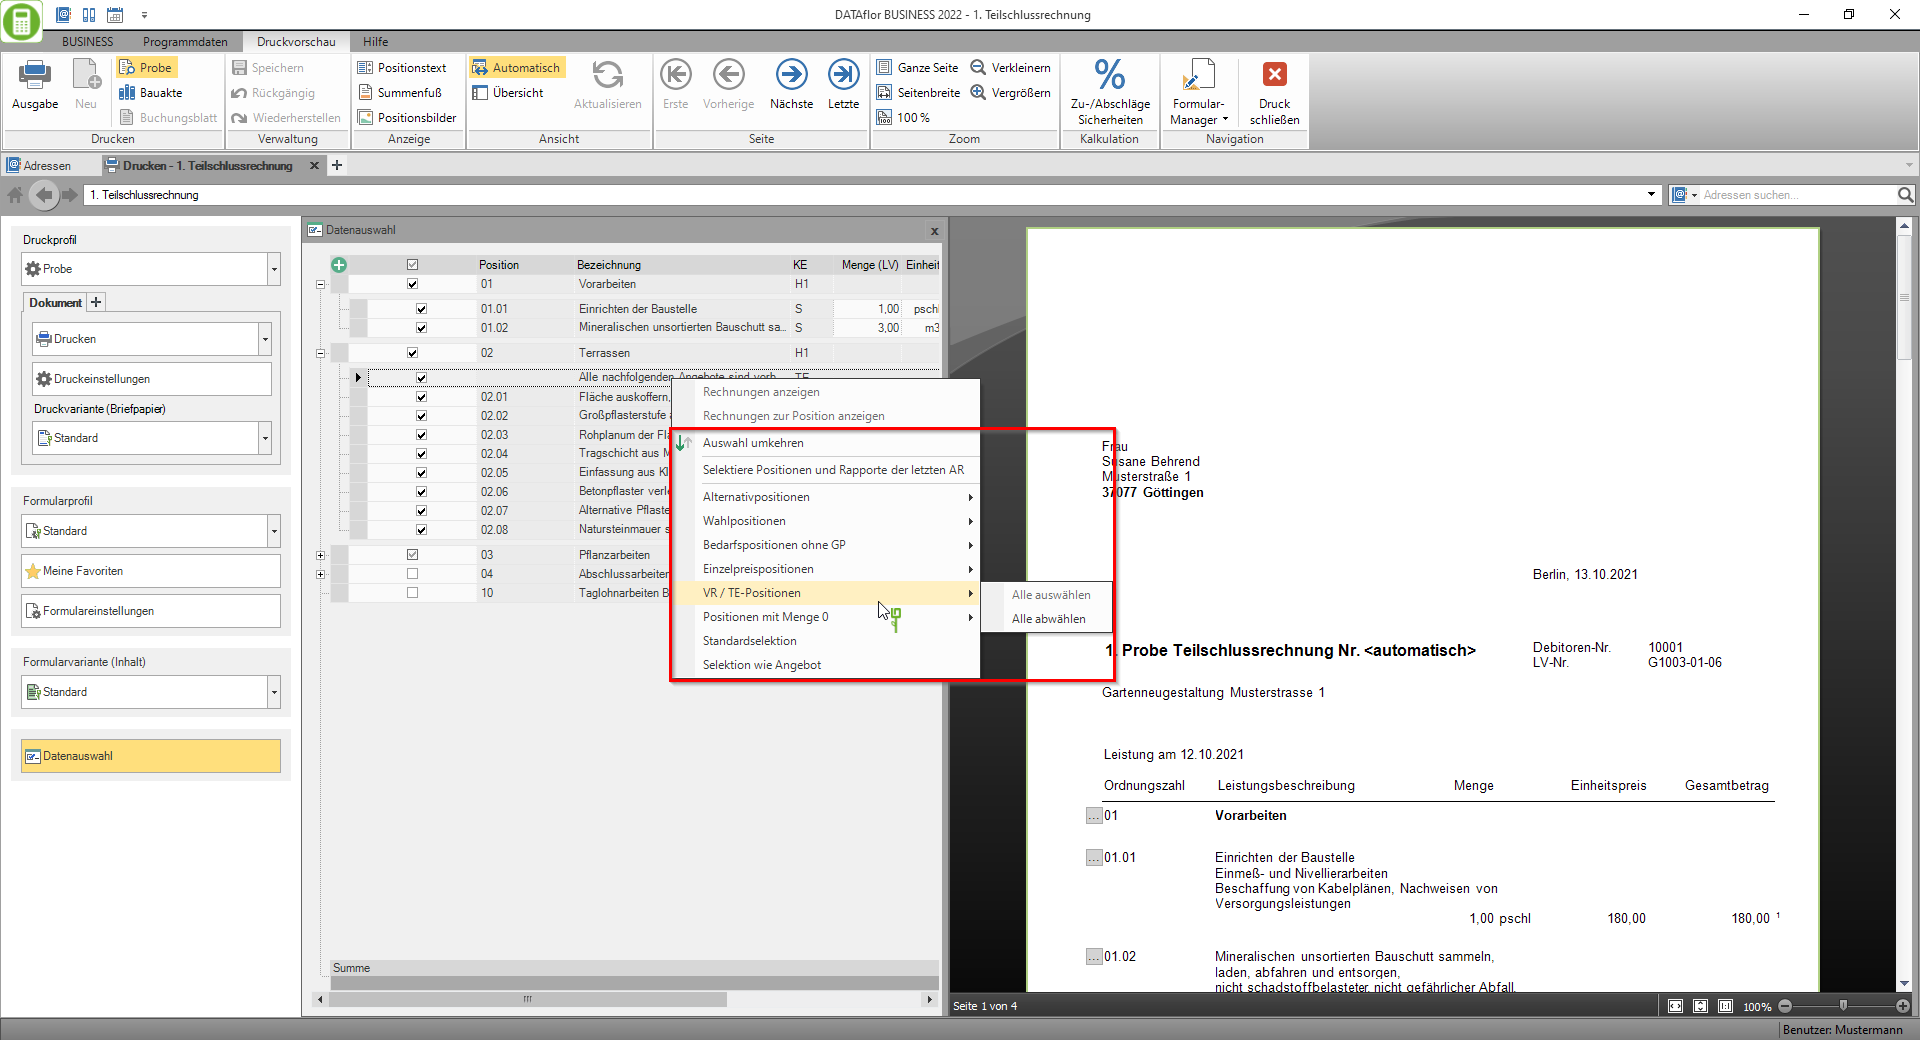
The following convenience functions for position selection are available in the context menu via the right mouse button.
| feature | Description |
|---|---|
| Invert selection | Selects the positions that are not selected and deselects all positions that are selected. |
| Select all items that have not been billed | Selects the items that have not yet been used in any invoice. |
| Select positions and reports from the last AR | Is displayed from 2.AR as well as TSR and SR. If no AR was placed before TSR or SR, no positions are selected. |
| Alternative positions (select or deselect all) | Is displayed if there are alternative positions in the course. Affects positions with the position identifier: SA, MA, PA. |
| Electoral positions (select or deselect all) | Is displayed if there are optional positions in the course. Affects positions with the position identifier: SW, MW, PW. |
| Requirement items without BP (select or deselect all) | Is displayed if there are requirement items without a total price in the LV. Affects positions with the position identifier: SO, MO. |
| Unit price items (select or deselect all) | Is displayed if unit price items are available in the LV. Affects positions with the position identifier: SE, ME, PE. |
| VR / TE positions (select or deselect all) | Is displayed if there are contractual services and / or text items in the course. Affects positions with the position identifier: VR, TE. |
| Items with a quantity of 0 (select or deselect all) | Is displayed if there are items without a quantity in the LV. |
| Standard selection | Services: Selects all positions Invoice/order confirmation/remuneration: Selects all positions except positions with the following position codes: SA / MA / PA, SW / MW / PW, SO / MO, SE / ME / PE, VR / TE. |
| Selection like offer | Is displayed if an offer for this course has already been printed. Selects the positions of the last printed offer. |
| Selection like order confirmation | Is displayed if an order confirmation has already been printed for this LV. Selects the positions of the last printed order confirmation. |
When selecting the position, note the selected Billing procedure:
- Cumulative: All items from previous advance payment invoices must be selected for each new AR, TR or SR. The sums from these invoices are deducted from the net at the end.
If a TR was placed above the previous AR, these positions may no longer be taken into account in future AR. By setting a TR, the positions concerned are completed and a zero line is formed. - Additive: Only those positions may be selected that are affected by this AR.
However, since TR and SR are always placed cumulatively, the selections from the additive AR must be made up for correct quantity determination.
Split
In addition to the most important Position data stand you above the Column selection of the plus menu ![]() the following additional columns are available:
the following additional columns are available:
Edit quantity / price
In the table the values are in the columns Quantity (LV), unity, approx amount, factor, Einheitspreis and Total editable. Click in the desired field and enter the new values for one or more items.
When you leave the respective field, the associated values are automatically recalculated:
- In the Change of Quantity (LV) and / or des Unit price is in the column Total the total price of the item is updated.
- In the Change of the total price in the column Total will the Einheitspreis the position updated.
Click on  im Print preview menu the new values are transferred to the LV.

Edit position text
In the table, select the item whose short and long text you want to view or edit and choose from the menu print preview the function Position text. In addition to the position table, the area Position text is opened and the short and long text of the item is displayed. The texts can be edited here or in the text editor, which can be opened with a double click on the text.

Click on  im Print preview menu the text changes are transferred to the course.
Select / edit position images
With the function Position images open the area next to the position table Position images. Select a position in the table to match the position in the LV to the tab Pictures deposited Pictures in the course to display.
- Here you can choose which images are used in the form if the option in the forum settings Pictures is activated.
- You can also add a description of the image or edit existing text.
- You can use the slider and the input field to set the height of the images for each position. The height entered in program parameter 70.20.105 is preset.

Click on  im Print preview menu the changes are adopted in the course.
Settlement of daily wage benefits
In the position table you can issue invoices by clicking on ![]() For each daily wage position, the services are displayed that are recorded in the reports for the LV. You can select all or individual services of an item for billing.
For each daily wage position, the services are displayed that are recorded in the reports for the LV. You can select all or individual services of an item for billing.

You can also select the services that you want to bill according to reports. The function is available in the context menu via the right mouse button Show reports is available for storage, management and analysis.
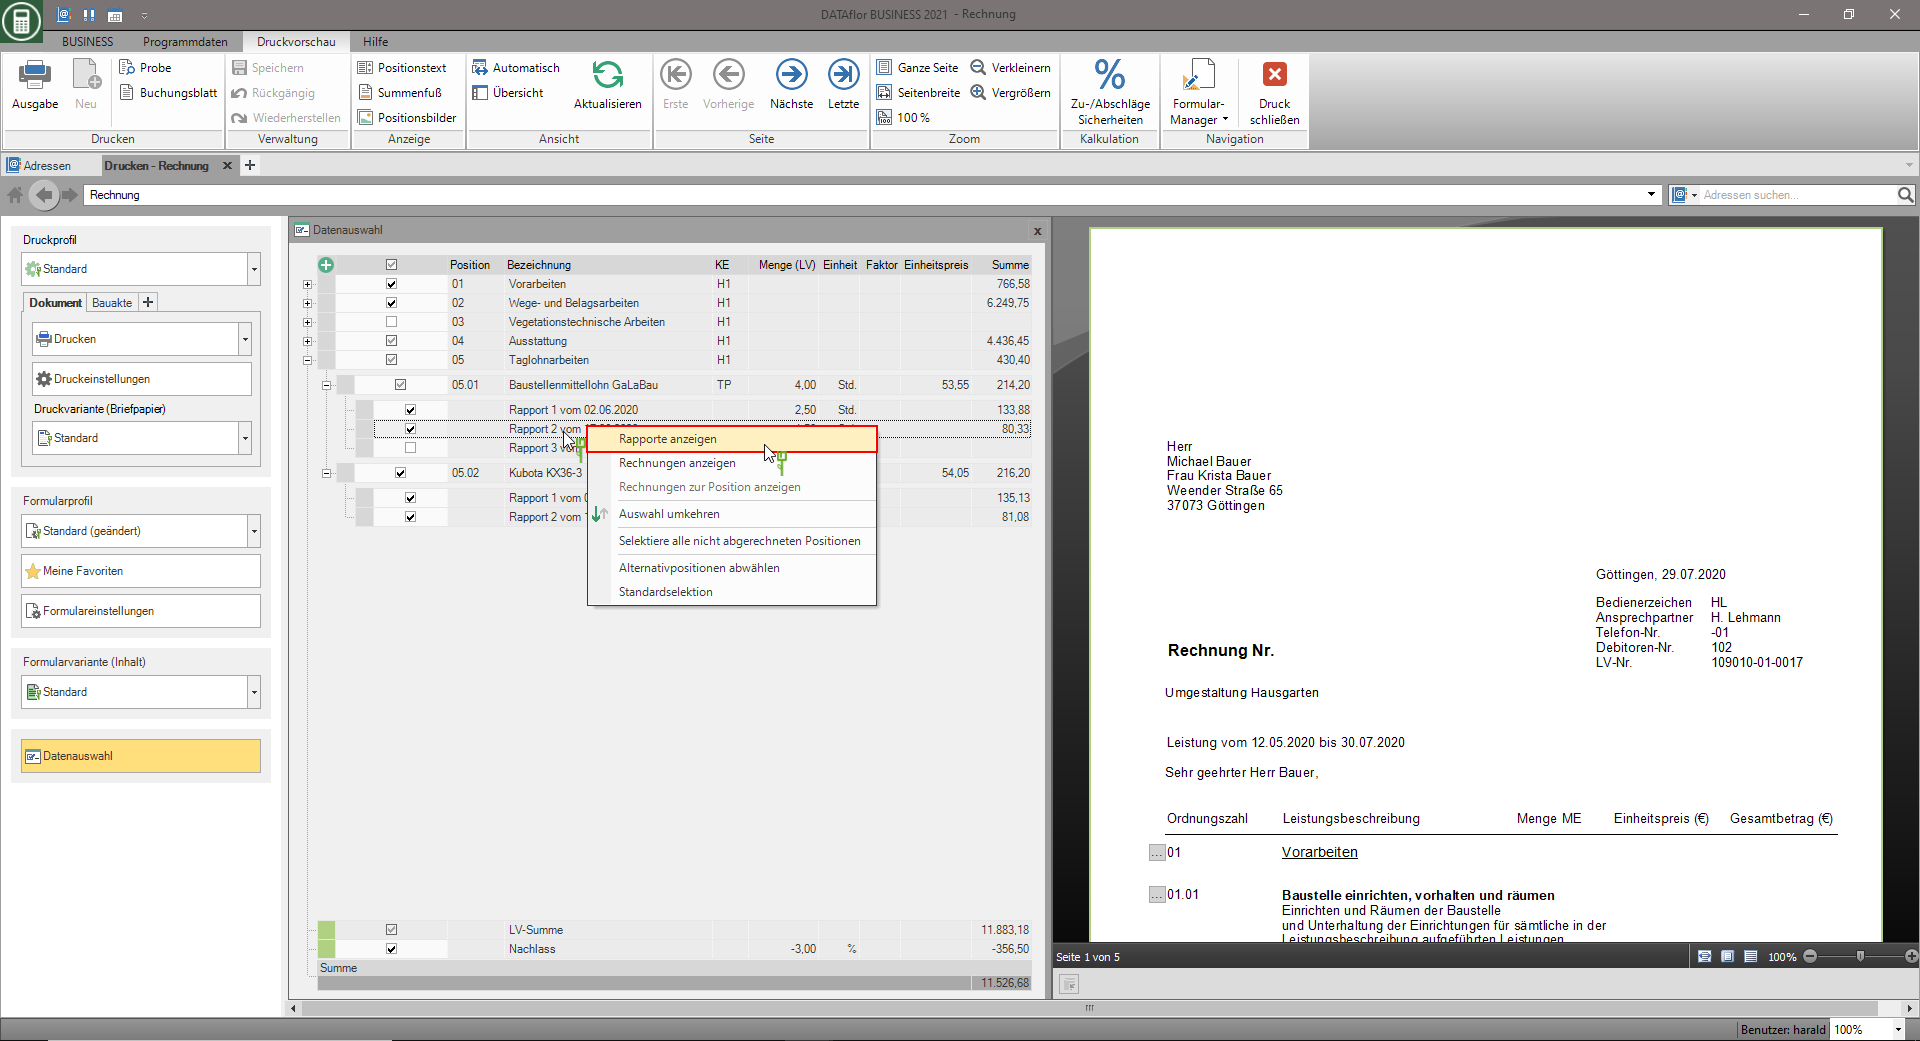
The dialogue Daily wage reports will be opened. You can select all or individual services of the reports. Confirm your selection with [OK]to apply the selection to the data selection.

Show net / VAT / gross
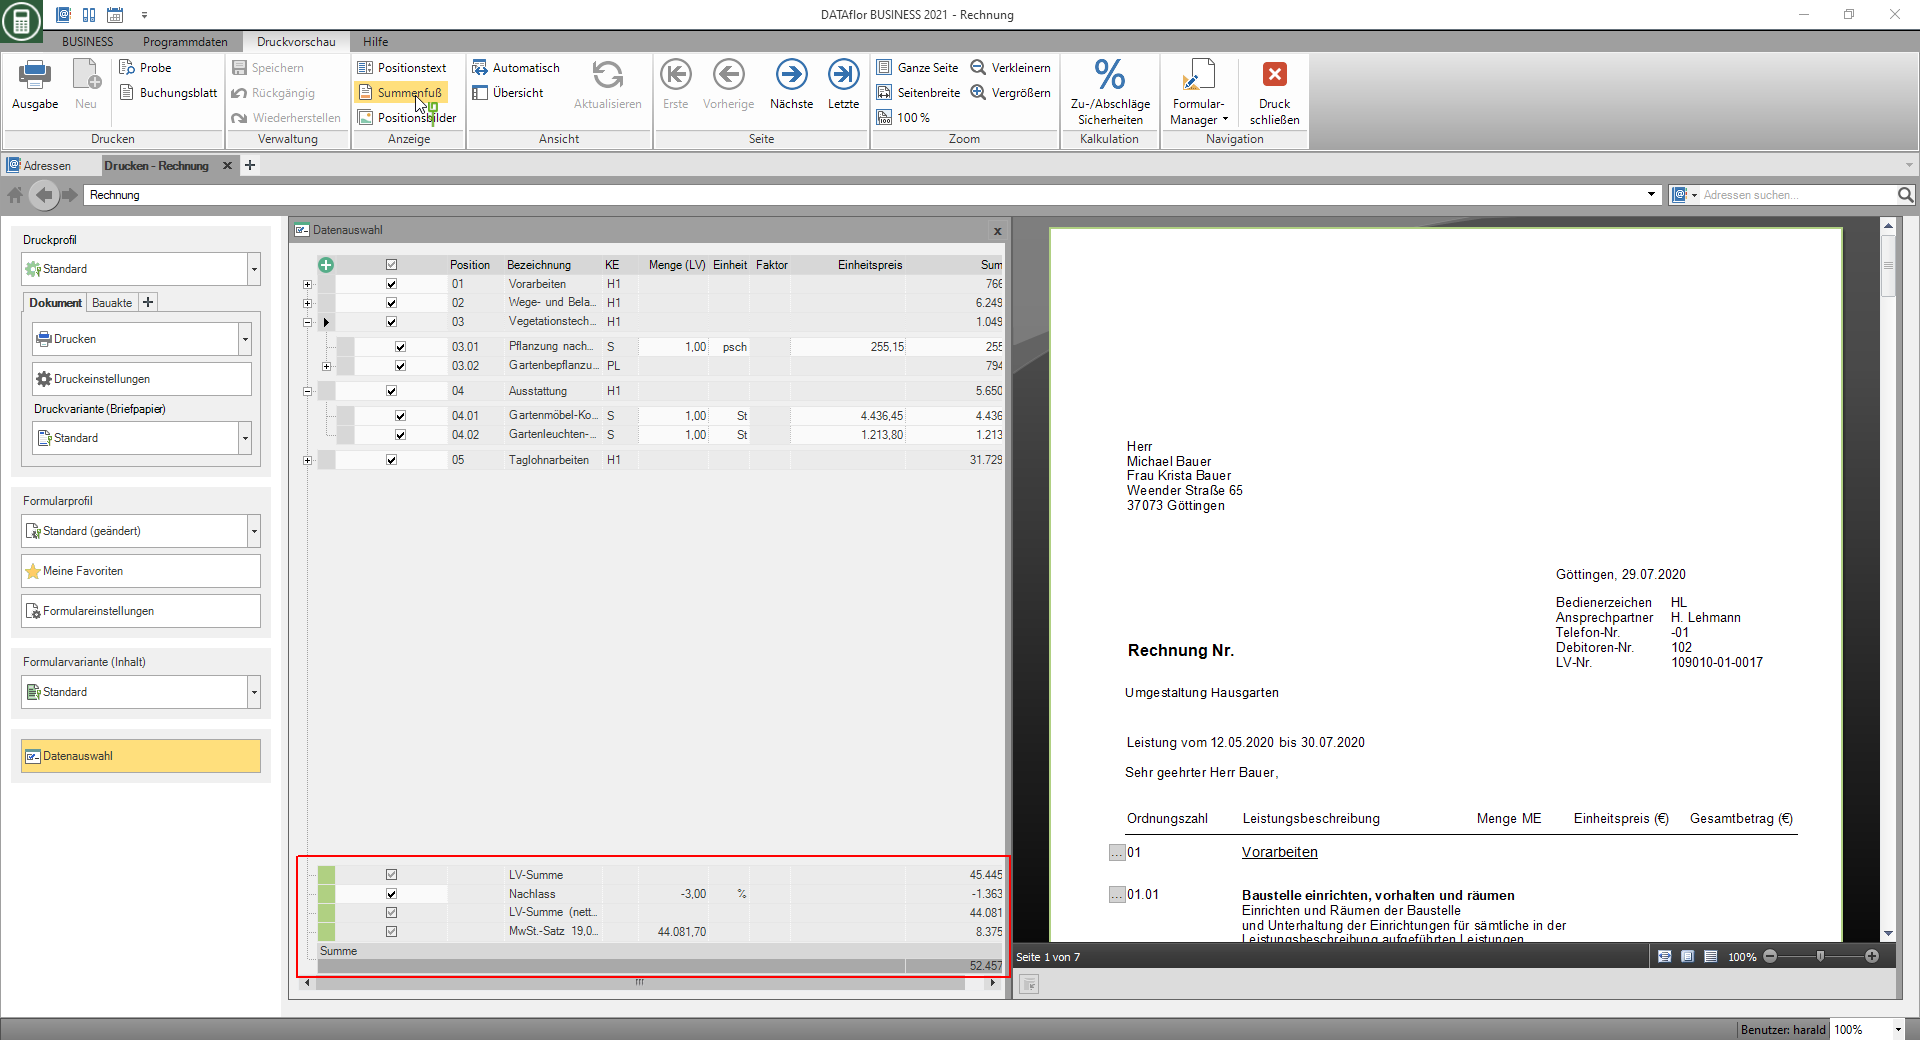
With the function Total foot im Print preview menu the calculation of the net amount, VAT and gross amount is displayed below the position table.
View invoices
The two functions are available in the context menu in the position table via the right mouse button View invoices and Display invoices for the item is available for storage, management and analysis.

The function View invoices opens the dialog Invoices and shows all invoices that have been submitted to the LV so far.
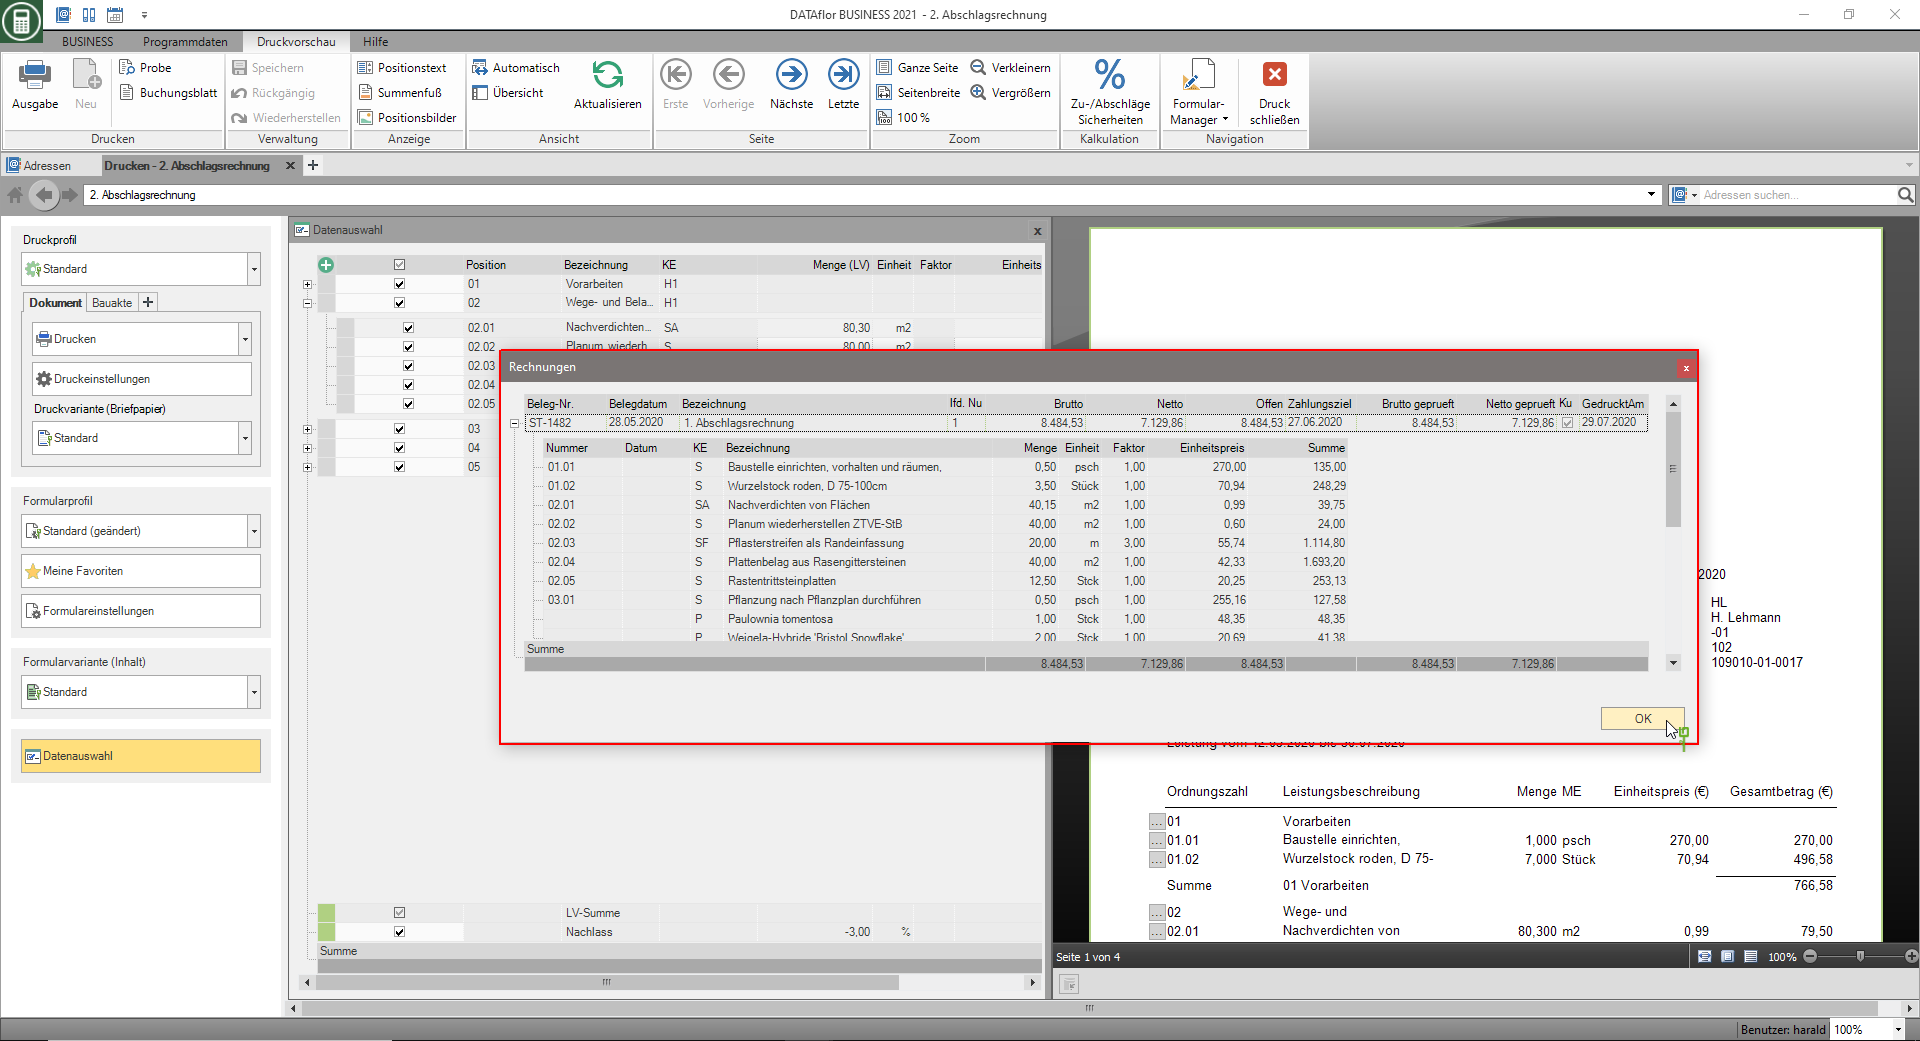
The function Display invoices for the item opens the dialog Invoices and shows all invoices in which the item was settled. In addition, the invoiced quantity and price of the item are displayed.

Position marking
Description
The Position marking improves the clarity in the data selection. Markers are represented in the form of symbols. The corresponding fields have a colored background. The individual positions can be marked as follows:
 | Important |
 | completed |
 | incompletely filled out |
 | important and incomplete |
| Long text contains text supplements (bidder gaps) |
Check for text supplements:
- All long texts are checked for <A and <B.
Application
The conditions for marking positions can be found in Program parameters 60.10.135 Presetting of automatic position marking preset. Here you define the status in which items in a LV should be automatically marked.

However, these settings can also be defined individually for each course. When a new course is created, the Course basic data these terms can be accessed.

manual position marking
In the case of position marking, a distinction is made between automatic and manual position marking. Whereby the manuelle Mark only the option Important has available.
automatic position marking
Within the automatic Position marking, all positions are checked for the conditions and marked accordingly. Positions the Important and have not yet been filled out in full will be accompanied by an  .
.
individual position marking
The individual position marker is displayed in the column Mark made by setting symbols at hierarchy and item level. If required, several symbols can also be set per hierarchy or per position. With a mouseover, the designations stored for the symbol are displayed in a tool tip.

About the button sortable list in the menu positions you can also conveniently sort your markings in ascending or descending order.

Define in advance in Program parameters 60.20.140 Individual position marking the symbols relevant to you and provide them with your own designations.
With the ![]() and
and ![]() or the key combination Ctrl + Page ↑↓ you can switch back and forth between all marked positions, including individually marked positions. This is very helpful with large service specifications where you have marked important positions that you do not want to search for a long time afterwards.
or the key combination Ctrl + Page ↑↓ you can switch back and forth between all marked positions, including individually marked positions. This is very helpful with large service specifications where you have marked important positions that you do not want to search for a long time afterwards.


