Table of Contents
Default
Description
In the pre-assignment you have the option to include parts of the input masks in the Addresses to customize according to your needs.
You can choose which Input fields for the tabs Address, Contacts, Employees, Client and Contractor should be displayed when creating an address. Defining Mandatory fields is also possible via the pre-assignment. Without filling out these defined fields, the address cannot be saved. You also have the option of adapting the names of some fields according to your requirements.
You can also define which options are included in the selection of the Plus logic should be displayed. You can Selection lists adapt to your needs and restrict or expand the entries.
Application
Features
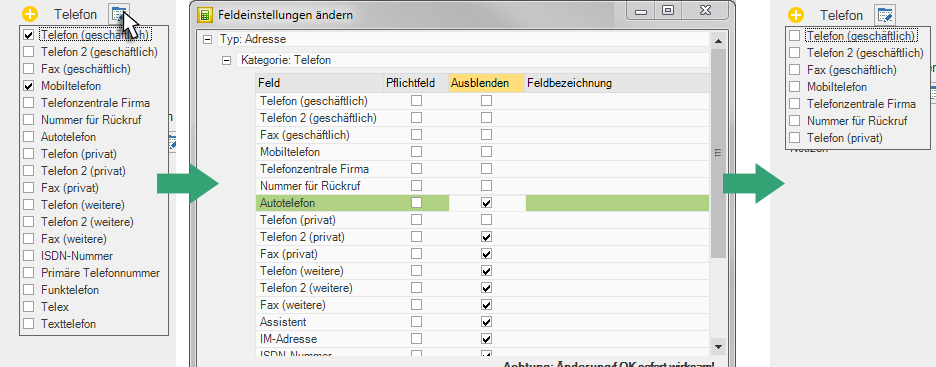
Display and deselect input fields
- Select the tab to edit.
- By clicking on
 the selection list opens. Here you can select and deselect the desired fields for the respective point.
 - The changes are applied after saving. The customized settings become new when you create them Addresses and contacts effective. With existing Addresses become the fields not automatically added.
Defining fields in lists of plus logic
- Select the tab to edit.
- In the column Hide you can select the fields that should be hidden or shown under this point.
- The changes are made by clicking on [OK] effective.
- The customized settings will apply to both existing and new Addresses and contacts effective.
Defining mandatory fields
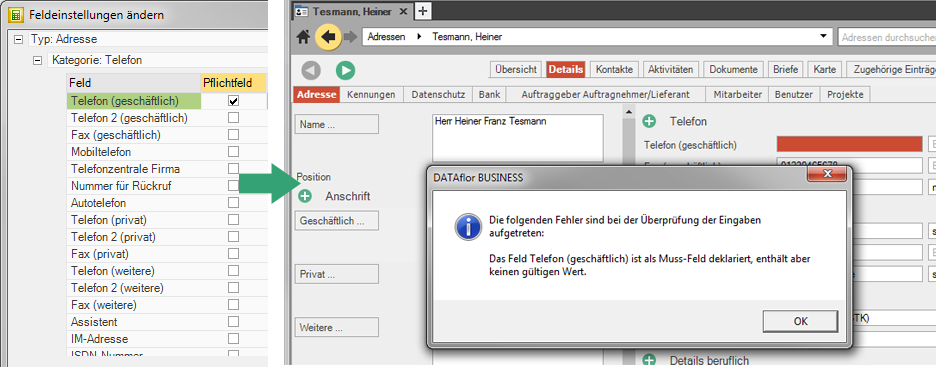
To ensure that important information Addresses are recorded, it is possible to define certain input fields as mandatory fields.
The address can therefore only be saved if these fields are filled.
- Select the menu> Info group Default .
- Select the tab to edit.
- In the column Required you can select the fields whose entry should be necessary.
- The changes are made by clicking on [OK] effective.
- The customized settings will apply to both existing and new Addresses and contacts effective.
Adjust field label
- Select the menu> Info group Default .
- Select the tab to edit.
- In the column Field name you can enter the new desired designation of the fields.
- The changes are made by clicking on [OK] effective.
- The customized settings will apply to both existing and new Addresses and contacts effective.
Adjustments to the field names are made only effective in the view of the address / contact. The Standard designation displayed.
Customize selection lists
- Select the menu> Info group Default .
- Choose tab Selection lists
- Adding list items:
- Click on the plus symbol for the selection list you want.
- To add an entry, choose new entry.
- A new field appears in the view. Here you can enter the name of the list item.
- List items that are not used in the program can be deselected using the same principle.
- Editing of list items:
- In the case of fields with a white background, the designation of the list items can be adapted.
- The changes will be made after the Save adopted.
- The customized settings will apply to both existing and new Addresses and contacts effective.


