Table of Contents
BUSINESS Network upgrade (up to version 2021)
Description
For updating your version DATAflor BUSINESS you must be logged on to the server as well as to the network workstations as a Windows administrator, in domain networks as a domain administrator. Later work with "normal" Windows user rights is possible.
Basic procedure:
- Perform replication and uninstall if necessary.
- First the BUSINESS-Server update.
- Then update all network workstations. It is not necessary to use the DVD at the workstations.
- If necessary, set up the replication again.
System Requirements
Make sure that your computer meets the system requirements. You can find all information about this here.
If there is replication
Before upgrading, please perform a replication for data synchronization in order to save all data on the server database.
When upgrading from DATAflor BUSINESS 2018 on DATAfor BUSINESS 2019 is a Uninstalling the replication required on the notebook. The installation program will advise you of this. In this case, uninstall replication and set it up again after the upgrade is complete.
BUSINESS-Server update
Start upgrade
Ab BUSINESS-Version 2018 the installation file is on the DATAflor Website available for download. Have you with DATAflor concluded a service contract, you will receive an e-Email sent with the link to this website.
1. Click on the link in the emailEmail the download page will open in your standard internet browser.
2. Open the section DATAflor BUSINESS -Version 2021 the material moisture meter shows you the DOWNLOAD AREA, then click in the section DATAflor BUSINESS 2021 on DOWNLOAD NOW and choose the function Save as.
3. Save the installation file DATAflorBUSINESS2021.exe directly on the server or copy them to the server after downloading.
4. Execute the installation file on the server with a double click.

If you are unable to download the installation file for technical reasons, send an e-mail to requestEmail an upgrade @dataflor.de a program DVD with details of the product. Insert the DVD into your DVD drive. By default this will be DATAflor BUSINESS-Start menu opened automatically. If the DVD does not start automatically, open Windows Explorer and run the file CD_Start.exe from the DVD.
Open the menu item in the start menu Installation and choose the option DATAflor BUSINESS to install. The installation begins.

The installation program will start. Depending on the computer system and the access rights, this can take 2 to 90 seconds.
Perform upgrade
First, the installation files are unpacked into a temporary directory.

Then the System Requirements checked. If a red traffic light is displayed, the installation cannot continue. Establish the system requirements and click with [To update].

If all requirements are met, ie all traffic lights are green, continue the installation with [Continue] continued.

The menu for setting the installation parameters is displayed:

Make the following settings:
| Feld | Description |
|---|---|
| installation type | Select the entry in the selection menu Server (update). |
| Program directory | The directories that you specified during the initial installation are set. |
| User data directory | |
| Database directory | So far they are BUSINESS- User data and the database are stored in the same shared directory. When upgrading, you can use the Database directory for your BUSINESS-Database select a different storage location. This can be a local directory without a share.
By default, when upgrading C: \ ProgramData \DATAflor preset. If necessary, specify a different directory. In this way, you protect your database and the associated log file from unauthorized access, deletion, modification and theft. Also check that the database is still being used by your Data backup system is backed up regularly. |
| License agreement | Read the user agreement carefully and confirm your consent by activating it  the option I agree to the license terms. the option I agree to the license terms. |
Confirm your settings with [To install].
The installation is carried out.

Exit the installation menu with [Complete].

BUSINESS- Update network workstation
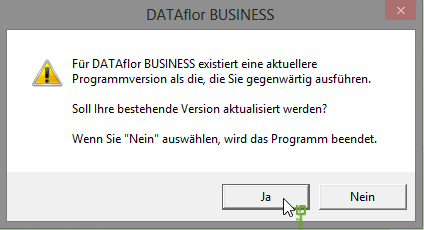
The update of the network workstations is started automatically the next time the program is started. Confirm the message with [Yes].

First of all, the System Requirements checked. If a red traffic light is displayed, the installation cannot be continued. Establish the system requirements and click on [To update].

If all requirements are met, ie all traffic lights are green, continue the installation with [Continue] continued.

The menu for setting the installation parameters is displayed:
- Select in the selection menu installation type the entry Network workstation (update).
Confirm your settings with [To install].

The installation is carried out.

Exit the installation menu with [Complete].

BUSINESS-Update server workstation
To carry out the update for a workstation on the server, proceed in the same way as for BUSINESS- Update network workstation.
The instructions for installing DATAflor BUSINESS up to version 2018 can be found here.
