Table of Contents
Create LV
Description
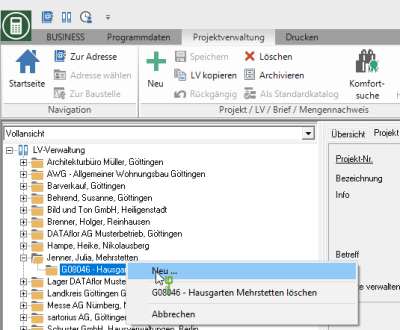
First mark the project or object in the project tree for which you want to create the LV. Then open the context menu with the right mouse button and select the function New… or click on  in the menu.
Specifications tab
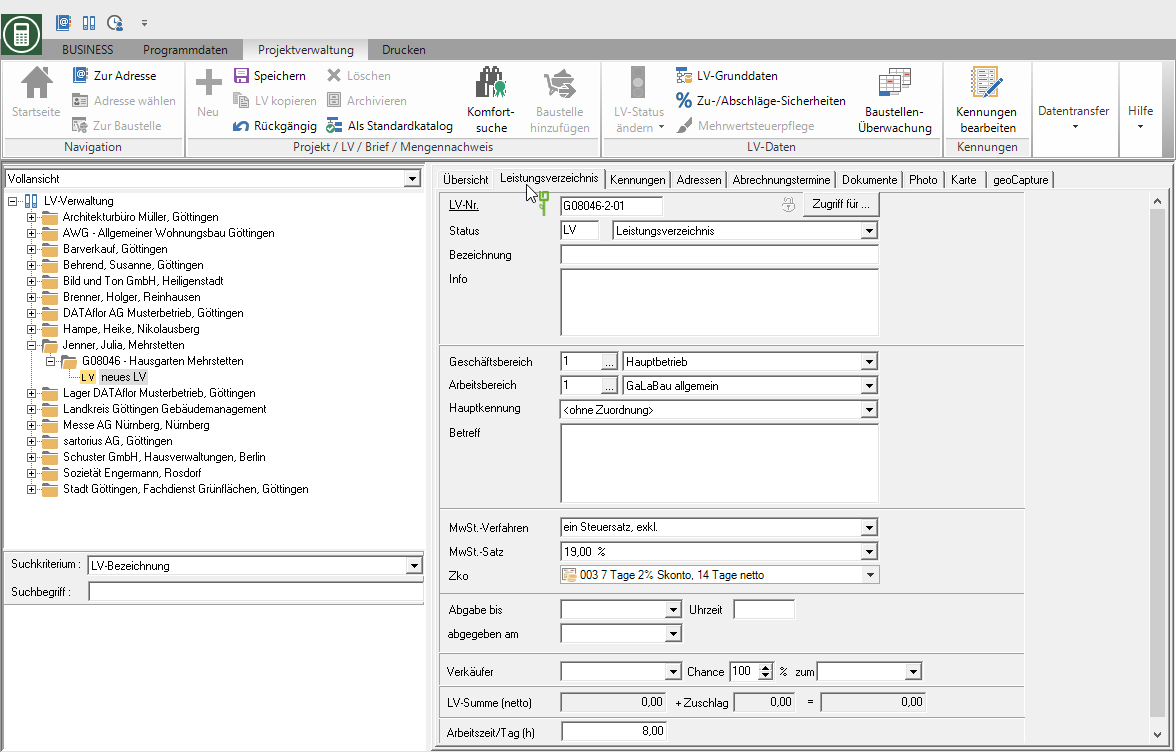
Newly created LVs receive this by default Status indicator LV. If you select the LV in the project tree, the tab on the right side of the screen Specifications displayed. Enter the following general information about the course.
| Feld | Description |
|---|---|
| Course no. | This number is used by the program according to the presetting in the program parameters LV numbering automatically assigned. At this point you have the option to change this number manually. |
| Access for | By clicking [Access for] you can give individual users the LV access refuse so that they cannot view and edit the course. |
| Status | Define the desired for the course Status indicator. |
| designation | In order to later find exactly that one from the multitude of courses that is to be processed, enter a clear name here. This could be, for example, the name of the decision template or the proposal or the house garden that is to be offered. |
| Info | In this field you enter further important information about the course. In info or text fields you are entitled to Editor with which you can change fonts and sizes. Furthermore, texts can be loaded from files and saved in BUSINESS created texts can be saved as files. |
| business | Assign a business area to the specification of services by clicking on it  to. You can also make your selection by entering the business unit number or by clicking to. You can also make your selection by entering the business unit number or by clicking  Switch to the basic data of the business areas, select a business area and click on Switch to the basic data of the business areas, select a business area and click on  assign to the course in the menu. assign to the course in the menu. |
| Workspace | The work area that is specified in program parameter 60.10.140 Default work area is set. By clicking  select the work area whose surcharge rates you want to use to calculate the offer. You can also make the selection by entering the workspace number or by clicking on select the work area whose surcharge rates you want to use to calculate the offer. You can also make the selection by entering the workspace number or by clicking on  Switch to the basic data of the work areas, select a work area and click on Switch to the basic data of the work areas, select a work area and click on  assign to the course in the menu. assign to the course in the menu. |
| Main identifier | The identifier is pre-assigned that is in program parameter 60.10.145 Default LV main identifier is set. By clicking  select the LV identifier for the LV, which is used as a selection criterion in numerous lists and evaluations. You can choose from all identifiers that are assigned to the LV on the Identifiers tab are assigned. You can also use program parameter 60.10.146 Enter the main course identifier as a mandatory field define that a main identifier must be assigned to save the LV. select the LV identifier for the LV, which is used as a selection criterion in numerous lists and evaluations. You can choose from all identifiers that are assigned to the LV on the Identifiers tab are assigned. You can also use program parameter 60.10.146 Enter the main course identifier as a mandatory field define that a main identifier must be assigned to save the LV. |
| Subject | This field is used to provide information to the client. It is listed in the print form. The field is edited by entering it directly or by using the editor. |
| VAT procedure | It is that VAT procedure preassigned that in program parameter 60.10.150 Default VAT procedure is set. By clicking  choose the method you want to use for the calculation of VAT in this LV. choose the method you want to use for the calculation of VAT in this LV. |
| VAT rate | The VAT rate is pre-assigned that is set in program parameter 60.10.160 Default VAT rate is set. By clicking on  choose the tax rate you want to use for your LV. If you use a VAT procedure with multiple tax rates, this is the main tax rate that is preset for new items. choose the tax rate you want to use for your LV. If you use a VAT procedure with multiple tax rates, this is the main tax rate that is preset for new items. |
| Zko | The payment condition that you entered in Address manager for the client. By clicking  select the payment term that you want to use for the offer. select the payment term that you want to use for the offer. |
| Submission by | The date on which the offer must be submitted for submission at the latest can be entered here. |
| Time of day | Since submissions are always scheduled at a certain time, the time specified by the advertising agency can be entered here as a memo item. |
| issued on | The date of the offer submission can be entered in two ways: If the offer is printed and this field is still empty, then the program automatically enters the date of the offer printing. Independently of this, the date can be entered manually. It is not changed by the program. |
| Seller | By clicking  assign an employee to the LV as a salesperson. All employees are available for selection, to whom in Address manager the option Provide in employee selection lists is set. For expression Offer overview potential you can sort your specifications according to seller. assign an employee to the LV as a salesperson. All employees are available for selection, to whom in Address manager the option Provide in employee selection lists is set. For expression Offer overview potential you can sort your specifications according to seller. |
| Luck | Make an evaluation of the offer here and estimate the probability with which you will receive the order. This percentage of the total offer is shown in the printout Offer overview potential included. |
| Enter the date on which you expect the order to be placed here. The selection of the specifications for printing Offer overview potential will be taken after this date. | |
| Offer amount | The amount will be used by BUSINESS is used and includes all items in the offer. In addition, the surcharge specified for the course as well as the sum of the course sum and the surcharge is calculated. |
| Working time / day (h) | The value that is preset in program parameter 70.40.50 Hours per working day is set. Enter the number of working hours per day (max. 24,00) that you use as the basis for the work planning to use. |
Offer tab
Select an offer course in the project tree (Status indicator Ax, e.g. AA (Offer, submitted), AB (Offer, commissioned)) is the tab on the right side of the screen Services with the general information of the offer LV.
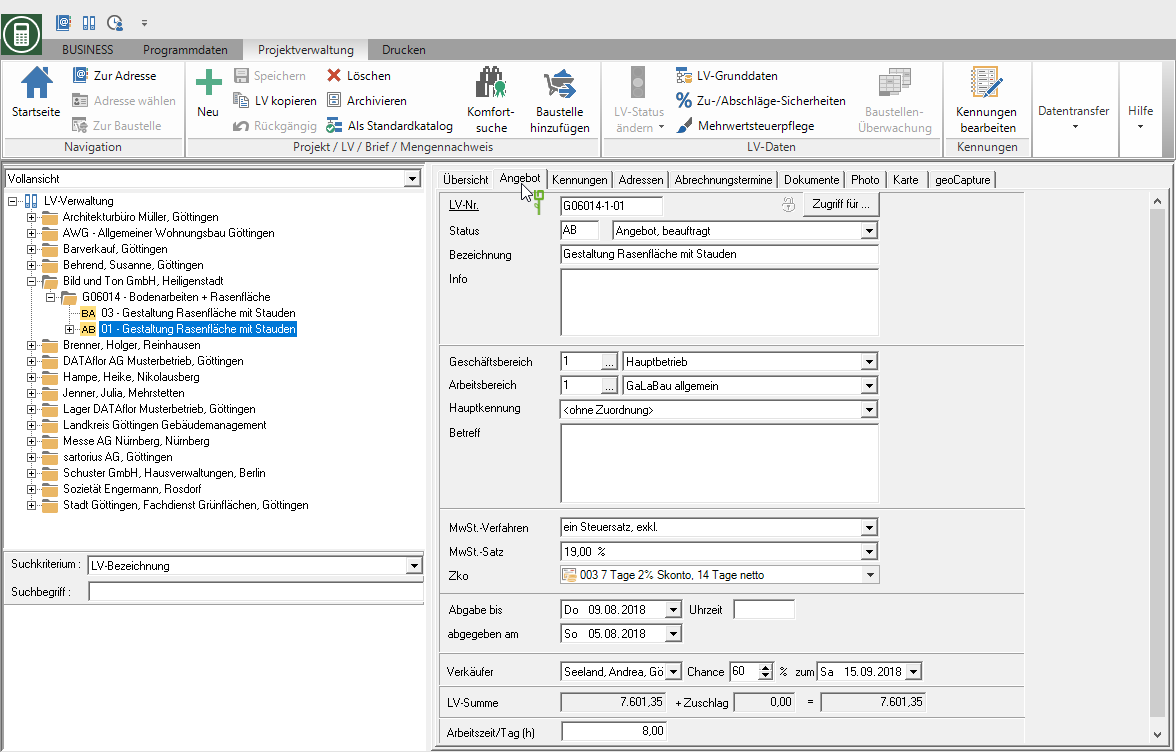
Enter the information about the course as on the register Specifications. The field issued on is automatically filled by the program with the receipt date that you set for the printout of the offer. By clicking  you can set a different date afterwards.
Job tab
Select a construction site course in the project tree (Status indicator Bx, e.g. BA (Construction site, work not yet started), BB (Construction site, work started)) is the tab on the right side of the screen Life Mission with the general information of the construction site LV.
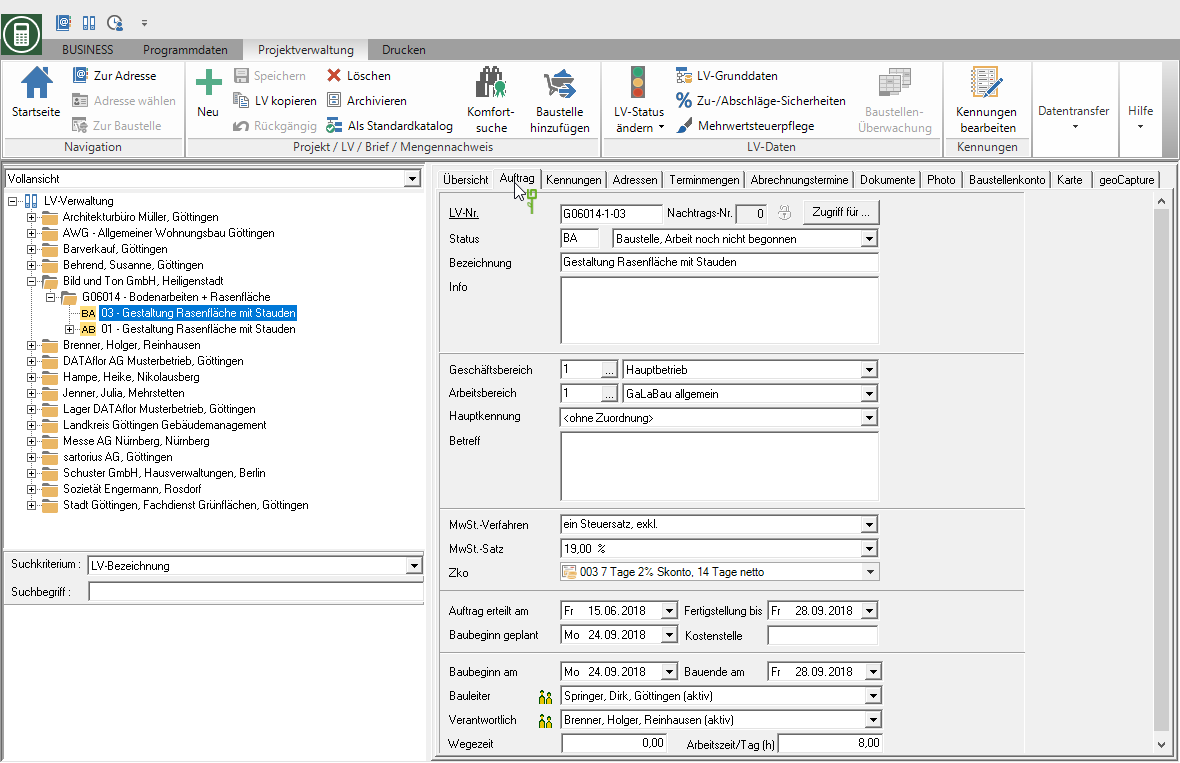
Store the information in the upper part of the tab as on the tab Specifications. In the lower part you store the following order-specific information:
| Feld | Description |
|---|---|
| Order placed on | The program automatically enters the date on which you made an offer LV (AA, offer submitted) for the order (BA, construction site work not yet started) by changing the status indicator. By clicking  you can set a different date afterwards. you can set a different date afterwards. |
| Completion by | By clicking  enter when you agreed to complete the construction site with the client. enter when you agreed to complete the construction site with the client. |
| Start of construction planned | By clicking  enter the planned start of construction for the construction site. enter the planned start of construction for the construction site. |
| Cost centre | Enter the cost center of the LV in order to use it for the business evaluation. In the Financial management you can define this as a mandatory field so that the entry cannot be forgotten. |
| Start of construction on | The program automatically enters the date on which you received the status indicator of the LV from BA (Construction site, work not yet started) after BB (Construction site, work started) have changed. By clicking  you can set a different date afterwards. you can set a different date afterwards. |
| End of construction on | The program would automatically enter the date on which you printed a final invoice for the LV or the status indicator of the LV from BB (Construction site, work started) after BE (Construction site, work finished) have changed. By clicking  you can set a different date afterwards. you can set a different date afterwards.The data for the start of construction and the end of construction are preassigned to indicate the performance period of the delivery or service on order confirmations and invoices / credit notes. |
| Construction manager | By clicking  assign an employee to the construction site as construction manager. All employees are available for selection, to whom in Address manager the option Provide in construction manager selection lists is set. assign an employee to the construction site as construction manager. All employees are available for selection, to whom in Address manager the option Provide in construction manager selection lists is set. |
| Responsible | By clicking  assign the employee who is responsible for this construction site, e.g. the foreman. All employees are available for selection, to whom in Address manager the option Provide "Responsible" in the selection list is set. assign the employee who is responsible for this construction site, e.g. the foreman. All employees are available for selection, to whom in Address manager the option Provide "Responsible" in the selection list is set. |
| Travel time | Enter the general travel time to and from the construction site. This time is used when recording wage hours in the Post calculation . |
| Working time / day (h) | The value that is preset in program parameter 70.40.50 Hours per working day is set. Enter the number of working hours per day (max. 24,00) that you use as the basis for the work planning to use. |
Addresses tab
There are three more tabs on this tab: Clients, contractor, Project address with the specific address data.
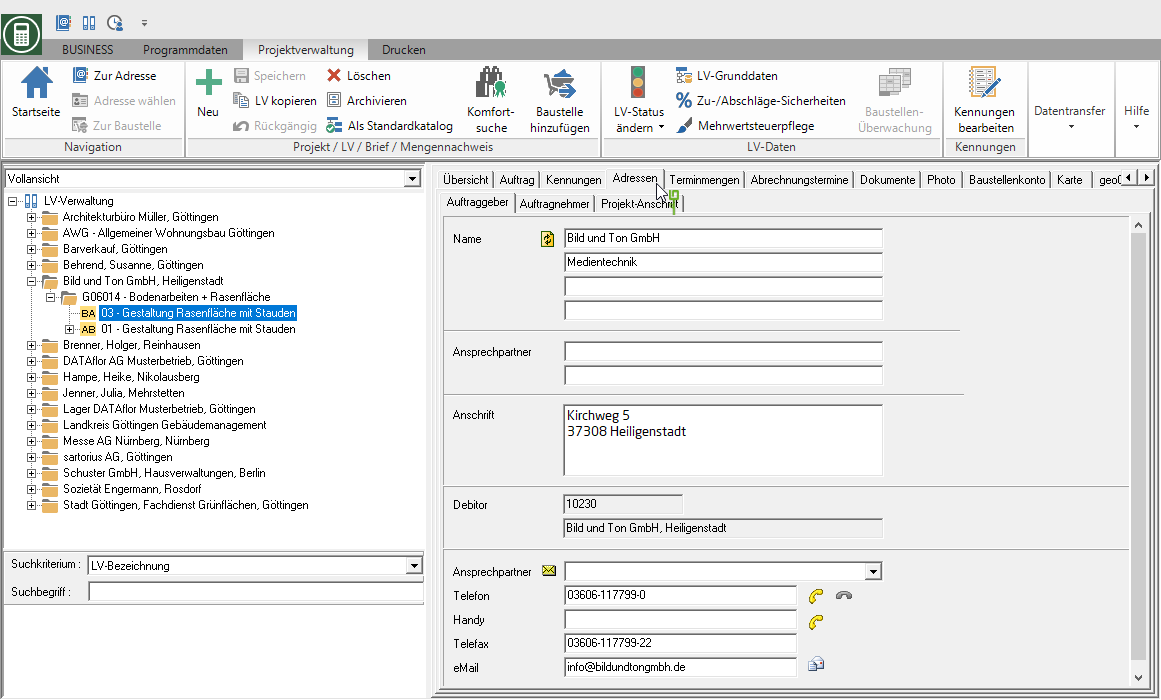
| Feld | Description |
|---|---|
| Salutation, name, address | The address data for Clients and Project address are preassigned by default with the data of the client for which the LV is recorded in the project management. You have the following two options for selecting a different invoice recipient: - assign a different billing address to the client - Assign a different invoice recipient/customer to the LV On the tab contractor are in the module Award the address master data of the commissioned bidder is entered. You have the option of selecting these three addresses as the 1st or 2nd address when printing the offer and invoice. By clicking  the data with the address data in Address manager compared and updated if necessary. the data with the address data in Address manager compared and updated if necessary. |
| Contact Person | By clicking  open a list of all the contacts you have in Address manager to the address. Select the contact person you want. open a list of all the contacts you have in Address manager to the address. Select the contact person you want. |
| Feature | The name and position of the contact person are automatically added to the address of the client. The name of the contact person is transferred to the 1st line and can be changed if necessary. The name entered here is printed in the address field of project letters. The position of the contact person is transferred to the 2nd line. It is for information only and will not be printed. |
| Phone | The telephone number assigned to the selected contact person in Address manager is deposited. By clicking  pass out BUSINESS out the phone or cell phone number directly to the Telephony. pass out BUSINESS out the phone or cell phone number directly to the Telephony. |
| Fax | The fax number assigned to the selected contact person in Address manager is deposited. |
The e-mail address assigned to the selected contact person in Address manager is deposited. By clicking  a new e-mail is created with your standard e-mail program. The e-mail address entered here will be transferred to the new e-mail. a new e-mail is created with your standard e-mail program. The e-mail address entered here will be transferred to the new e-mail.Emails sent this way will not be included in the DATAflor Building file taken over. |
