Table of Contents
incoming payments
Description
To determine the open items of your customers and to use the program area Dunning enter in the program area incoming payments:
- payments received
- Changes to the invoice amount such as reductions
- discount amounts granted
- Deferrals
- Other balance sheet entries
- Payouts for credits
- prepayments received
To open the program area incoming payments Do you click in the menu BUSINESS on  .
.

The program area incoming payments will be opened.
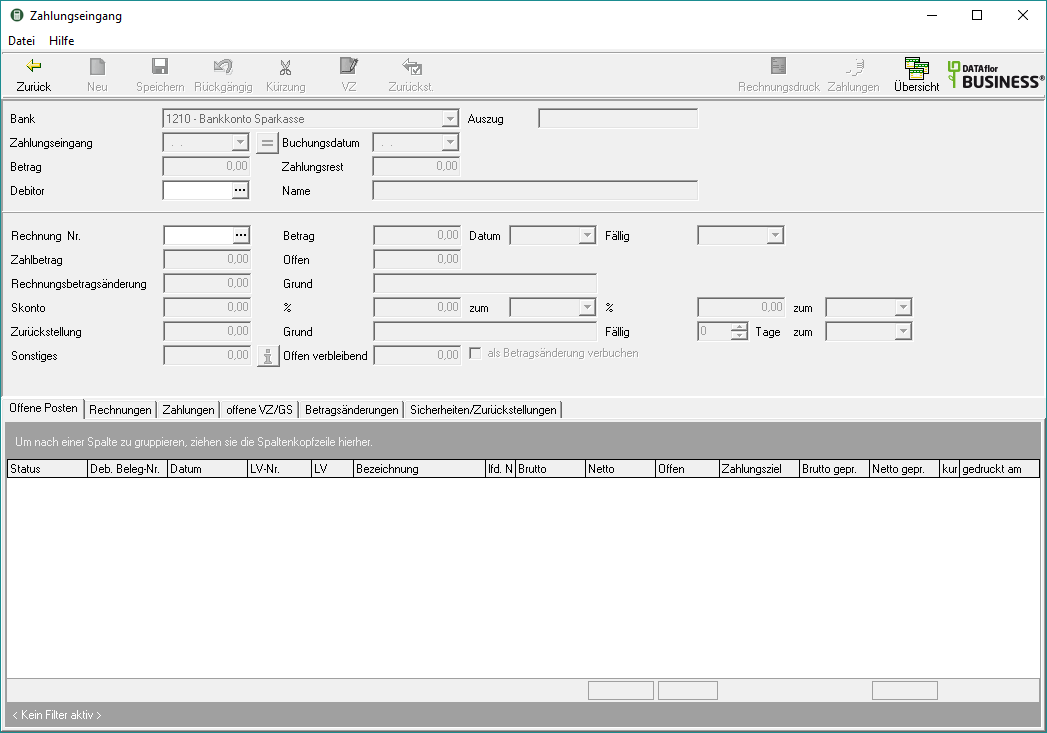
The input mask for data entry is displayed in the upper part of the screen.
In the lower part of the screen you get an overview of on the respective tab vacant positions, invoices issued, recorded payments, open prepayments / credits, Amount changes and Collateral / Provisions.
Register payment
Customer and Invoice Number
To record an incoming payment, first select the customer from whom you received the payment and the invoice that was paid. You have the following options:
- If you have the invoice number of the invoice for which you want to enter the payment at hand, you can select the invoice and the customer at the same time. Enter the invoice number in the field Invoice Number. and confirm with Enter.
- By clicking
 in The Field Invoice Number. open a list of all open invoices. Select the invoice and confirm your selection with [OK].
 - First, select the customer from whom you received the payment. To do this, enter in the field Customer Enter the debtor number or open the address search by clicking on
 and take over the customer. After selecting the customer, in the lower part of the screen on the tab Vacant positions all invoices of the customer that have not yet been paid are listed. Select the invoice for which you want to enter the payment.
Then click  in the toolbar and enter the following data of the incoming payment in the entry mask.
| Feld | Description |
|---|---|
| Banks | Select the financial account to which the incoming payment will be posted in your financial accounting. In the parameters of the Financial management determine which financial account is preset by default. The selected financial account is used when the incoming payments are transferred to external Financial accounting software and can be used for evaluation in Finance manager should be used. |
| Excerpt | If necessary, enter the number of the account statement. |
| incoming payments | By clicking  Open the calendar in which you select the date of receipt of payment with a mouse click or enter the date using the number pad on your keyboard. The program automatically recognizes the entry 20,10,19 as 20.10.2019. Open the calendar in which you select the date of receipt of payment with a mouse click or enter the date using the number pad on your keyboard. The program automatically recognizes the entry 20,10,19 as 20.10.2019. |
| Posting date | If the posting date is not the same as the date of receipt of payment, click on  . Enter the different booking date or select it by clicking on . Enter the different booking date or select it by clicking on  in the calendar. in the calendar. |
| amount | Enter the amount received in your bank account. The program automatically pre-allocates the amount of the selected open invoice. |
| Payment remainder | If the amount received differs from the amount of the open invoice, the program calculates the difference. A negative payment balance is managed as a new open item. With a positive balance you can pay further open invoices from the customer or assign him to the next invoice as a prepayment. |
| Invoice Number., amount, Date and Due | The receipt number of the selected invoice, the invoice amount, the receipt date of the invoice and the due date of the invoice are displayed. |
| Payment amount | The program automatically enters the amount that you have entered in the field amount have entered. If the amount received is higher than the amount of the selected open invoice, the amount of the invoice will be pre-assigned. If you only want to pay part of the bill, enter the desired amount here. |
| Open-back | If the payment amount differs from the invoice amount, the program calculates the difference. The open item is managed as a new open item for the customer. |
| Change in invoice amount and reason | You can find a detailed description of how to enter changes to the invoice amount in the section Record change in invoice amount. |
| cash discount | If the payment is within the granted discount period, the program automatically calculates the granted discount amount for the payment amount. In the following fields the payment terms displayed on the invoice. |
| Deferral, reason and due | A detailed description of how deferrals are entered can be found in section Record deferral. |
| Other | A detailed description of the entry of other balance sheet entries can be found in section Record other balance sheet entry. |
After you have entered all the necessary information for the payment received, click on  in the toolbar. The posting records are generated.
If an open invoice has been paid in full, it is displayed on the Vacant positions no longer listed. On the tab Payments all recorded payments are displayed.
Record change in invoice amount
You can enter an increase or reduction in the invoice amount in the course of a payment received and without a payment received. To do this, you can define the value of the change in the invoice amount or edit the invoiced quantities for each item.
Change of invoice amount with receipt of payment
After you have paid the received payment have recorded in the field Change of invoice amount the amount by which you want to change the invoice amount. By entering a positive value you increase the invoice amount; a negative value reduces the invoice amount. in The Field Plot you can enter a comment for internal information. In the selection revenue account select by clicking on  the revenue account in your financial accounting to which the change in the invoice amount is posted.
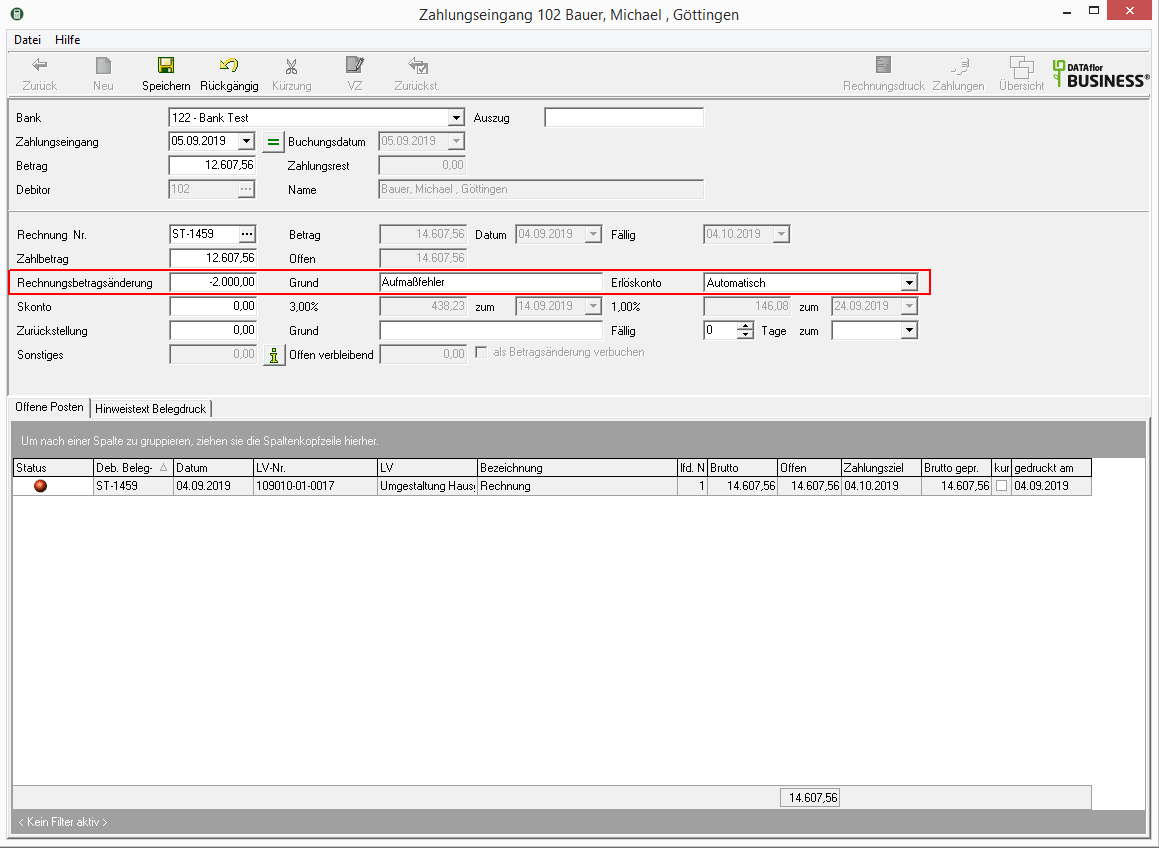
Save the recorded payment including the change in the invoice amount by clicking on  in the toolbar.
Change of invoice amount without receipt of payment
If you have not received a payment for the invoice but would like to enter a change in the invoice amount, then click on after selecting the customer and the invoice ![]() in the toolbar.
in the toolbar.

Wear on the tab General the following data of the change in the invoice amount.
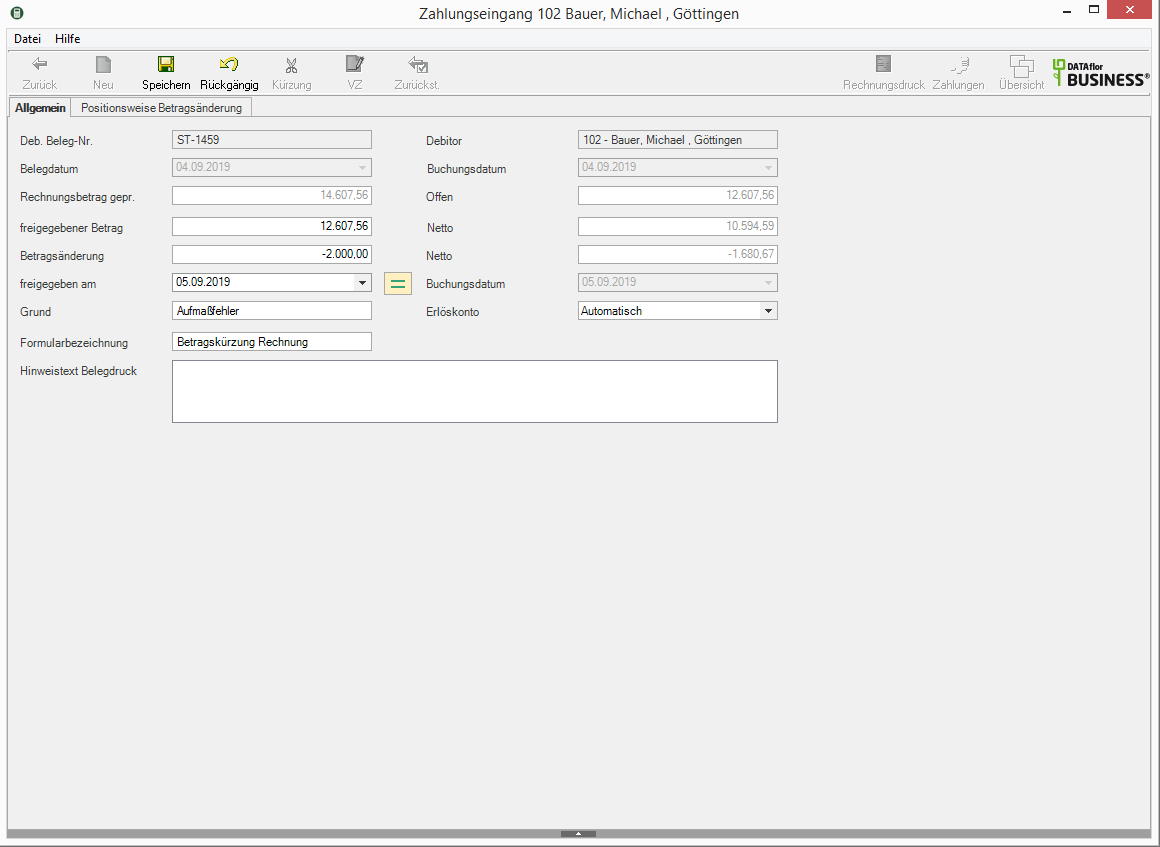
| Feld | Description |
|---|---|
| released amount | Either enter the amount that has been approved for the invoice by the examiner or the amount by which the invoice will be changed. A positive change value increases the invoice amount; a negative value shortens it. The two fields are automatically updated alternately. |
| Change in amount | |
| Released on | Enter the date or select it by clicking on  from the calendar on which the new invoice amount was approved by the examiner. from the calendar on which the new invoice amount was approved by the examiner. |
| Plot | If necessary, enter a comment for internal information. |
| Revenue account | By clicking  select the revenue account in your financial accounting to which the change in the invoice amount is posted. select the revenue account in your financial accounting to which the change in the invoice amount is posted. |
| Form name | Enter the description that will be printed on the receipt. |
| Note text receipt print | Enter the text that will be printed on the receipt |
After saving your details, click on  The print menu for printing receipts opens automatically in the toolbar. Create a receipt for your financial accounting for the change in the invoice amount.
amount change item by item
If you would like to record the change in the invoice amount by editing the invoiced quantities, prices or total amount for each item, then first click on after selecting the customer and the invoice ![]() in the toolbar.
in the toolbar.

Then open the tab Item-based amount change. Change the quantity, price or total amount of one or more items.
- In the column Quantity the quantity that was billed with the selected invoice is displayed for each item. In the column Quantity checked enter the new quantities. The price and total amount as well as the LV sum are updated automatically.
- You can also change the price or the total amount of an item. The values are alternately updated as well as the LV total.
- Changed values are displayed in bold.
- The amount resulting from the entries as a change in the invoice amount is shown in the column at the bottom of the screen Sale as well as on the tab General displayed.
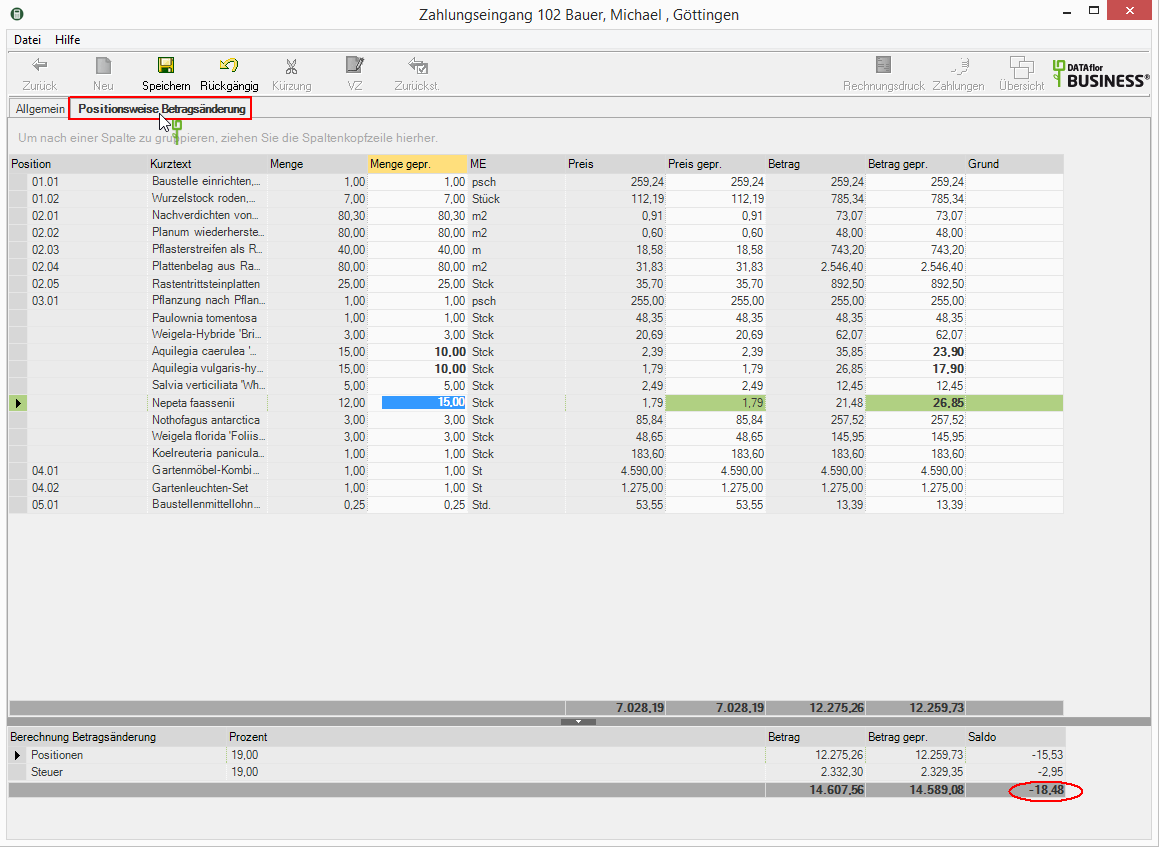
After saving your details, click on  The print menu for printing receipts opens automatically in the toolbar. Create a receipt for your financial accounting for the change in the invoice amount.
Enter the discount granted
After you have paid the received payment have recorded in the field cash discount the amount that you grant as a discount for this payment. The payment conditions that you used for this invoice are displayed in the input mask. Based on the data, it is automatically determined whether the payment is within the discount period and, if necessary, the corresponding discount amount is preassigned. You can change the pre-assigned cash discount amount manually.
For example: Document date of the invoice = 04.09.2019/12.09.2019/14.09.2019, date of receipt of payment = 1/3,00/3,00 ⇒ payment was made before 14.607,56/438,23/XNUMX (end of period for discount XNUMX) ⇒ you granted a XNUMX% discount ⇒ XNUMX% of the invoice amount XNUMX = XNUMX €
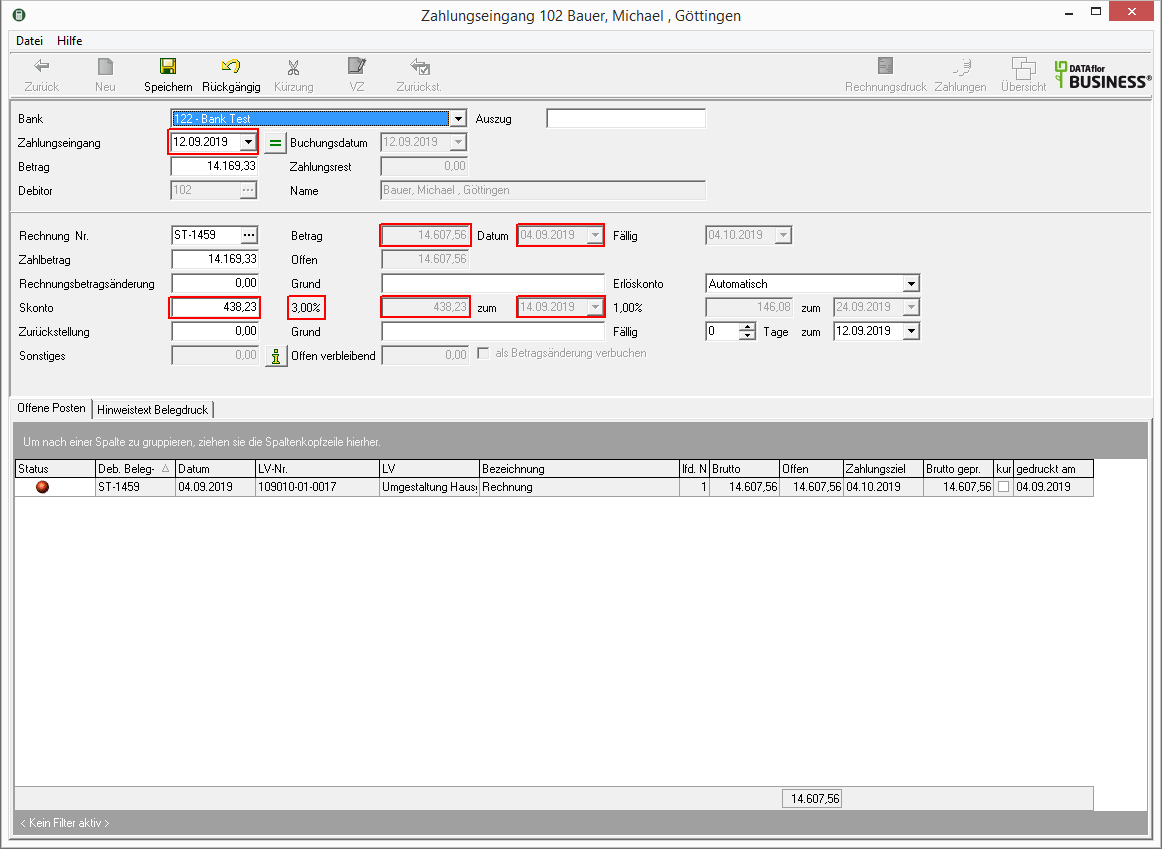
Save the recorded payment including the discount granted by clicking on  in the toolbar.
Record deferral
If you have subsequently agreed with your client that part or all of the invoice amount should only be due at a later date, then enter this amount as a deferral and define the new due date. You can record a deferral in the course of a payment received and without a payment received.
Postponement with receipt of payment
After you have paid the received payment have recorded in the field Deferment the amount whose due date you want to postpone. in The Field Plot you can enter a comment for internal information. You define the new due date for the deferred amount by entering the due date or selecting the duration in days.
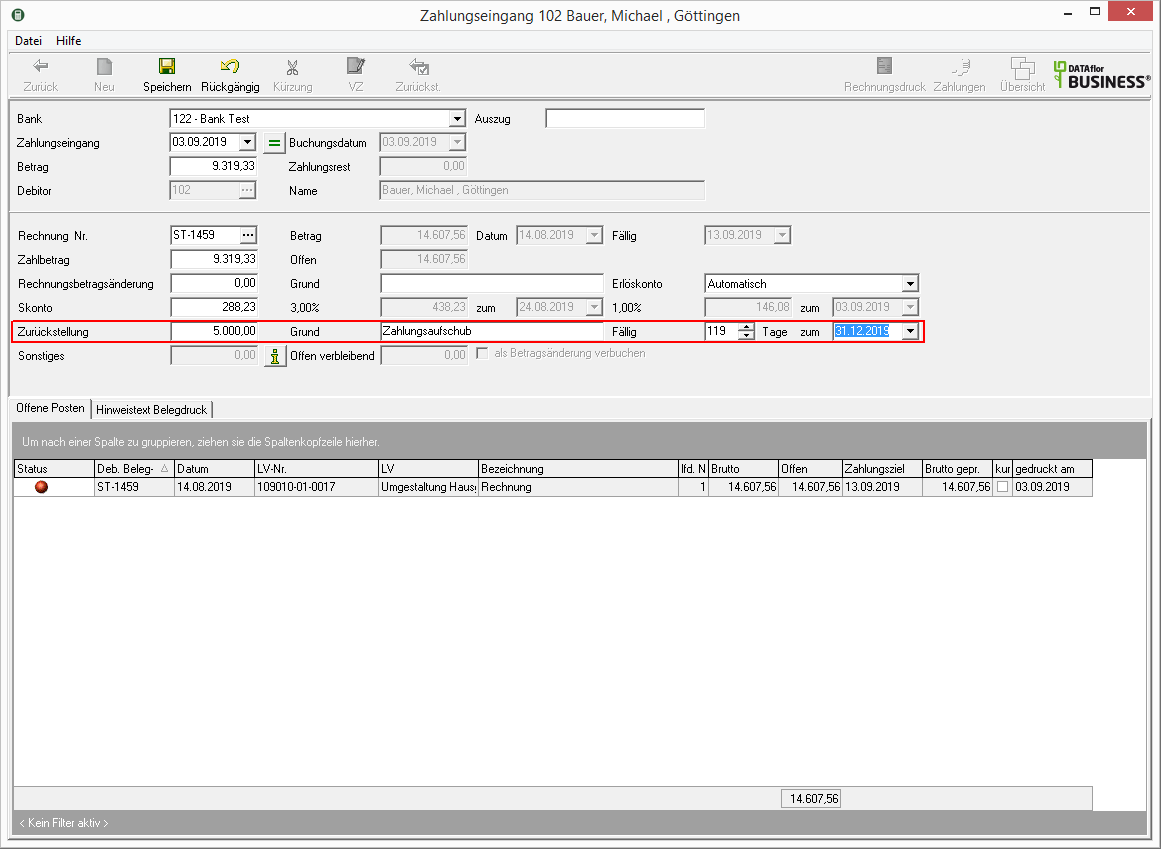
Save the recorded payment including the deferral by clicking  in the toolbar.
Postponement without receipt of payment
If you have not received a payment for the invoice, but would like to record a deferral, then click on in the toolbar after selecting the debtor and the invoice ![]() .
.

The fields for entering the deferral can be edited in the entry mask. As with deferment with incoming payment, enter the amount, a comment if necessary and define the new due date.
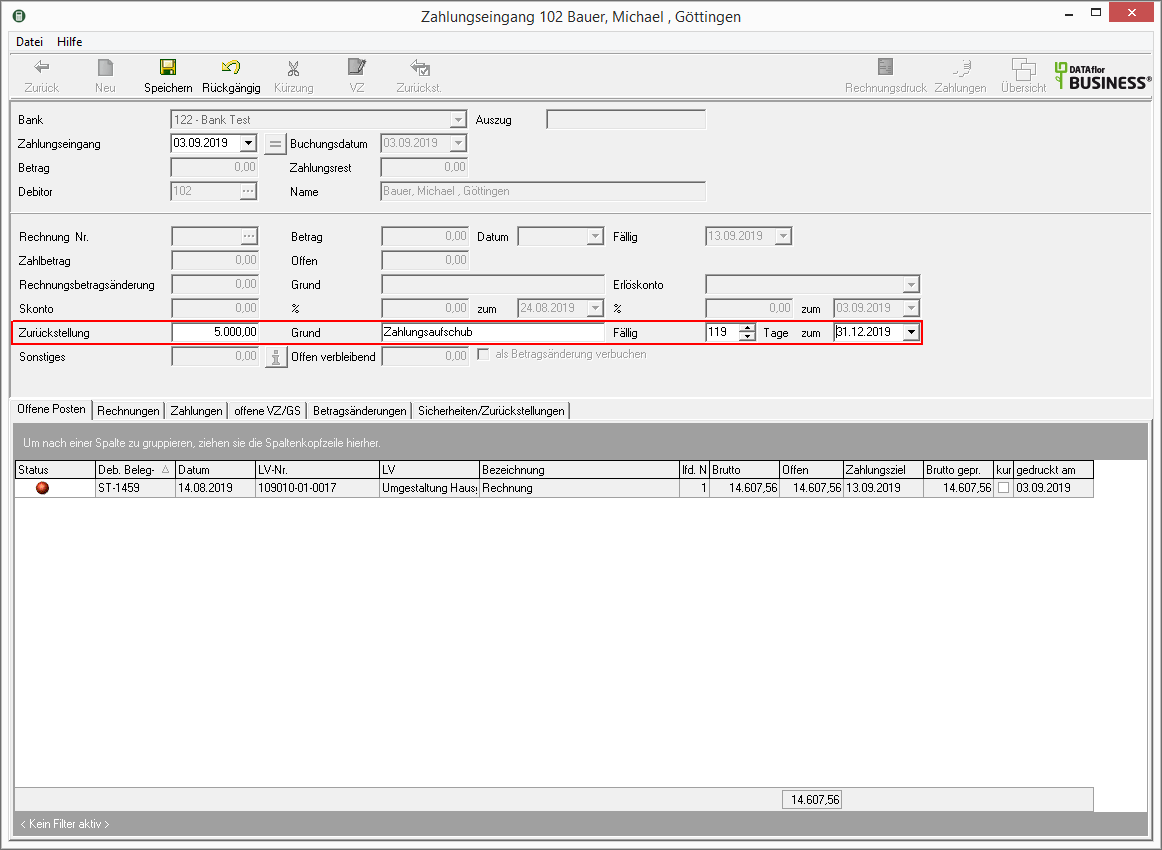
Save the information entered by clicking on  in the toolbar.
Record other balance sheet entry
If the incoming payment contains an amount that was paid in addition to the invoice amount, you can enter this as an additional balance entry (e.g. for tips, street cleaning fees). To do this, click on the field after entering the payment amount Other on  .
.
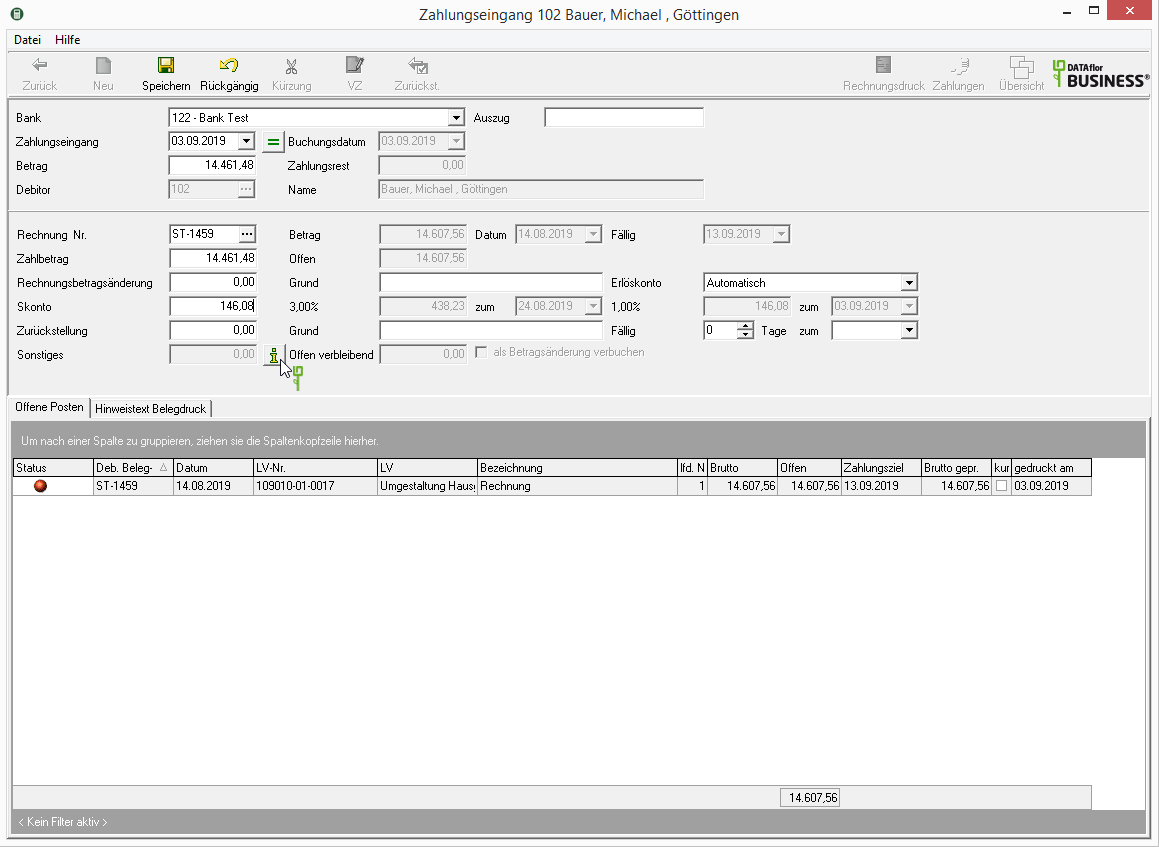
The dialogue additional postings on balance sheet accounts will be opened.
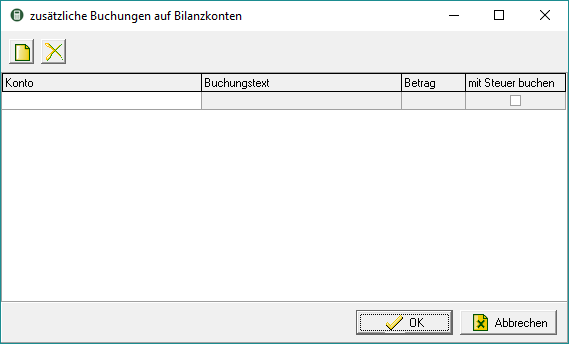
To enter a new balance entry, click on  , select the balance account and enter a posting text and the amount. Also determine whether the amount will be claimed from taxes (e.g. tip with tax, street cleaning fee without tax). Confirm your entry with [OK].
Record payout for credit note
Did you in the program area accounting If you have issued a credit memo for a client, enter the credit amount paid out here. To do this, proceed as when entering a received payment. Select the debtor and the credit note, but enter in the fields amount and Payment amount negative Amounts.
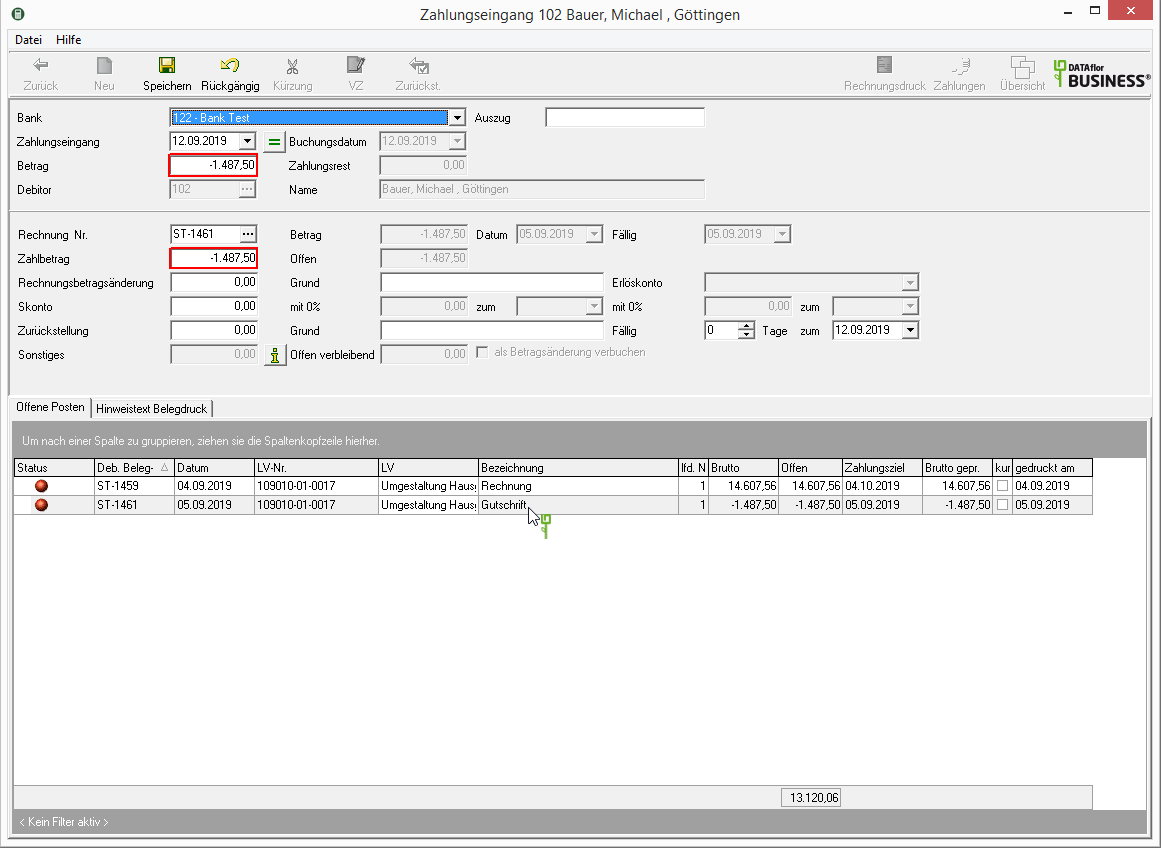
After you have entered all the necessary information for the paid out credit, click on  in the toolbar. The posting records are generated.
If an open credit has been paid out in full, it is displayed on the tab Vacant positions no longer listed. On the tab Payments all recorded deposits and withdrawals are displayed.
Record prepayment
You can enter taxed down payments with your own receipt, prepayments for clearing and prepayments from overpayments of invoices, and offset prepayments with existing invoices.
Taxed down payment (printing a receipt)
For down payments that should or must be taxed. All necessary booking records are generated and, if necessary, via an interface to external ones Financial accounting software to hand over. In addition, the print menu for creating a receipt is started automatically.
After selecting the customer, click in the toolbar ![]() and choose the function Taxed down payment (printing a receipt).
and choose the function Taxed down payment (printing a receipt).

The input mask for entering the taxed down payment opens.
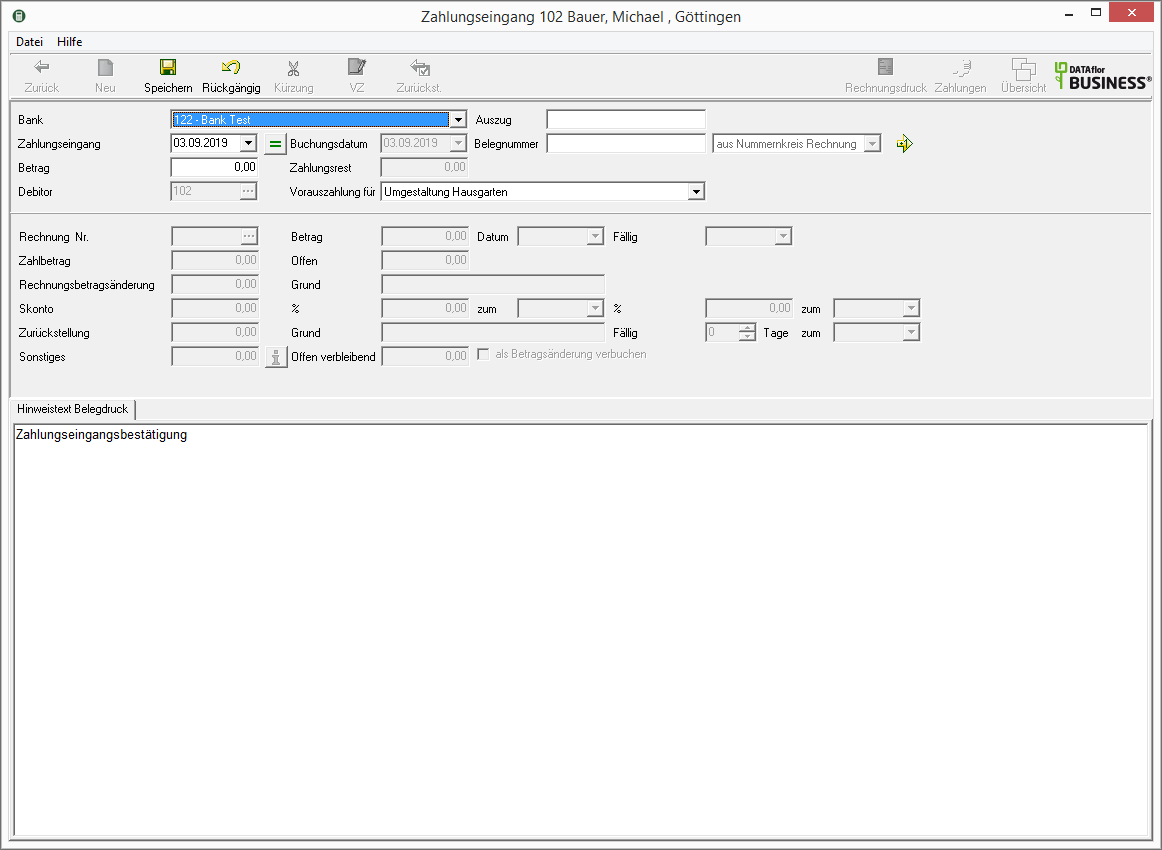
Enter the following data:
| Feld | Description |
|---|---|
| Banks | Fill in the fields as you did when entering payments. A detailed description can be found in the section registering payments. |
| Excerpt | |
| incoming payments | |
| Posting date | |
| Document number | Enter the document number that will be used for the subsequent issue of the document and for the financial postings. By clicking on  take the next free number from the number range on account. If no document number is entered, the next free number from the number range is automatically used when saving. take the next free number from the number range on account. If no document number is entered, the next free number from the number range is automatically used when saving. |
| amount | Enter the down payment received including tax. |
| Prepayment for | If there are several construction sites for the customer in the project management, select through  the construction site for which you received the deposit. the construction site for which you received the deposit. |
| Note text receipt print | Enter the text that will be printed on the prepayment receipt. |
After saving your details, click on  The print menu for printing receipts opens automatically in the toolbar. Create a receipt for your financial accounting for the down payment entered.
Prepayment (assign to an invoice or claim)
For down payments that are to be offset against a subsequent invoice or an existing open item from the same customer. No posting records are generated for financial accounting. The prepayment is available for offsetting the next time the invoice is printed out and in the payment management.
After selecting the customer, click in the toolbar ![]() and choose the function Prepayment (assign to an invoice or claim).
and choose the function Prepayment (assign to an invoice or claim).

The input mask for entering the advance payment for settlement is opened.
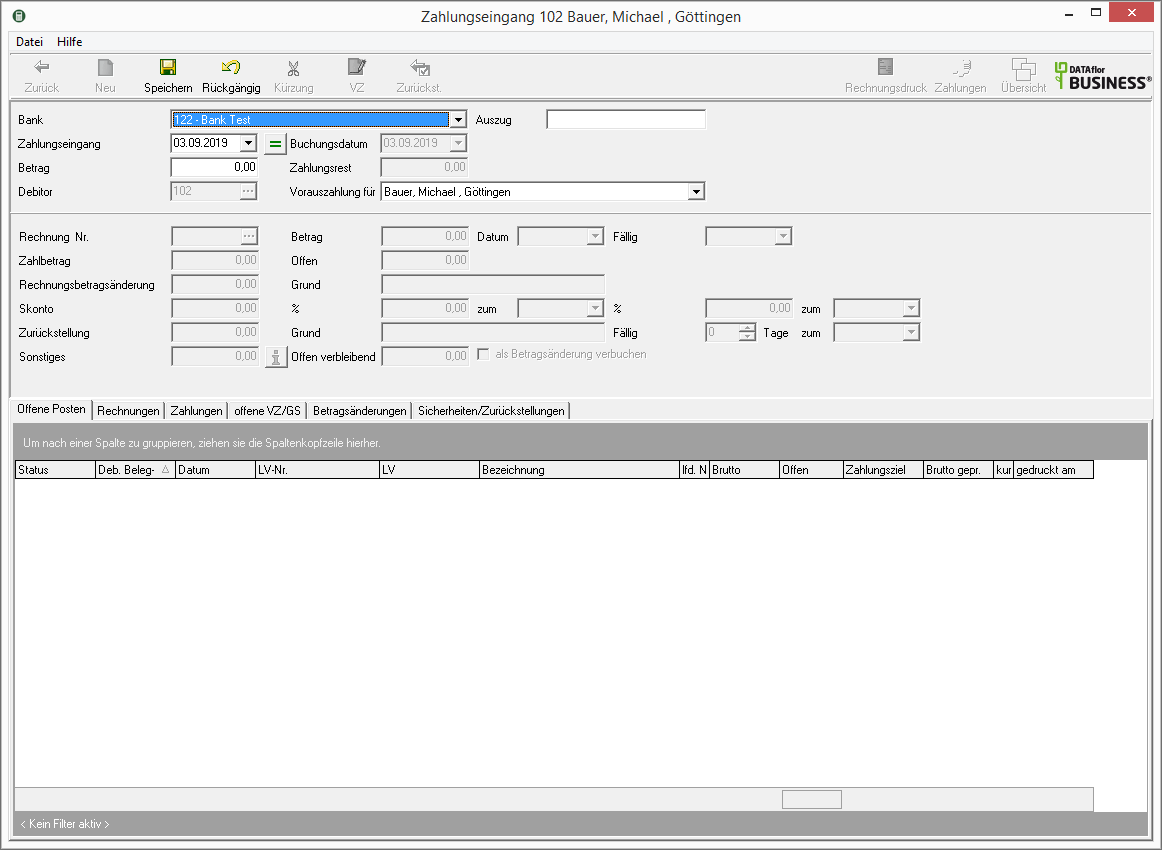
Enter the following data:
| Feld | Description |
|---|---|
| Banks | Fill in the fields as you did when entering payments. A detailed description can be found in the section registering payments. |
| Excerpt | |
| incoming payments | |
| Posting date | |
| amount | Enter the down payment amount received. |
| Prepayment for | - If there are several construction sites for the debtor in the project management, select through  the construction site for which you received the deposit. The advance payment can then only be offset against an invoice to this construction site. the construction site for which you received the deposit. The advance payment can then only be offset against an invoice to this construction site.- In addition, you can first assign the advance payment to the customer. The advance payment can then be offset against an invoice to each construction site of this debtor. |
After saving your details, click on  The advance payment is available for settlement in the toolbar. A detailed description of how prepayments are offset can be found in section Set off prepayment.
Prepayment from overpayment of an invoice
If the amount of money received is higher than the amount paid on the invoice, that is, if there is a remainder, you can enter the overpayment as a prepayment. To do this, enter the incoming payment as usual.
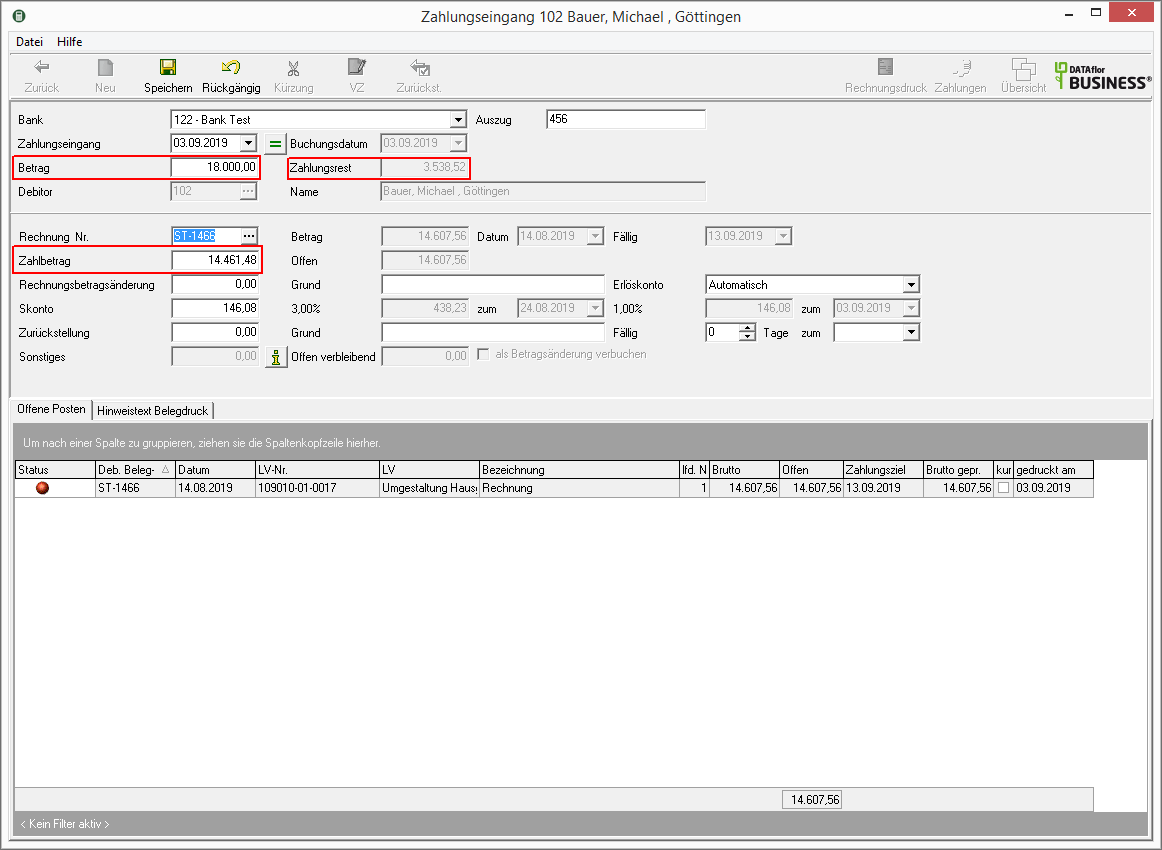
When you save your entry, a message appears stating that there is a residual payment. Confirm the message with [OK]. Then click on ![]() in the toolbar and choose whether you want to save the payment balance as Taxed down payment (printing a receipt) or Prepayment (assign to an invoice or claim) want to capture. Proceed according to the respective description.
in the toolbar and choose whether you want to save the payment balance as Taxed down payment (printing a receipt) or Prepayment (assign to an invoice or claim) want to capture. Proceed according to the respective description.
Set off prepayment
Recorded advance payments that have not yet been assigned to an invoice can then be offset against a next invoice when you create it, or assigned to an existing invoice. Taxed down payments are not shown for billing, as these are a separate document and are not billed.
Set off advance payment with the next invoice
Was when the prepayment was entered in the field Prepayment for If a construction site is specified, the advance payment will only be displayed when the next invoice is created for this construction site. Was when the prepayment was entered in the field Prepayment for If the customer is selected, the prepayment is displayed when creating an invoice for each construction site of this customer.
A detailed description of the function in invoice printing can be found in the chapter Assign prepayments.
Assign prepayment to an existing invoice
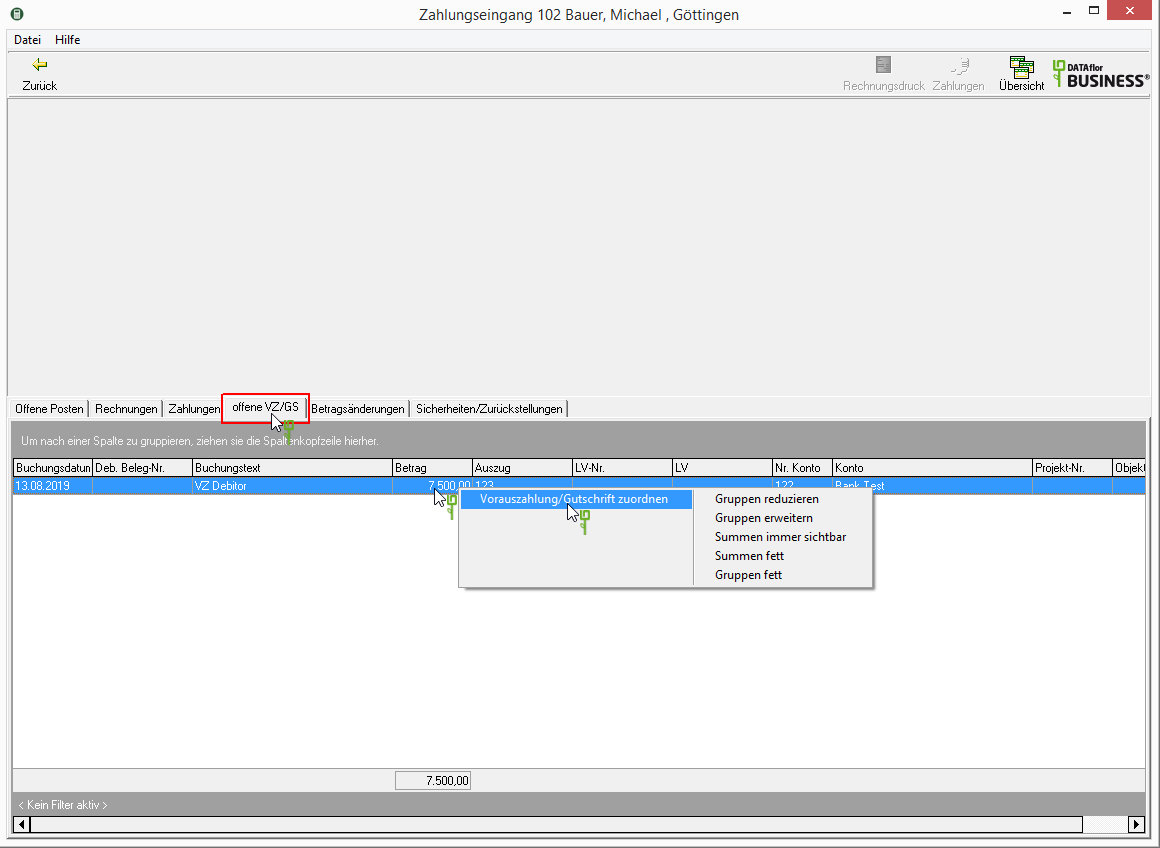
All recorded advance payments that have not yet been offset against any invoice are displayed on the open VZ / GS tab. Taxed down payments are not listed as these are a separate document and are not offset.
You can assign open prepayments and credits to an existing open invoice and thus generate the necessary postings for determining your open items and for financial accounting. Right-click to open the context menu for the desired prepayment or credit note and select the entry Assign prepayment / credit.
The dialogue Allocation of invoice to prepayment will be opened. Select the invoice to which you want to assign the prepayment and confirm with [OK].
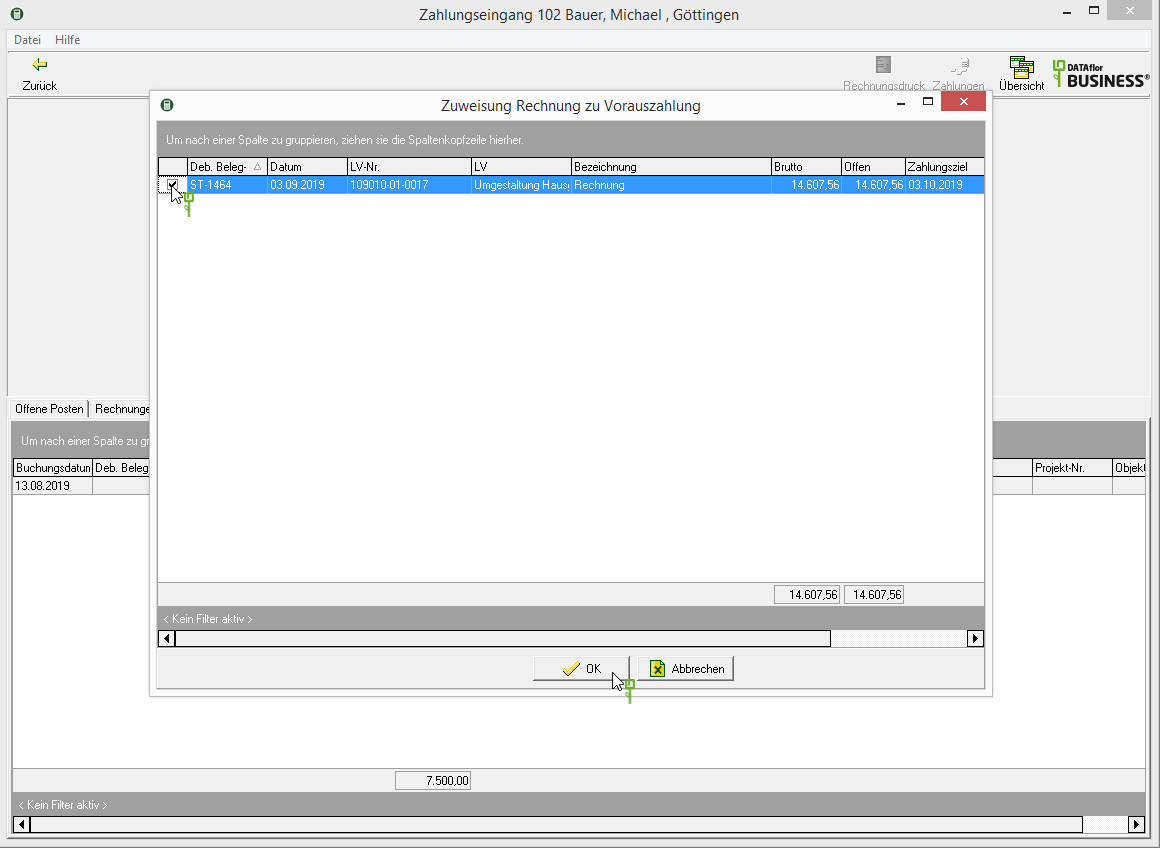
If the prepayment or credit has been fully offset, it will be shown on the open VZ / GS no longer displayed.
