Table of Contents
Make a Payment
Description
Prepared payments you can do it in several ways:
Clearing interface
Clearing interface can you a Create clearing filewith which you instruct your bank to pay your supplier invoices.
- A DME file is generated for the old payment method by bank code and account number.
- An XML file is generated for the new SEPA procedure via IBAN and BIC. In addition, the Clearing history is available for storage, management and analysis.
Create clearing file
In the program part Prepare payment determine how you would like to pay open supplier invoices. This is a payment option Creation of a clearing file.
To do this, open the menu BUSINESS the selection menu Outgoing payment and choose the Entry Clearing SEPA / DTA.
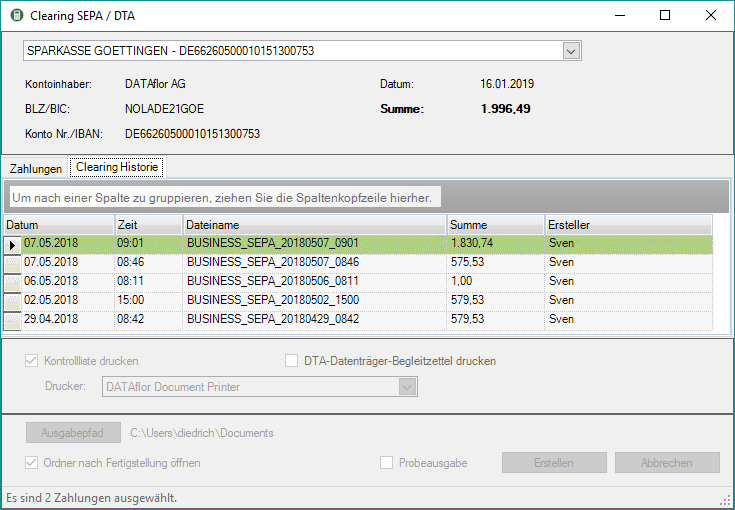
The window Clearing SEPA / DTA will be opened.
Open the selection list by clicking on  and choose Your bank details the bank account for which you want to create a clearing file. Your selected main bank details are preset by default.
Im upper area The dialog displays information on the selected bank details, the current date and the total of the payments listed.
During the Table all payments are listed for which you at Instruct payment have discontinued payment from the selected bank account using the clearing procedure. In the column SEPA it can be seen whether an XML file for the SEPA procedure or a DTA file for non-SEPA payments is created for the payment.
Im lower area make the following settings:
Print checklist
A checklist is printed when the clearing file is generated. The control list shows all payments (SEPA and DTA) contained in the clearing file.
printer
By clicking  select the printer you want to use for printing the checklist. Only printers that are installed under Windows are available for selection.
Output path
Click on [Output path] specify the location of the clearing file. This setting is saved and automatically pre-assigned the next time a clearing file is created.
Open folder after completion
After the clearing file has been created, Windows Explorer opens automatically and the set directory with the clearing file is displayed.
Test print
The clearing file is created, but the payments in BUSINESS not yet booked.
After you have made the settings, create the clearing file with the specified payments by clicking on [Create].
After the clearing file has been created, the outgoing payments are made depending on the setting of the parameter Mark the invoice as "paid" as a printed or bezahlt characterized.
Clearing history
During the Clearing history you have the option of creating a new XML file for payments that have already been made. The payments are made in BUSINESS not posted again.
Open in the window Clearing SEPA / DTA the tab Clearing history.
During the Table all clearing files that were created in the past are listed with the following information:
Date
Shows the date when you created the XML file.
Time
Shows the time the XML file was created.
Filename
Shows the name under which you saved the clearing file.
Total
Shows the total of all payment instructions in the XML file.
Creator
Shows the BUSINESS-User who created the XML file.
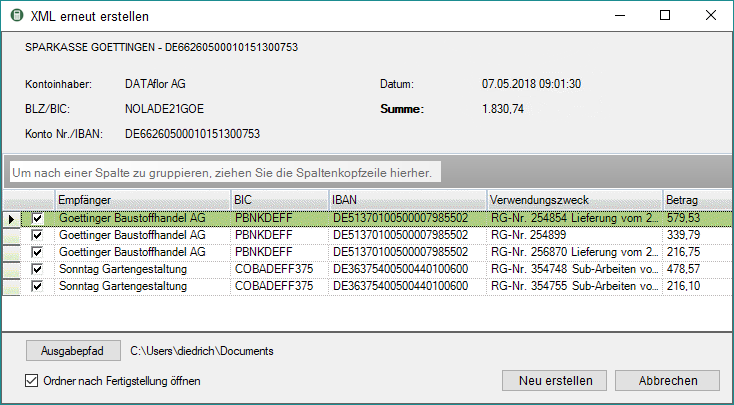
Double-clicking on a clearing file opens a new dialog in which all payments contained in the clearing file are listed. The bank details of the recipient, the purpose and the amount of the payment are displayed for the payments.
Mark Irish  In the first column of the table, select the payments for which you want to generate a clearing file again and make the following settings:
Output path
Click on [Output path] specify the location of the new clearing file. This setting is saved and automatically pre-assigned the next time a clearing file is created.
Open folder after completion
After the clearing file has been created, Windows Explorer opens automatically and the set directory with the clearing file is displayed.
After you have made the selection and settings, create the clearing file by clicking on [Create new].
Quicken interface
Payments for which you at Instruct payment If you have stopped paying via Quicken, you can use the billing and home banking software Quicken (2000 or higher) passed.
SEPA payments cannot be made with Quicken. Payments will only be made to suppliers whose address in Address manager a bank code (sort code) and an account number are stored.
First take in the parameter Transfer of parameters to Quicken basic settings. Then open the menu BUSINESS the selection menu Outgoing payment and select the entry Quicken interface.
The window Quicken interface will be opened.
Bank selection
By clicking  choose Your bank details the bank account for which you want to transfer payments to Quicken.
Configure clearing
For each bank account you choose how the payments are processed in Quicken. You can choose between Data carrier exchange (Create a data disk) or Online Select (BTX or Internet banking). Save your details with [Save].
Is passed
By ticking the box  choose whether all payments or only certain ones should be transferred.
After you have made all the necessary settings, confirm with [Start takeover].
After the transfer, the outgoing payments are marked as printed or paid, depending on the setting of the parameter Mark invoice as "paid".
With the data transfer to Quicken, a Handover protocol printed. All invoices are listed here with details of the date, type of transaction, recipient, purpose, credit institution and the payment amount.
After you have read the entries into the Quicken program (see the Quicken 2000 manual), they appear on your bank account and can be carried out from there.
When handing over to several corporate banks, the field unique designation in the company data Sofas match the bank name in Quicken. The same goes for the Recipients. The column contains the name you entered on the tab Banks who have stored supplier data. It must be absolutely identical to the name below Address in Quicken.
check
In the program part Prepare payment determine how you would like to pay open supplier invoices. A payment option is the expression of a checks.
To do this, open the menu BUSINESS the selection menu Outgoing payment and select the entry Check printing.
The following print menu opens.
Print settings
Make the following settings:
By clicking  switch to the printouts Accounts payable sheet, Accounts payable open list, Incoming invoice list, check, Transfers, Outgoing payment list and Payment list.
Preview
Each printout can be checked again before printing. The display of a preview is preset by the program. If you do not want to see a preview, deactivate it  The option.
Contact Person
The full name of the employee who is the contact person for all queries should be entered here. The program enters the name of the logged in user here, who is in the Address manager was stored in the user data.
printer
By clicking  choose the printer you want to use for printing. Only printers installed under Windows are available for selection.
Paper feed
If your printer offers several paper trays, select by clicking on  the slot from which the paper is used for printing.
print from / to page
The pages to be printed out can be specified here.
Copies
If you need several copies of the printout, enter the required number here.
Settings tab
Activate the respective option by ticking the box  .
.
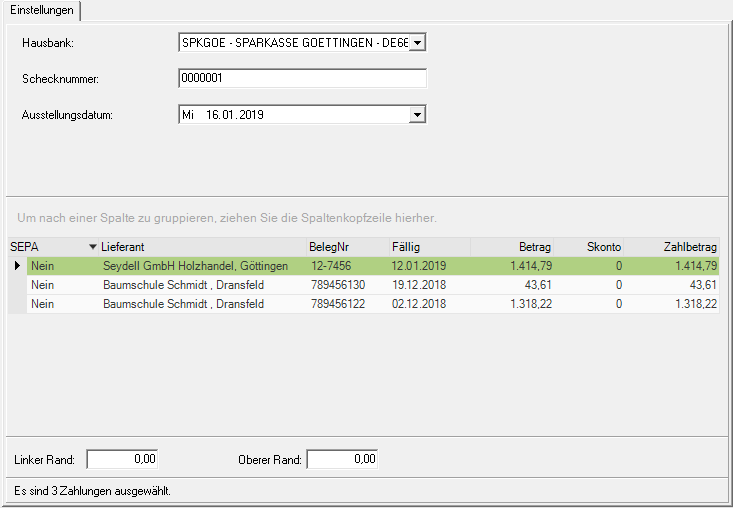
House bank
By clicking  select the bank account for which you want to print checks. Your selected main bank details are preset by default.
Check number
If not already stated on the check forms, please enter the number of the check here. This is printed on the form.
date of issue
Set the issue date that will be printed on the check. By clicking  open a calendar in which you select the date by clicking on it.
Table
The table shows all prepared payments displayed, which the selected bank details and the payment method check was assigned.
Left margin and upper edge
If necessary, adjust the margins to match your bank's check form.
First define this for each bank account Check print layout and put the bank's check form in the printer.
After you have entered all the necessary information for your printout, click on  in the menu Print settings or alternatively use the key combination Ctrl + P.
After printing, you will be asked whether the checks were printed correctly. Answer this with [Yes] the outgoing payments depending on the setting of the parameter Mark the invoice as "paid" as a printed or bezahlt characterized.
Transfer
In the program part Prepare payment determine how you would like to pay open supplier invoices. One payment option is to print out Transfers.
To do this, open the menu BUSINESS the selection menu Outgoing payment and select the entry Transfers.
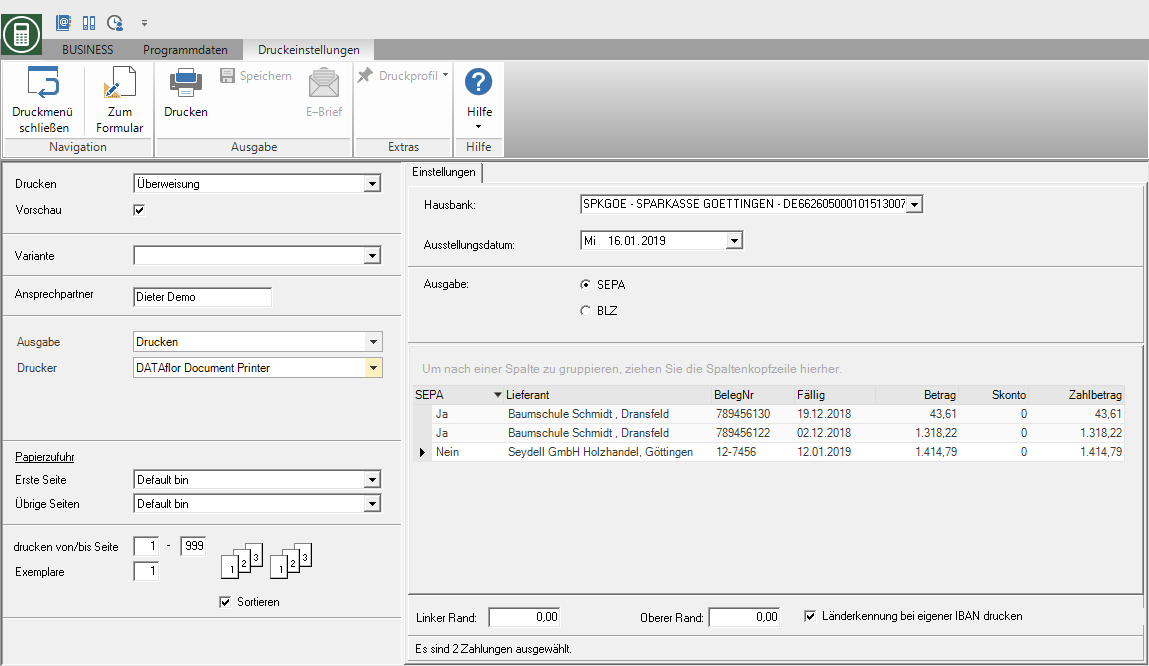
The following print menu opens.
Print settings
Make the following settings:
By clicking  switch to the printouts Accounts payable sheet, Accounts payable open list, Incoming invoice list, check, Transfers, Outgoing payment list and Payment list.
Preview
Each printout can be checked again before printing. The display of a preview is preset by the program. If you do not want to see a preview, deactivate it  The option.
Contact Person
The full name of the employee who is the contact person for all queries should be entered here. The program enters the name of the logged in user here, who is in the Address manager was stored in the user data.
printer
By clicking  choose the printer you want to use for printing. Only printers installed under Windows are available for selection.
Paper feed
If your printer offers several paper trays, select by clicking on  the slot from which the paper is used for printing.
print from / to page
The pages to be printed out can be specified here.
Copies
If you need several copies of the printout, enter the required number here.
Settings tab
Activate the respective option by ticking the box  .
.
House bank
By clicking  select the bank account for which you want to print transfers. Your selected main bank details are preset by default.
date of issue
Set the issue date that will be printed on the transfer. By clicking  open a calendar in which you select the date by clicking on it.
output
Select  For which payment method you want to print transfers.
Transfers according to the SEPA procedure with BIC and IBAN require a different one Transfer form than the non-SEPA procedure with bank code and account number. You should therefore print the transfer out one after the other and change the transfer forms in the printer.
Table
The table shows all prepared payments displayed, which the selected bank details, the payment method Transfer and the selected payment method has been assigned.
Left margin and upper edge
If necessary, adjust the margins to match your bank's transfer form.
Print country code with your own IBAN
When printing SEPA transfers, the country code of your own IBAN is also output.
First define this for each bank account Transfer print layout and put the bank transfer form in the printer.
After you have entered all the necessary information for your printout, click on  in the menu Print settings or alternatively use the key combination Ctrl + P.
After the printout you will be asked whether the transfers were printed correctly. Answer this with [Yes] the outgoing payments depending on the setting of the parameter Mark the invoice as "paid" as a printed or bezahlt characterized.


