Table of Contents
Services
Description
To print a offer open the menu within the course editing Print and select the entry Services or alternatively use the key combination Ctrl + P.

The following print menu opens.

Print settings
Make the following settings:
Variant
For each form you can use the designer to create different Print variants shape. When opening the print menu for the first time, the variant that you used for Form Services have set. By clicking on ![]() select the variant that you want to use for the printout.
select the variant that you want to use for the printout.
Test print
This option enables the form to be printed out. However, it only becomes more important with order confirmations and invoices, since no entries or bookings are made through a test print. To prevent a test print from being accidentally passed on as an official document, the printout is marked as a test print in the form description. Proofs are not included in the DATAflor Construction file filed.
Document no.
In order to be able to make an exact differentiation between this and other copies in the event of later queries, a document number can be assigned here. In the case of an offer, this is not absolutely necessary, but this is a prerequisite for order confirmations, advance payments, final and invoices. Apply the next free number in the number range by clicking on ![]() or enter a document number manually.
or enter a document number manually.
Document date
The program automatically pre-populates all date fields with the system date. This can be changed manually at any time. By clicking ![]() a calendar opens, making it easier to select dates.
a calendar opens, making it easier to select dates.
Operator sign
The operator symbol should be an abbreviation from the name of the employee who is responsible for this LV. This can be, for example, the first two letters of the surname or the initials of the employee. The program enters the operator code of the logged on user here, which is saved in Address manager was stored in the user data.
Contact Person
The full name of the employee who is the contact person for all queries should be entered here. The program enters the name of the logged in user here, who is in the Address manager was stored in the user data.
Telefon-Nr.
If this employee has his own extension number and you want to prevent the customer from having to go through the switchboard first, the direct extension number of the employee can be printed out here. The program has the telephone number here. of the logged-in user, which is saved in Address manager was stored in the user data.
Define in the Program parameters Pre-assignment of processor in LV printoutswhether the fields Operator sign, Contact Person and Telefon-Nr. are preallocated with the data of the registered user or the seller / site manager who is entered for the LV.
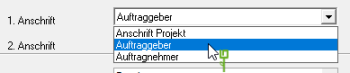
1. Address
The program automatically suggests the address of the client. However, you can also send the offer to the address of the project or the contractor.
2. Address
Automatically do not print is preset for the 2nd address. If you want to choose a second address, take it over from the list field.
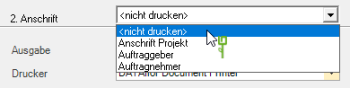
The addresses become the LV on the Addresses tab entered. You can join a project further project addresses which are then displayed for selection in the list field.
output
By clicking  choose whether you want to print the quote or as a Fax or e-mail want to send. After opening the print preview, you can also save the printout as a save file.
printer
By clicking ![]() choose the printer you want to use for printing. Only printers installed under Windows are available for selection. The default setting is the printer that you selected for the selected Pressure variant have deposited.
choose the printer you want to use for printing. Only printers installed under Windows are available for selection. The default setting is the printer that you selected for the selected Pressure variant have deposited.
Settings copies
For printing out several copies on different printers or on different paper, use the here Advanced print settings in front. The settings that you made in the form manager for Form Services have deposited. The number in brackets on the switch [Copy Settings] shows the number of copies defined.
Include in building file
Have a license for the module DATAflor Construction file, you can save the offer as a document.
Paper feed
If your printer offers several paper trays, select by clicking on ![]() the slot from which the paper is used for printing. By default, the shaft selection that you have selected is set Pressure variant have deposited.
the slot from which the paper is used for printing. By default, the shaft selection that you have selected is set Pressure variant have deposited.
print from / to page
Here you can specify the pages to be printed out. If you want to print the entire catalog, please do not make any changes in this field.
Copies
If you need several copies of the offer, please enter the desired number here.
Sort by
The grouping function is available for LV printouts. The output of several copies, e.g. of an offer, can be sorted (page 1,2,3, ..; page 1,2,3, ...) or grouped (page 1,1,1; page 2,2,2; page 3,3,3 , XNUMX; page ... ..).
Remove to change the dispensing method ![]() or put
or put ![]() Please tick the box by clicking the mouse button. You can use this function if, for example, you get paper sets for the laser printer from your printer, which provide 3 copies on different paper colors.
Please tick the box by clicking the mouse button. You can use this function if, for example, you get paper sets for the laser printer from your printer, which provide 3 copies on different paper colors.
After you have entered all the necessary information for your printout, click in the menu Print settings on ![]() to see a print preview and use the functions in the print preview to use for the layout of your printout.
to see a print preview and use the functions in the print preview to use for the layout of your printout.
Send the printout to the printer by clicking ![]() or alternatively use the key combination Ctrl + P.
or alternatively use the key combination Ctrl + P.
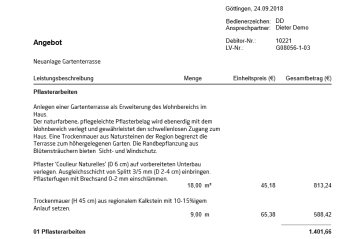
Sample expression: First page
 |
Sample expression: Last page
 |
To individual design Your offers are available to you the following Program parameters to disposal:
Area Text editing:
- Default character set
- Default font size
- Subject input width
- Head / footer text input width
- Position text input width
Area Adjustments to the print layout:
- Text heading of the columns
- Print heading line (offer)
- Distance between text and price (offer)
- Distance between positions (offer)
- Bold titles and title totals
- Text of the offer amount
- Flat rate text
Are there positions without Amount and / or without Price, one appears for each position before opening the print preview or the printout Security checkwhether this should be printed anyway. For example:

Settings tab
Activate the respective option by ticking the box ![]() .
.

Quantities from
Choose whether you want to use the quantities from the order specification for the offer or whether you want to print a flat-rate offer.
Im Program parameters Flat rate text Enter the text that will be printed in front of the total amount for package deals.
payment terms
Select the payment term that you want to use for the offer. It is the Terms of payment preset that is stored for the course or that in the Terms of payment group which is assigned to the LV.
only selected positions
Only the positions on the tab are printed Position selection (see following chapter) have been selected.
All positions
Put the in front of the respective function ![]() , all items of the LV are printed without ordinal number, quantity, unit price or total price.
, all items of the LV are printed without ordinal number, quantity, unit price or total price.
With the option without ordinal number all texts are printed starting from the left margin. By specifying the text width, you can control the width up to which the text to be output should be printed. For example:
Items in a hierarchy without quantity / EP / BP
Put in the option according to position selection and the ![]() , the selected items are shown in the printout without quantity, unit price and total price. Only the hierarchy sums are output.
, the selected items are shown in the printout without quantity, unit price and total price. Only the hierarchy sums are output.
You make the item selection on the tab page Position selection (see following chapter) in the column without price in front. Insert in front of a hierarchy level ![]() to select all subitems.
to select all subitems.
Short list
Only the first line of the short text is printed.
short text only
You can enter short and long text independently of each other. Select this option to print only the short texts.
Im Program parameters Copy number of lines of long text into short text Specify how many lines of the long text are automatically copied into the short text if only long text is available for the item.
long text only
You can enter short and long text independently of each other. Select this option to only print the long texts.
Short and long text
You can enter short and long text independently of each other. Select this option to use both texts in the printout.
Subject / header / footer
The ones on the tabs Subject, Header text or Footer text entered texts are also output. When opening the print menu for a course for the first time, the header and footer texts are pre-entered which you can use in the form manager for Form Services have deposited.
You are responsible for the text design Editor and Text variablesthat are automatically filled by the program.
Compilation on a new page
The summary of the hierarchy totals is printed on a separate page.
Im Program parameters Always print the compilation on a new page you can specify that this option is preset the first time you open the print menu.
Hierarchy on a new page
For visual reasons, a new page can be started when changing the title.
Pictures
The one on the Pictures (please refer Pictures in the course) added to the position / hierarchy and images selected for printing are printed for each item between the service description and the quantity / price line.
Price shares
The offer is printed with Identification of the price shares (please refer Billing> Settings tab).
Sum of labor costs
The offer is printed with Identification of labor costs (please refer Billing> Settings tab).
The Pauschalangebot is excluded from labor costs as it cannot be assigned to the beneficiary portion.
Im Program parameters Default output Sum of labor costs you can set the option Sum of labor costs When printing offers and invoices for clients with the address type Person is pre-assigned.
Output "0% VAT" suppress
For offers according to §13b UStG, you can output the line VAT 0,00% suppress.
Im Program parameters Text in front of the offer amount deposit the text that in the offer amount is printed.
Form name
When you first open the print menu, the Form name preset that you can use in the form manager for Form Services have deposited. To use a different form name for the printout, enter the name here.
Item selection tab
All positions and hierarchies of the course are included Position indicator, Short text, Quantity and unit listed. The columns Price and amount as well as the sums of the hierarchies and the total are filled according to the selected selection.
Position selection
To mark the items that you want to print out, insert in front of the items in the first column ![]() . Insert in front of a hierarchy level
. Insert in front of a hierarchy level ![]() , all subordinate items are selected. The functions are also available for quick selection of the positions Select All
, all subordinate items are selected. The functions are also available for quick selection of the positions Select All ![]() and Cancel election
and Cancel election ![]() is available for storage, management and analysis.
is available for storage, management and analysis.

without price
In the column without price take the selection of hierarchies for the option without quantity / EP / GP on the tab Settings .
If the print menu is opened repeatedly, the item selection is always preset that was selected when an offer was last printed for the LV.
Surcharge / discount collateral
The Surcharges or discounts takes into account those for the LV in the window Surcharges-discounts-securities are deposited.
You can check or edit the stored settings within the print menu by clicking in the menu Print settings on ![]() . click
. click

The window Enter surcharges-discounts-securities will be opened. The surcharges / discounts recorded for the course are displayed.

Enter new surcharges / charges by clicking on ![]() or delete existing surcharges / charges by clicking on
or delete existing surcharges / charges by clicking on ![]() .
.
Only the surcharges / deductions in the column are taken into account for the calculation use active set ![]() are. Confirm your selection with [OK].
are. Confirm your selection with [OK].